Flying disc techniques facts for kids
Flying discs, like Frisbees, can be thrown in many cool ways! To make a disc fly well, you need to snap your wrist and flick your arm. This makes the disc spin, which keeps it steady, and gives it speed. Without spin, the disc wobbles and falls. Without speed, it won't go anywhere. Most discs are made to fly best when the flat side is facing up.
Awesome Throwing Techniques
Understanding Disc Flight
When you throw a disc with the flat side up, it reacts to how you tilt it. If the front edge is tilted up, the disc will slow down and land softly. If it's tilted sideways, it can curve around things. This sideways tilt is called "roll."
There are special words to describe throws that curve:
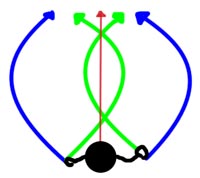
- Inside-out (i-o) throws (like the green paths) happen when you release the disc so it first moves towards where you're aiming. But the side of the disc closest to your body is higher. This makes the disc curve away from you.
- Outside-in (o-i) throws (like the blue paths) are the opposite. You release the disc moving away from where you're aiming. But the side of the disc closest to your body is lower. This tilt makes the disc curve back towards you.
In disc golf, "inside-out" throws are called "hyzer" throws. "Outside-in" throws are known as "anhyzer." These terms have been used since at least 1975.
Backhand Throw
The backhand is probably the most common throw people learn. It can also be one of the most powerful.
- How to Grip: Curl your fingers under the disc's rim. Place your thumb on top to hold it steady. You can put your index finger on the edge to help aim. Or, tuck all four fingers under the rim for more power.
- How to Throw: If you're right-handed, swing your arm across your body from left to right. This builds up speed for the disc. As your arm straightens, flick your wrist to make the disc spin. Step forward with your strong leg (the same side as your throwing arm) for a smooth and accurate throw.
Backhand Variations
- The High Release: Use this throw to get the disc over an object or person. You throw it above your shoulder. This throw relies more on a strong flick of your wrist for power.
- The Air Bounce: This throw starts by going downwards. But then it rises up, making it look like the disc "bounces" in the air. You do this by pressing down with your thumb as you release the disc.
- The Beach Backhand: Instead of swinging your arm across your body, you curl your arm. The disc is held next to your hip on the same side as your throwing arm. You release the disc by extending your arm straight and snapping your wrist. This throw is sometimes called the "chicken wing" because of the awkward elbow position. It's generally not as good as a standard backhand.
- The Shocker: Step out with your non-throwing foot. Hold the disc with a backhand grip. Release the disc very close to the ground and between your legs. It doesn't go very far, but its unusual release point makes it hard for defenders to stop.
Forehand Throw (Sidearm)
This throw is also known as the "flick" or "side-arm." It uses a lot of wrist power and is quick to do. The forehand and backhand are the two main throws used in Ultimate. The forehand lets you throw from the opposite side of your body compared to the backhand.
- How to Grip: Extend your middle finger along the disc's rim. Place your index finger next to your middle finger for power. Or, press your index finger on the bottom of the disc, pointing towards the center, for stability. Press your thumb against the top of the disc. Cock your wrist back and extend your arm out from your body.
- How to Throw: Snap your wrist to make the disc spin and give it forward speed. Extending your lower arm adds more power. Rotating your shoulder and upper body also helps. But relying too much on arm movement can make the throws "floaty" with less spin.
Forehand Variations
The forehand is very flexible and can be used in many situations.
- You can change the curve of the throw (inside-out or outside-in) by changing your wrist or arm angle.
- Most upside-down throws (explained below) use a forehand grip and wrist snap. So, they are like forehand variations.
- The High Release: Like the backhand version, this is used to get the disc over something. You throw it above your shoulder. Power comes from your wrist flick and the upward motion of your arm.
- The Pizza Flip: This is mostly used for faking out opponents. Start a normal forehand throw. At the last moment, rotate the disc counter-clockwise (for right-handers) under your throwing arm. Use only your middle finger and the disc's spin to hold it. Then, release it towards your dominant side, sideways to a normal forehand.
Push Pass
This throw isn't used very often. You grip it like a backhand (index finger on the rim, thumb on top, other fingers underneath). But you release it from the forehand side, with a forehand stance. You push the disc forward with a wrist snap, like a forehand. The disc spins "backwards" (the same way a backhand would spin). A final flick of the index finger finishes the throw. It's hard to get as much spin on a push pass as on a forehand or backhand. This makes it less stable. It's useful in Ultimate for very short throws to the forehand side.
Thumber Forehand
This throw is also called the Beach Thumber or Peach. In the game of Guts, it's just called a thumber. Its main benefit is that you can throw it very hard with a lot of spin. It's also pretty easy to learn. You often see it in Guts because of its power and speed. It's not as popular in Ultimate because it's harder to make it curve. It's also harder to release it far from your body.
- How to Grip: The name "thumber" comes from the grip. You throw it on the forehand side with your thumb under the rim. The rest of your hand is against the outside of the disc. Your arm should be tucked against your side, and your elbow bent. Keep the disc parallel to the ground and cock your wrist back.
- How to Throw: To release, snap your wrist forward. The disc spins off the flat part of your thumb. You can get more power by rotating your arm at the shoulder or your body at the hips. Releasing the disc flat is very important for a good thumber forehand.
Finn Throw
The Finn is an extreme version of the high release backhand. The disc is released from a very high point, above your head. It uses less spin than a regular high release. The lack of spin makes the disc drop fast. This makes it a good quick throw for short passes. Good throwers can also send the Finn long distances. It's often used instead of a hammer throw because it's more stable.
- How to Grip: Grip the Finn like a regular backhand, but with slight changes. Your index finger is loosely on the outside rim. The other three fingers point towards the center on the underside of the disc. This helps keep the disc parallel to the ground, even when thrown high.
- How to Throw: Most of the power comes from the vertical motion of your throwing arm. When your arm is almost fully extended upwards, make a slight circular motion to give it forward speed. Release the disc between your index and middle finger. The amount of spin from your wrist snap controls how long the disc floats.
Overhand Throw
This throw is also known as an "overarm" or "chicken wing." It was common in the early days of Ultimate. With modern discs, the forehand is usually preferred. The forehand allows you to extend your arm more sideways, has a quicker wind-up, and offers more control. The Overhand is most useful when you catch the disc above your head and need to throw it quickly without changing your grip. It's similar to the Hammer because it's usually released above shoulder level. This throw is often used in attempts at "The Greatest" play.
- How to Grip: Spread your fingers over the top of the disc. Your thumb is under the disc and straight across the rim. For more control, extend your index finger along the rim, like in a forehand grip.
- How to Throw: Hold your arm horizontal and behind you. Then, quickly bring it forward, snapping your wrist sideways as you release. You usually release it at or above shoulder height. Your whole body and arm can rotate. Your forearm must move very quickly to give the disc enough speed. For maximum power, your entire body rotates, like throwing a discus. A strong wrist snap is very important for spin and stability.
Duck Throw
This throw is also called a "bear claw" or "bow tie." It's like a backward version of the Overhand. The Overhand spins counter-clockwise (for right-handers), but the Duck spins clockwise. It's usually thrown with the arm out to the side or above the head. It's called the duck because your hand shape looks like a duck puppet during the throw. This throw is used in attempts at The Greatest (jumping out of bounds and throwing the disc back into play while in the air).
Upside-Down Throws
When a disc is thrown upside-down, it flies very differently. It doesn't get the same stable lift as a right-side up disc. This makes it fly in more of a curved path, like a rainbow. Just like right-side up throws, the disc will curve towards its lower edge. This curving effect is strongest when the disc is tilted at a 45-degree angle.
The disc will naturally try to rotate towards being flat. However, an upside-down disc won't just settle flat. Instead, it will wobble past flat and start to curve in the opposite direction. This wobbly flight is called "helixing." It's usually avoided because it's hard to control. To avoid helixing, an upside-down throw is usually released with clockwise spin and the left edge up, or counterclockwise spin and the right edge up. The longer you want the disc to stay in the air, the more vertical it needs to be when you release it.
Hammer Throw
The hammer is gripped just like a normal forehand throw. It's usually a mid-range, high, and arching throw.
- How to Grip: The grip is exactly the same as a forehand.
- How to Throw: From an open stance, swing your throwing arm over your head. It's like the motion for an overhand throw or a volleyball spike. Release the disc with a wrist snap, just like a forehand. The disc's angle when released can be anywhere from vertical to almost upside-down. This depends on how you want it to fly.
A hammer thrown by a right-handed person will arc up and to the left. As it flies, it will tilt towards the right. This tilting effect will be stronger if the disc is thrown higher. This means it spends more time near a 45-degree angle. There's a variation called the "Horseshoe." Here, the thrower steps towards their dominant side and throws the disc over and slightly behind their head. This is mainly used to trick defenders in short to mid-range passes near the end zone. It works because it seems to go the opposite way a defender expects.
Scoober Throw
The scoober is another upside-down version of the forehand. It's also known as the "spoon pass." It's similar to a hammer, but you release it away from your body from a backhand stance. You don't throw it over your head from a forehand stance. The scoober flies in a similar path to the hammer. However, its initial release is usually flatter than a hammer. It's harder to get as much power on a scoober as a hammer. But a scoober can be a good short-range throw (10 to 20 yards/meters). It's used in Ultimate to get around defenders or throw over them in a zone defense.
- How to Grip: The grip is the same as a forehand or hammer.
- How to Throw: Step towards your backhand side. Hold the disc upside down. Bring your throwing arm across your body. Lead with your elbow as you swing your arm forward. Flick the disc off your middle finger (like a forehand), releasing it upside down.
Thumber Throw
This thumber throw (not to be confused with the thumber forehand) is rarely used in competitive games. It has a flight path that is the mirror image of the Hammer. For a right-handed thrower, it arcs high and to the right. It can be useful when the disc needs to drop quickly and curve the opposite way of a Hammer to avoid defenders. In disc golf, this throw is also called the "hook thumb."
- How to Grip: The name "thumber" comes from the grip. Hold the disc with your thumb pressed tightly against the rim. The rest of your hand is against the outside of the disc. Cock your wrist back, similar to a forehand.
- How to Throw: Cock your arm backwards. Then, bring it forward like a baseball pitch. Release the disc with a forward wrist snap.
Wheel Throw
The wheel (also known as the "wheel of death") is similar to a hammer or thumber. But it's thrown with a backhand grip. Its flight path is like the hammer, but it starts more vertical and tends to drop faster.
- How to Grip: The grip is the same as a backhand.
- How to Throw: Start with your hand cocked just above your shoulder. Rotate your hand so the disc is almost vertical, with the top side facing your head. Straighten your arm in front of you. Use a backhand wrist snap to release the disc.
Rainbow Throw
The rainbow (also called "Matador") starts from a standard backhand stance. But you use a wide, straight-arm movement. The release point is directly above your head. The name comes from the wide, arching arm movement. The disc is released almost straight up and down. It flies like an off-hand hammer (so, like a left-handed hammer for a right-handed thrower). It's different from a Wheel because it starts from a backhand position (sideways, not forward-facing). It's released with a straight arm and wrist, while the Wheel needs both to bend. It can be seen as the backhand version of a hammer.
- How to Grip: The grip is the same as a backhand.
- How to Throw: Start with a standard backhand stance. Instead of rotating your arm horizontally, rotate it straight up and down. The release point is above your head. You can slightly bend your wrist to change how the disc spins when you release it.
Blade Throw
The blade throw is unique. It's not thrown right-side up or upside-down. Instead, the flat part of the disc is held almost straight up and down. The disc cuts through the air like a blade. It doesn't float or get the same lift as most other throws.
- How to Grip: The grip is usually like a forehand or hammer grip.
- How to Throw: The throw is like a forehand, but the disc is held straight up and down instead of flat. You throw it up and forward. It flies in a simple curved path, like a thrown ball. It's used to throw over someone but get the disc down to the receiver quickly.
Table of Basic Disc Throws
| SIDE | THROW | PATH | SPIN | HAND | |||
|---|---|---|---|---|---|---|---|
| Side | Name | Acronym | Natural | Hyzer | Anhyzer | Spin | Hand |
| Right-side up | Backhand | BH | R
L |
L
R |
R
L |
-1
+1 |
RH
LH |
| Forehand | FH | L
R |
R
L |
L
R |
+1
-1 |
RH
LH |
|
| Push Pass | PP | 0
0 |
-1
+1 |
RH
LH |
|||
| Thumber Forehand | TFH | L
R |
R
L |
L
R |
+1
-1 |
RH
LH |
|
| Overhand | OH | R
L |
L
R |
R
L |
-1
+1 |
RH
LH |
|
| Not side defined | Blade | B | L
R |
+1
-1 |
RH
LH |
||
| Upside-down | Hammer | H | R
L |
+1
-1 |
RH
LH |
||
| Scoober | S | R
L |
+1
-1 |
RH
LH |
|||
| Thumber | T | L
R |
-1
+1 |
RH
LH |
|||
| Wheel | W | R
L |
+1
-1 |
RH
LH |
|||
This table shows the main ways to throw a disc using classic techniques. There are many other ways to throw and grip a disc, so the number of possible throws is huge!
The natural path is how the disc flies without any special tilt when you release it.
The hyzer path is when the outer edge of the disc is tilted downwards.
The anhyzer path is when the outer edge of the disc is tilted upwards.
The spin is how the disc rotates.
Every throw can be done with your right hand or left hand. This is shown in the hand column.
RH means right hand, LH means left hand. R means the path goes to the right of the thrower. L means the path goes to the left of the thrower. 0 means the path is mostly straight.
So, R with RH and L with LH are outside-in (OI) paths. R with LH and L with RH are inside-out (IO) paths.
In the spin column, numbers show the direction of the disc's spin. +1 means positive (counter-clockwise rotation). -1 means negative (clockwise rotation).
You can describe throws using a code: hand acronym + throw acronym + tilt acronym. For example, LHBHIO means an inside-out backhand throw thrown with the left hand. RHFH0 means a straight forehand throw thrown with the right hand. To make a disc fly straight, you need to release it with a slight tilt opposite to its "natural path."
 | Delilah Pierce |
 | Gordon Parks |
 | Augusta Savage |
 | Charles Ethan Porter |


