Hydration system facts for kids
A hydration system is a cool piece of gear that helps you carry water or other drinks easily when you're doing outdoor activities like hiking or biking. It lets you drink without stopping, taking off your backpack, or even using your hands! These systems were first sold to cyclists and then became popular with hikers in the 1990s. You might even see them used by soldiers.
Most hydration systems come with a few main parts:
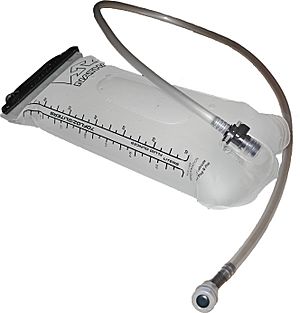
- A flexible bag, called a bladder, that can hold a few liters of liquid. It has a way to fill it up and seal it tightly, usually with a screw-on cap.
- A light tube, or hose, that carries the drink from the bladder to your mouth.
- A special bite valve that you bite to start and stop the flow of water. It's super easy to use!
Many systems also include a way to carry the bladder comfortably, often as part of a backpack.
Contents
How Hydration Systems Started
People in Australia started using plastic bags from box wine to carry water for hiking in the late 1960s. But these often broke or leaked. Real hydration systems that you could buy first appeared in stores in the late 1980s or early 1990s. The US military also started using them in the 1990s, and they soon became standard gear for all US troops.
Did you know the idea for a hydration system was even in a book before they were invented? In Robert A. Heinlein's 1955 novel, Tunnel in the Sky, the main character has a special belt canteen with a tube that goes up to his mouth so he can drink without taking it off. Sounds a lot like today's systems!
Parts of a Hydration System
Bladder Design
The bladder, or water bag, is usually designed in a similar way across different brands:
- It's tallest in the vertical way, fitting nicely along your back.
- The hose connects near the bottom of the bladder. This helps you drink almost all the liquid inside.
- As you drink, the bladder gets thinner. This means it doesn't shift around much in your pack, and it keeps its shape better.
How They Are Carried
You can find hydration systems in a few different styles:
- Bare Bladder: This is just the bladder itself. It's made to fit into a special pocket in a "hydration-system compatible" backpack. These backpacks usually have a small hole for the hose to come out, often with a flap to keep rain out.
- Hydration Pack: This is a complete system that includes both a backpack and the hydration system. These packs often have extra pockets for your other items. They might also have a special channel inside the shoulder strap to keep the hose tidy and prevent the water from getting too warm or freezing.
- Protective Shell: Some systems come in their own fabric shell. This protects the bladder from other gear in your regular pack. For example, the "CamelBak Unbottle" is like a small pack with a handle, but it doesn't have shoulder straps.
Extra Parts and Features
Manufacturers offer different parts you can buy to replace old ones or customize your system.
Keeping Water Cold or Warm
- Hose Insulation: Some hoses have a plastic foam cover around them. This helps keep cold water cool in summer and slows down freezing in winter.
- Bite Valve Cover: You can get a foam cover for the bite valve. This helps stop the water in the valve from freezing and keeps it cleaner.
Water Filters
Some companies, like MSR, make special filters that you can put right into the hose. These ceramic filters let you fill your bladder with water from streams or lakes, making it safe to drink. You can clean these filters at home, so you don't need to buy new ones often.
Cleaning Your System
It's important to keep your hydration system clean!
- Brushes: You can buy special brushes to clean the inside of the bladder and the long hose. This helps remove any slimy stuff (called biofilm) that can grow inside.
- Drying Systems: After cleaning, you need to dry the bladder completely. There are tools, like plastic frames, that you can put inside the bladder to hold its walls apart. This helps it dry faster, even in the corners, which stops mold from growing.
Tips for Using Your Hydration System
Here are some helpful tips for using your hydration system:
- Add Ice: On hot days, you can add ice cubes or crushed ice when you fill your bladder. This keeps your water cold for longer. Just remember that too much ice means less water!
- What to Drink: Some people put sugary drinks or flavored water in their bladders. While these give you energy, they can make it harder to clean the bladder because bacteria love sugar. It's often easier to carry plain water in your bladder and drink other things from a separate bottle during breaks.
- Purifying Water: If you're on a long trip or in a very hot place, you might need more water than you can carry. You can purify water from local sources. Make sure your water filter works well with your bladder or a separate bottle you use to fill it. Be careful with chemical purification systems, as they can sometimes stain or weaken the bladder material.
- Freezing to Prevent Germs: To stop germs from growing, you can empty as much water as possible from your bladder and then freeze it. Germs can't grow when things are frozen!
 | Sharif Bey |
 | Hale Woodruff |
 | Richmond Barthé |
 | Purvis Young |


