
Siege of Giarabub facts for kids
Quick facts for kids Siege of Giarabub |
|||||||
|---|---|---|---|---|---|---|---|
| Part of the Western Desert Campaign of the Second World War | |||||||
|
|||||||
| Belligerents | |||||||
|
|
|||||||
| Commanders and leaders | |||||||
| Strength | |||||||
| 2 mechanised cavalry squadrons 1 augmented infantry battalion |
2,100 (1,350 Italian & 750 Libyan troops) | ||||||
| Casualties and losses | |||||||
| 17 killed, 77 wounded (final assault only) | 250 killed 1,300 prisoners 26 field guns |
||||||
The Siege of Giarabub was an important battle during World War II. It took place in Libya, a country in North Africa. This fight was part of the Western Desert Campaign. It involved soldiers from the Commonwealth (mainly Australia) and Italian forces.
The siege began in December 1940. Australian troops surrounded the Italian position at the Al Jaghbub Oasis. This meant the Italian soldiers inside were cut off from supplies. They depended on air drops, but these were not enough. Many local troops left because they were hungry.
Australian forces, with more soldiers and big guns, attacked Giarabub on March 17, 1941. The Italian soldiers surrendered a few days later, on March 21. This was a victory for the Commonwealth forces.
Contents
What was Giarabub?
Giarabub is an oasis in the Libyan Desert. An oasis is a green area in a desert where water is found. It is about 320 kilometers (200 miles) south of Bardia. It is also 65 kilometers (40 miles) west of the border with Egypt.
The Great Sand Sea, a huge desert area, is to the south. Giarabub is at the west end of some salt marshes. These marshes stretch to the Egyptian border. In 1940, Giarabub was Italy's southernmost outpost near Egypt.
Who defended Giarabub?
Italy had controlled Giarabub since 1925. In 1940, Major Salvatore Castagna led the soldiers there. His force included about 1,350 Italian and 750 Libyan soldiers. They had different types of guns, including small cannons.
The area around the village had trenches and barbed wire. This made it harder for enemies to attack. However, Giarabub was far from other Italian bases. It was hard to get supplies there. The Italian army did not have enough vehicles. They could only bring in a small amount of supplies by air.
Who were the Australian Cavalry?
On December 2, 1940, a group of Australian soldiers arrived. They were from the 6th Australian Divisional Cavalry Regiment (6th ADCR). They went to Siwa oasis in Egypt, which was near Giarabub. Their job was to take over from a British force.
The 6th ADCR was supposed to have light tanks. But few were available. The ones they had often broke down in the desert. Most of their soldiers used trucks for transport.
Early Fights
On December 11, the Australians attacked Garn-el-Grein. This place was north of Giarabub. The Australians were outgunned and had to leave. Italian soldiers in trucks and three Italian fighter planes arrived.
On December 14, the Australians ambushed an Italian convoy. They destroyed it near Fort Maddalena. The Australians then started watching Giarabub closely. They wanted to cut it off for an attack. On December 31, the 6th ADCR lost its first soldiers. A patrol came under artillery fire. Two men were killed and three vehicles were destroyed.
How the Siege Began
On December 20, a group from C Squadron secretly checked Giarabub's outer defenses. On December 24, part of B Squadron attacked Ain Melfa. This was an outpost at the east end of the salt marshes. They captured it and used it as a forward base.
The Australians also took El Qaseibieya, further south-west. This gave them control of the western part of the area. On December 25, C Squadron tried a stronger attack. They faced artillery fire and air attacks. The next night, a raid on an Italian gun position failed. One Australian soldier was captured.
Cutting Off Supplies
On January 8, 1941, the Royal Air Force (RAF) destroyed an Italian supply convoy. This happened near Giarabub. This was the last time Italy tried to supply the oasis by land. Italy's main army had been defeated elsewhere.
The Regia Aeronautica (Royal Italian Air Force) tried to fly supplies in. But on January 4, four big 25-pounder guns arrived at Siwa. On January 9, these guns fired at the Italian airstrip in Giarabub. They damaged a transport plane. They also silenced two Italian guns.
Air drops were not enough to feed the soldiers. Libyan troops started leaving their posts. By the end of February, 620 had been captured. The regular Italian soldiers stayed. The 6th ADCR watched and bothered the defenders. But they were not strong enough to attack the main position yet. Small Italian supply drops continued. But food for the soldiers was greatly reduced.
Getting Ready for the Attack
Brigadier-General George Wootten was ordered to Giarabub. He led the 18th Australian Infantry Brigade. But there were not enough vehicles. So, only a reinforced battalion could go. They had to finish the siege quickly.
This group was called Wootten Force. It included the 2/9th Australian Infantry Battalion. They also had extra infantry, mortar, and machine-gun platoons. An anti-aircraft platoon was added too. A battery of the 4th Regiment, Royal Horse Artillery (4th RHA) joined them. They had twelve 25-pounder field guns. Wootten Force had no air support. They also had little ammunition and no tanks.
Scouting the Defenses
The Australians checked Giarabub's defenses on March 12 and 16. They found a path across the southern marshes. They also found a gap in the barbed wire big enough for vehicles. An Italian force in trucks tried to go around the Australian scouts. But the Australians drove them off with artillery fire.
The high ground south of the town was very important for Italy's defense. B Squadron was told to take an Italian observation post. This post was later called Wootten House. They were to move north-west towards Giarabub.
B Squadron took Wootten House easily on March 17. This was at 6:00 a.m. They then ambushed two trucks. Two Italians were killed, three wounded, and 15 were captured. An Italian officer gave them information about the oasis defenses. The squadron pushed on for 7 kilometers (4 miles). They captured Daly House, the last post before Giarabub. But the Australians were forced back by artillery fire. The Italians took the post back. They used Breda cannons to keep the Australians away.
Moving into Position
On March 19, Wootten ordered an attack. Two companies would go along the southern path. Their goal was to retake Daly House. They also wanted to push the Italians back to their main defenses. This would give them a good starting point for attacking the southern heights.
Two 25-pounder guns were pulled through the marsh. They followed the infantry. This was hard going and delayed the attackers until 3:00 p.m. The post was empty. Artillery and machine-gun fire from the town was not accurate. The Australians kept going. They took the Tamma Heights south-east of the oasis. There was little resistance.
A group was sent to Ship Hill. This was at the east end of the heights. Their job was to provide covering fire. Two other groups moved towards the town. By dark, they reached the south-eastern corner. The barbed wire there was covered by sand. Two small groups went into the Italian position. They found that Post 42 was empty. Another group arrived and they took Post 36. At 2:00 a.m., Italy counter-attacked. The Australians pulled back. Three were wounded and two were captured.
By the morning of March 20, the main attack was planned for this area. The cavalry would make a fake attack in the north. D Company took Post 76 on Brigadiers Hill. This protected the side of the main attack. It also made the Italians unsure where the real attack would come from.
The Attack Plan
Two companies of the 2/9th Battalion would attack. Mortars and machine-guns on Ship Hill would provide covering fire. The 4th RHA would also fire. The attack's first goal was to capture the southern fort. Then, the other two companies would attack the sides of the fort. D Company would move from Brigadiers Hill. They would open a path across the marsh. This would make the supply route shorter.
The cavalry would make a smaller attack from the north. They would go down Pipsqueak Valley to take the airfield. A sandstorm started. It jammed weapons, which needed cleaning. The storm calmed down in the afternoon. But it was still enough to hide the Australian soldiers gathering. There were some exchanges of fire. From Ship Hill, Australian machine-gunners could hit Italian defenses. They stopped several positions from firing. An Italian sniper tried to hit the machine-gun posts but failed.
Patrols went out after dark. They watched Italian positions. They wanted to make sure the Italians were not trying to escape. An Australian listening post met an Italian patrol. The Italians left when challenged. The Australians found the Italians in the fort "very nervous." They were firing and throwing grenades at shadows. Then they left before the attack started.
The attack was set for 5:15 a.m. A Company would attack on the right. C Company would attack on the left. They would aim for four small hills on the edge of the fort. After these were taken, A Company would take a fifth hill further back. The twelve guns of the 4th RHA would fire at the first targets. Then they would shift their fire to the second target. Machine-guns and mortars on Ship Hill would provide covering fire as the soldiers moved forward.
The Battle Begins
Before the attack time, the lead companies gathered. Another sandstorm was blowing. A Company moved to within 50 meters (55 yards) of the wire. Then, the British gunners fired. But they had misjudged the wind. Their shells fell short. This cut the communication line to the forward observer. So, the gunners could not adjust their aim quickly. Shells also fell short onto Ship Hill, causing one injury.
Twelve men from A Company were killed. Twenty were wounded. The remaining soldiers reorganized and moved forward. One group had avoided the worst of the shelling. But they lost contact with the rest of A Company. They kept attacking. C Company found that the wire had been cut. They moved quickly to their first target. The Italians seemed too shocked by the shelling to fight much. The Australians quickly reached the first line of hills.
Taking the Fort
The Australians used many hand-grenades to clear out dugouts. They soon ran out. Some Australians had been told not to take prisoners. They were slow to advance when it seemed few Italians wanted to keep fighting. The Australians were then told to encourage the Italians to surrender. By 7:26 a.m., the 2/9th Battalion had taken the first four hills.
Because of the short shelling on A Company, a group from D Company was sent to help. The Italian defenders fought back. A mountain gun on the last hill opened fire. Italian positions around the fort also fired. An Australian group tried to cross the open ground into the town. But they were pushed back. Fire from the mortars and machine-guns on Ship Hill helped. A machine-gun group with A Company also fired. This covered the Australians as they captured the fifth hill, just after 9:00 a.m.
Prisoners said the soldiers had not eaten for two days. B Company on the left side had moved forward. They got back in touch with battalion headquarters at 10:00 a.m. In the north, the cavalry's fake attack began at 6:15 a.m. This was an hour after the main attack started. B and C Squadrons moved to high ground on either side of the valley. There was little Italian resistance. They easily took the "Egbert" position. By 9:00 a.m., the cavalry were on their first target.
D Company moved through the farmed area north-east of the fort into the town. But there was a minefield. An RAF plane had seen it earlier. It took a long time to clear. At 11:25 a.m., the 2/9th Battalion moved into the town. They found the mosque still standing. By midday, the Australians had entered the fort. The siege was over. After only two days, the Australians left Giarabub. This was because Italian and German forces were advancing elsewhere.
What Happened Next?
In the final attack, the 2/9th Battalion lost 17 soldiers killed. Another 77 were wounded. The Italians lost about 250 men killed. About 1,300 were taken prisoner. This included Major Castagna, who was hurt in the head. The Australians also captured 26 Italian field guns.
Images for kids
-
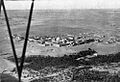
Italian photograph of the Giarabub oasis in 1941
-

An Italian troop convoy on its way to relieve the Siege of Giarabub.


See also
- Film: Giarabub (1942)
- List of Australian military equipment of World War II
- List of British military equipment of World War II
- List of Italian military equipment in World War II
