Action of Agagia facts for kids
Quick facts for kids Action of Agagia |
|||||||
|---|---|---|---|---|---|---|---|
| Part of the Senussi Campaign of the First World War | |||||||
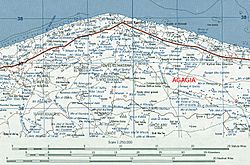
 Map showing Agagia |
|||||||
|
|||||||
| Belligerents | |||||||
| Commanders and leaders | |||||||
| Jaafar Pasha (POW) | William Peyton Henry Lukin |
||||||
| Strength | |||||||
| 1,500–1,600 | 1,400 | ||||||
| Casualties and losses | |||||||
| c. 500 | 47 killed 137 wounded |
||||||
The Action of Agagia was a battle that happened on February 26, 1916, in Egypt. It was part of the Senussi Campaign during World War I. This fight was between the British army and the Senussi forces. The Senussi were a religious group from Libya, supported by the German and Ottoman Empires.
Before Agagia, there had been several smaller battles. In December 1915, British forces fought the Senussi at Duwwar Hussein and Wadi Senba. They also fought at Wadi Hasheifiat and Wadi Majid. In January 1916, another battle took place at Halazin. In these fights, the Senussi were often defeated but managed to escape.
In February 1916, the British army, called the Western Frontier Force, moved west. Their goal was to take back Sollum, a town in Egypt. On their way, airplanes spotted a Senussi camp at Agagia. The British attacked this camp on February 26. They captured Jaafar Pasha, a leader of the Senussi forces. As the Senussi tried to escape, British cavalry charged them. This charge scattered the Senussi and led to many casualties. The British took Sollum back on March 14, 1916, which ended the fighting along the coast.
Contents
What Led to the Battle?
Who Were the Senussi?
The Senussi were a religious group of nomads, mainly from Libya. They had fought against Italy in Libya a few years before World War I. When World War I began, Britain declared war on the Ottoman Empire. In 1915, leaders from the Ottoman Empire and Germany made a deal with the Grand Senussi, Sayyid Ahmed ash-Sharif. They agreed that the Senussi would attack the British in Egypt from the west. This attack would happen at the same time as an Ottoman attack on the Suez Canal from the east.
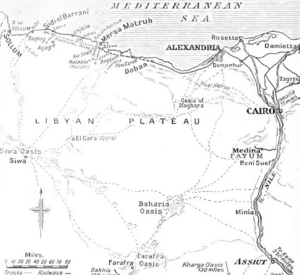
By late 1915, many British soldiers in Egypt had been sent to other battlefronts. This left western Egypt guarded mostly by the Egyptian coastguard. The Ottomans and Germans sent modern weapons to the Senussi using submarines. German and Turkish officers also arrived by submarine. They set up their main base at Siwa Oasis. The Senussi gathered about 5,000 foot soldiers and other fighters. They had Ottoman artillery and machine guns. They planned to attack towns like Sollum and Mersa Matruh along the coast. They also planned to attack oases further inland. The Senussi crossed into Egypt on November 21, 1915, to start their coastal campaign.
The Western Frontier Force
The British army group fighting in western Egypt was called the Western Frontier Force (WFF). It was led by Major-General Alexander Wallace at first, then by Major-General William Peyton. The WFF included different types of soldiers. There were infantry battalions, cavalry regiments, and units from Australia. It also had armored cars from the Royal Naval Air Service and aircraft from the Royal Flying Corps.
On February 4, the WFF got stronger with more soldiers. These included the 1st South African Brigade. The WFF also received 2,000 camels. These camels helped the force travel longer distances in the desert. They also helped the soldiers carry supplies and stay in the desert for longer periods.
Fighting Along the Coast
In November 1915, a German submarine sank some British and Egyptian ships near Sollum. On November 14, the Senussi attacked Sollum. The British then pulled back from Sollum to Mersa Matruh, which was 120 miles east. Mersa Matruh was a better place for a military base. This is when the Western Frontier Force was officially formed.
On December 11, a British group was attacked at Duwwar Hussein. The British fought back and pushed the Senussi out of the area. Two days later, on December 13, the British were attacked again at Wadi Hasheifiat. After some fighting, the Senussi were forced to retreat. The British went back to Matruh. On December 25, they surprised the Senussi at Wadi Majid. The Senussi were defeated but managed to get away. Airplanes then found more Senussi camps at Halazin. The British attacked Halazin on January 23. The Senussi fought skillfully and tried to surround the British. But the British pushed them back and defeated the main Senussi force. Still, the Senussi were able to retreat once more.
Getting Ready for Battle
British Plans
The Western Frontier Force moved along the coast from Mersa Matruh towards Sidi Barrani. Their main goal was to take back Sollum, which was near the border of Libya and Egypt. To trick the enemy, the British spread rumors that they were going to retreat from Mersa Matruh.
A supply convoy was sent 80 miles ahead to Unjeila. It had 800 camels carrying 28 days of food for 1,400 men, 200 horses, and the camels themselves. This convoy arrived on February 16. Three days later, a convoy with wheeled vehicles followed. On February 20, Brigadier-General Henry Lukin led his troops towards Unjeila. He had orders to reach Sidi Barrani quickly. His force included South African infantry, the Dorset Yeomanry cavalry, and artillery.
During their march, British airplanes spotted a Senussi camp at Agagia. This camp was about 15 miles south-east of Sidi Barrani. The British force arrived on February 22. Local people told them that Senussi leaders Nuri and Jaafar were at Agagia. On February 23, some guards were left at Unjeila. The rest of the force marched to Shammas, then to Wadi Mehtila. This was about 8 miles north-east of Agagia. Lukin planned to rest his troops on February 25. Then, he would make a night march to attack the Senussi camp at dawn.
Senussi Plans
Jaafar Pasha tried to attack the British first. At 5:30 p.m. on February 25, he attacked the British camp with two field guns and a machine gun. The British artillery quickly silenced the Senussi guns, and the Senussi were driven away. Because of this attack, Lukin expected more fighting and decided not to do the night march.
The next day, February 26, the British cavalry scouted the area at 5:00 a.m. They found that the Senussi were still at Agagia and had no guards posted outside their camp. The Senussi were in sand hills with about 1,500 men, three guns, and five machine guns. Their defensive position was about 1 by 2 miles wide. It was dug into the sand dunes on a low plateau. Some parts even had barbed wire. An attack from the north would mean advancing over open ground with no cover.
The Battle of Agagia
Lukin received the cavalry report. At 9:30 a.m., he ordered his troops to advance from their camp. He sent the Dorset Yeomanry cavalry to cut off any Senussi retreat. The cavalry moved around to the west of the Senussi position, reaching some sand hills. From there, they could see the Senussi. The cavalry got off their horses and, with help from two armored cars, advanced to keep the Senussi busy. The armored cars stopped the Senussi machine guns from firing effectively.
The infantry then advanced. The 3rd South African Battalion led the way, with the 1st South African Battalion behind them. By 11:00 a.m., the troops had moved 5.5 miles and were ready to fight. At 11:20 a.m., they came under fire. The battalion advanced in a line, with machine guns on the sides. British artillery also fired to cover their advance. The Senussi fired back with their artillery, machine guns, and rifles. They were hidden in positions that the South Africans could not see.
As the South Africans got closer to the sand hills, their losses increased. Jaafar Pasha then launched a counter-attack against the South African left side. A company from the 1st South African Battalion moved to that side and pushed back the attack. At this point, Lukin ordered a general attack.
The infantry rushed the Senussi front line at the edge of the sand hills. Then, a running fight began as the Senussi retreated through the dunes. This slowed down the South African advance. It was 3:15 p.m. when the South Africans reached the southern end of the sand hills and found that the Senussi had left.
The Dorset Yeomanry cavalry waited for the escaping Senussi to move some distance away from their trenches and wire. The cavalry then moved about 1,000 yards west of the Senussi escape route. At 2:00 p.m., they saw the Senussi stretched out over a mile of desert. Camels and baggage were at the front of their column. The column was protected by Bedouin fighters and other armed guards with machine guns. These guards formed a protective line on the sides and back. The cavalry dismounted to rest their horses and study the ground.
After resting, the cavalry attacked in two lines at a steady gallop. The Senussi fired back. Their shots were accurate at first, then became wilder, and finally stopped. When the cavalry was 50 yards from the Senussi rear guard, which had about 150 men, they charged with their swords. The rear guard broke ranks, and the Bedouin scattered. The cavalry leader, Souter, was shot off his horse near Jaafar Pasha. The attackers paused, but the machine-gun section arrived and continued the attack. Jaafar Pasha and two Ottoman officers were captured. The cavalry chased the remaining Senussi into the desert, killing many with their swords. After the battle, 39 prisoners were taken. The Senussi tents were burned, and their camels were gathered.
After the Battle
Losses
The Senussi had about 500 casualties, meaning killed or wounded. Thirty-nine of their men were captured. The British also captured 60 camels loaded with dates and 40,000 rounds of ammunition.
The British had 184 casualties in total. The Dorset Yeomanry cavalry, who made the charge, lost 32 men killed and 26 wounded.


