
Action on the Polderhoek Spur facts for kids
Quick facts for kids Action on the Polderhoek Spur |
|||||||
|---|---|---|---|---|---|---|---|
| Part of the Third Battle of Ypres of the First World War | |||||||
 Diagram showing the front line in November 1917 (Polderhoek Spur is south of Polygon Wood) |
|||||||
|
|||||||
| Belligerents | |||||||
|
|||||||
| Commanders and leaders | |||||||
| Douglas Haig | Crown Prince Rupprecht | ||||||
| Units involved | |||||||
| 2nd New Zealand Brigade | 19th Reserve Division | ||||||
| Casualties and losses | |||||||
| 1,198 (1–31 December) | |||||||
The Action on the Polderhoek Spur was a small but important battle during the First World War. It happened on 3 December 1917, in Belgium, as part of the larger Third Battle of Ypres. British forces, specifically two battalions from the 2nd New Zealand Brigade, attacked a low ridge called Polderhoek Spur. This ridge was important because German soldiers could see a wide area from it.
The goal was to capture the ridge and stop German observers from seeing British positions. This would protect the area north of the Reutelbeek stream. The New Zealanders aimed to advance about 600 yd (550 m) (550 meters) along a 400 yd (370 m) (365 meters) wide front.
The British tried a trick: they attacked in daylight, hoping to surprise the Germans. Usually, attacks happened at dawn. They also planned smoke and gas attacks on nearby ridges. However, the plan did not work. Some British artillery shells landed on their own troops. German machine guns fired from Polderhoek Spur and Gheluvelt ridge. Strong winds blew away the smoke screens, and the British artillery could not stop the German machine guns. The New Zealanders had to take cover.
Later, New Zealand machine gunners stopped a German counter-attack. The New Zealanders were still about 150 yd (140 m) (137 meters) short of their first goal. Another attack planned for after dark was cancelled because of the bright full moon. German reinforcements were also seen arriving at Polderhoek Château.
On 4 December, British artillery stopped another German counter-attack. The New Zealanders dug in their new trench line. They also defeated a German attack on 5 December. The New Zealanders then left the area, and other British troops took over. On 14 December, German forces recaptured the ground.
Background to the Battle
The Difficult Conditions of War
Rain caused many problems for the British army after the battle started on 31 July. In August, the ground dried quickly. But in October, heavy rains returned and made the ground very muddy. Moving supplies to the front lines became very hard. Soldiers had to carry everything. Even pack mules were used to carry ammunition for the big guns.
The muddy conditions also made it difficult for artillery. Heavy guns had to be placed in long lines on special plank roads. This made them easy targets for German observers.
British Army Plans in 1917
The British commander, Field Marshal Sir Douglas Haig, knew how bad the conditions were. He also knew that German troops were suffering even more. Haig decided to stop the main attack in early October. However, he wanted to capture Passchendaele Ridge. This ridge would be a good place to hold during winter.
By November, the German army was struggling. They reported that their troops could not fight much longer. Constant British artillery fire and the terrible weather in muddy shell-holes wore them down.
How the British Attacked
After a battle on 20 September, British attack plans became very organized. They had a set way of doing things. Commanders were given more freedom to make decisions. Soldiers also became better at fighting in these conditions.
Because of the mud and German defenses, soldiers no longer attacked in straight lines. Instead, they moved in small groups, weaving around shell-holes. The rifle became the main weapon again. New types of artillery barrages (lines of exploding shells) were used to help the soldiers advance.
How the Germans Defended
German forces used "instant counter-attacks" (called Gegenstöße) against British advances. This was because the British struggled to coordinate their attacks in the bad weather.
The Germans also changed their defenses. They used small groups of soldiers and machine guns in an "outpost zone." When the British attacked, these soldiers would fall back to a main defense line. Then, German reserve troops would quickly counter-attack.
The German army also reduced the length of the front line each division had to hold. This was because of the weather, heavy British artillery, and many German soldier losses. Soldiers were rotated out of the front lines often to rest. These changes helped the Germans hold their ground. But by mid-November, they were just trying to survive until winter.
Before the Attack
Polderhoek Spur in Late 1917
| Date | Rain mm |
Temp °F |
|
|---|---|---|---|
| 1 | 0.2 | 51 | dull |
| 2 | 0.7 | 56 | dull |
| 3 | 0.0 | 52 | dull |
| 4 | 0.0 | 47 | dull |
| 5 | 0.0 | 49 | fog |
| 6 | 1.0 | 52 | dull |
| 7 | 1.4 | 48 | dull |
| 8 | 2.6 | 44 | dull |
| 9 | 1.6 | 50 | dull |
| 10 | 13.4 | 46 | — |
| 11 | 1.8 | 48 | — |
| 12 | — | — | fine |
| 13 | — | — | fine |
| 14 | — | — | rain |
| 15 | — | — | fine |
| 16 | — | — | dull |
| 17 | — | — | dull |
| 18 | — | — | dull |
| 19 | — | — | dull |
| 20 | — | — | dull |
| 21 | — | — | rain |
| 22 | — | — | rain |
| 23 | — | — | rain |
| 24 | — | — | rain |
| 25 | — | — | rain |
| 26 | — | — | snow |
| 27 | — | — | rain |
| 28 | — | — | fine |
| 29 | — | — | fine |
| 30 | — | — | fine |
| 1 | — | — | fine |
| 2 | — | — | cold |
| 3 | — | — | fine |
| 4 | — | — | cold |
| 5 | — | — | fine |
British forces tried to capture Polderhoek Spur several times in October and November. On 4 October, a British brigade attacked the spur and the château. They captured some strong points but German troops quickly counter-attacked and took the spur back.
Another attack on 9 October also failed. Mud made many weapons unusable. Machine-gun fire from a nearby ridge forced the British back. On 26 October, another attack was launched. Again, mud and heavy German fire stopped the British. Even when they reached the château, they had to pull back.
By dark, the British were back where they started. German artillery heavily shelled British positions. The shells often sank into the mud before exploding, which reduced their effect.
On 6 November, the British tried again. They used many artillery guns to bombard the German strong points. But the German strong points were small and hard to hit. As the British soldiers advanced, they were met with heavy machine-gun fire. They got close to the château ruins but could not capture them.
The Front Line in December
The Germans held a line of posts from Joiners' Wood in the north to Juniper Wood in the south. Their main defenses were on higher ground further east. South of the Reutelbeek stream, the British front line was exposed to fire from the side.
The New Zealand Division held about a 1.5 mi (2.4 km) (2.4 km) front. Their position was on a small rise. The ground was completely destroyed by artillery fire. It was full of shell holes, fallen trees, and dead animals. Moving around was very difficult.
New Zealand Army Prepares
New Zealand patrols explored the area between the two armies. They found that the German soldiers were careful. However, German artillery kept firing constantly. A German message was intercepted, warning of a gas attack. The gas attack happened but had little effect.
The New Zealand front line was not ready for defense. It was hard to get supplies and artillery to the front. The Germans could gather their troops unseen for an attack. Losing certain high ground would make other British positions very vulnerable.
The New Zealand Plan
General Sir Henry Rawlinson took command of the British Second Army on 8 November. The main offensive ended on 20 November. However, smaller attacks continued to keep German troops busy. This was to prevent them from moving to another battle at Cambrai.
The plan was to capture Polderhoek Spur. This would stop German observers from seeing British positions. The New Zealanders were chosen for this attack. The attack was planned by Brigadier-General William Garnett Braithwaite.
Attacking from the south was too risky due to German machine guns. So, an attack from the west was planned. This would allow British artillery to fire parallel to the infantry advance. Heavy artillery bombarded Polderhoek Château and its strong points on 28 and 30 November. Howitzers cut the German wire defenses.
Three extra artillery brigades joined the New Zealand artillery. They would create a moving wall of shells (creeping barrage) just in front of the attacking soldiers. Other artillery would fire further ahead. On the right side, artillery would target the Menin road and nearby areas. Mortars would fire gas bombs at German positions.
To surprise the Germans, the attack would happen in daylight. It was timed to catch the Germans when they usually took cover from regular morning bombardments. The attack would start with the "routine" bombardment. Smoke and gas would cover other German positions. The château was only 200 yd (180 m) (180 meters) away. To make sure the German outposts were hit, the artillery barrage would start very close to the New Zealand lines.
To trick the Germans, only a few soldiers would stay in the front line. They would stay hidden and quiet. The attacking soldiers would gather in support trenches. They would carry only their fighting gear and some basic supplies.
The Attack
3 December: The Battle Begins
The plan to gather troops in the support line was a good idea. When the New Zealanders moved into the open, some shells from their own artillery landed short. This caused many casualties, especially on the left side of the 1st Otago Battalion.
The German soldiers and machine gunners were not hiding, even though there had been regular bombardments. As soon as the New Zealand artillery fired, German machine guns fired back from the strong points near the château and from Gheluvelt Ridge. German artillery also shelled the duck-board track near Veldhoek.
The first New Zealand wave pushed forward into a ruined landscape. The German wire defenses were well cut. On the right side, the 12th (Nelson) Company faced heavy machine-gun fire. They managed to capture a strong point and eight prisoners.
However, a strong westerly wind blew away the smoke screen. This exposed the Nelson Company to machine-gun fire from Gheluvelt Ridge. The British artillery failed to stop these machine guns. The Nelson Company suffered many losses but kept going. As they advanced, some soldiers formed a defensive line on the spur's southern slope. They used machine guns and rifles, causing many German casualties.
Despite their efforts, the Nelson Company and the left company of the 1st Canterbury could not capture a large strong point. Reinforcements also failed. On the left, the 1st Otago Battalion was supported by machine-gun fire. This fire stopped German troops advancing along the Becelaere road.
The 1st Otago Battalion captured a strong point. But heavy machine-gun fire from the château stopped their advance. They were about 150 yd (140 m) (137 meters) short of their goal. More troops were sent forward, but they could not get past the German positions. Many New Zealand machine guns were knocked out, and both battalions lost about half their soldiers. The lack of experience among new soldiers and the heavy machine-gun fire from undamaged strong points were too much.
About thirty German prisoners were taken. The remaining New Zealand soldiers began to dig in on the captured ground. This position gave them a good view over the Scherriabeek valley.
Later that afternoon, German soldiers were seen gathering for a counter-attack. They were easily spotted. A mortar was moved into position and fired quickly, scattering the German troops. Very few Germans reached Gheluvelt. No attack followed. For several hours, German medics were allowed to rescue their wounded.
During the evening, many German reinforcements arrived at the château. Some were shot by New Zealand machine gunners. The New Zealand commander wanted another attack after dark. But the German reinforcements and the bright full moon made it too risky. The New Zealand positions would be vulnerable if they attacked again. During the night, the New Zealanders strengthened their lines. Medics searched for wounded soldiers among the shell holes.
Aftermath
Casualties
The New Zealanders suffered 1,198 casualties in December 1917.
Later Events
On the morning of 4 December, German troops were seen gathering again. But British artillery fire broke them up. New Zealand snipers shot many Germans near the château. German artillery then heavily shelled the New Zealand positions.
During the night, the remaining New Zealand soldiers were replaced by Maori pioneers. Patrols got within 50 yd (46 m) (45 meters) of the château. They saw that the Germans had also brought in new troops. The captured ground was important, but other British positions were still exposed to German view.
At dawn on 5 December, about 80 Germans launched a surprise attack. They got very close and knocked out one machine gun. But another machine gun and riflemen opened fire, killing about half of the German attackers.
After dawn, the Germans used an observation balloon to direct their artillery. This caused much damage to the New Zealand trenches. Prisoners later said the bombardment was for an attack. But British artillery fired back, stopping the German attack. The German shelling lessened, and the New Zealand trenches were rebuilt.
During the evening, the position was given back to other British troops. The 2nd New Zealand Brigade went into reserve. On 14 December, German forces recaptured the ground that overlooked the Scherriabeek valley.
See Also
- Third Battle of Ypres
- First World War
- New Zealand Division
Images for kids
-
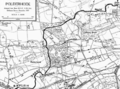
II Anzac Corps front line from Reutel to Polderhoek Spur and the Menin road
-
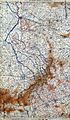
Map showing Allied advances in the Ypres Salient, 1917 (expandable)


