
Battle of Buna–Gona: Allied forces and order of battle facts for kids

The Battle of Buna–Gona was a major fight during World War II in New Guinea. It was part of the larger Pacific War. This battle happened after the tough Kokoda Track campaign. It lasted from November 16, 1942, to January 22, 1943. Soldiers from Australia and the United States fought against Japanese forces. The Japanese had strong bases at Buna, Sanananda, and Gona.
Allied troops, including the Australian 7th Division and the US 32nd Infantry Division, moved towards these Japanese positions. As the battle went on, more soldiers, including four extra infantry brigades, two infantry regiments, and a tank squadron with 19 M3 Stuart tanks, joined the fight.
Many people, including military leaders and historians, have talked about how the US 32nd Division struggled. They often point to a lack of proper training as the main reason. Australian part-time soldiers (militia) also faced similar training problems. Some Australian units did get help from experienced officers from the regular army.
Before the Allies reached Buna–Gona, their leaders thought the Japanese defenses were weak. They were very wrong. The Japanese had strong forts. Allied maps were not accurate, and aerial photos were hard to get. The Allies also thought air support could replace big guns and tanks. This was a mistake. Commanders on the ground couldn't get enough firepower to break through Japanese defenses. Also, getting supplies to the front was very difficult.
General Douglas MacArthur, the top Allied commander in the Southwest Pacific, believed Buna would be easy to capture. He never visited the front lines during the battle. He didn't understand the tough conditions his soldiers faced. Yet, he kept pushing them to achieve impossible goals quickly. Many believe MacArthur's pressure made the battle last longer and caused more Allied casualties.
Training and Equipment Challenges
US 32nd Division's Struggles
The US 32nd Infantry Division was a National Guard unit from Michigan and Wisconsin. It arrived in Australia in April 1942. This division was supposed to train for a year, but they received over 3,000 new recruits just before being sent to Australia. They also moved camps often, which cut into their training time.
Their training was for a war in Europe, not for jungle fighting. They weren't prepared for the tough conditions or Japanese tactics. One general said they were still "elementary" in their training just before the battle.

When they got to New Guinea, their uniforms were the wrong color. They were dyed green, but the dye made the fabric trap moisture, causing painful "jungle ulcers." They lacked important gear like machetes, insect repellent, and waterproof containers for medicine. Many heavy weapons, like their big artillery guns and most of their mortars, were left behind due to transport problems.
The American soldiers were not physically ready for New Guinea's harsh environment. One battalion had to hike 210 kilometers (about 130 miles) across a very difficult trail. More than two-thirds of them got sick with diseases like malaria before even seeing a Japanese soldier.
At the start of the battle, the 32nd Division was confident. But after a tough first day, they were shocked by the strong Japanese resistance. By late November, many soldiers had low morale due to heavy losses and sickness. Some even hurt themselves to avoid fighting.
One officer noted that the US officers didn't seem to care much for their soldiers. However, there were also many brave individual acts by junior leaders.
Australian Militia Units
Australian part-time soldiers (militia) from the 30th Brigade also faced similar problems. Many of these units had spent their time in New Guinea building roads or unloading boats, not training for combat. Some soldiers learned to use machine guns or throw grenades only a few days before going into battle. One soldier remembered, "I’d never held a rifle in my hand, never ever fired one... Next minute we're over there and we're lining up... fixed bayonets."
These units suffered heavy losses. For example, the 55th/53rd Battalion lost nearly 60 percent of its attacking force in one day. Moving forward in the dense jungle was very hard, and soldiers often found it difficult to keep moving under fire.
.jpg)
By late December, some Australian commanders were very critical of the militia units' training and fighting spirit. However, historians point out that few units could have done much better after such heavy losses in their first battle. Australian militia losses made up almost one-third of all Allied casualties at Sanananda.
There were also cases of soldiers refusing to go on patrols in other units, showing that low morale was not just in the militia. Both the US 32nd Division and Australian militia units went into battle without enough preparation.
Poor Intelligence Gathering
Before the battle, the Allies didn't know much about the Japanese forces or the battlefield. They greatly underestimated how strong the Japanese defenses were. Allied leaders thought there were only 1,500 to 2,000 Japanese soldiers and that they would surrender quickly. But in reality, at least 6,500 experienced Japanese soldiers and marines were defending the area. They were well-prepared and had plenty of supplies. Some American soldiers were even told there were only two squads of Japanese at Buna.

General Charles A. Willoughby told MacArthur that there was "little indication" the Japanese would put up a strong fight. Allied intelligence also thought the swampy land would prevent the Japanese from building strong defenses. This bad information led MacArthur to believe Buna would be easy to take.
Australian maps were mostly rough sketches and very inaccurate. Some even showed rivers flowing uphill! This made it very hard to aim artillery correctly.
Aerial photos were not widely available to commanders. When they were, they didn't show enough detail or were not given out quickly. The 30th Brigade at Sanananda didn't get any aerial photos until almost two weeks after arriving at the front. Even when photos were available, the thick jungle often hid important features and Japanese defenses.

Because of the difficult land and the rush to attack, there was little time for scouting. Information about Japanese defenses was often incomplete. One officer wrote that they were sent into battle with "scant information about the enemy, no aerial photographs, nothing to go on." He felt that sending in patrols to find the enemy first was the right way to fight, not rushing in a whole company.
Logistics and Supply Challenges

After another battle, the Allies built airfields to quickly move troops and supplies. These airfields helped bring some US soldiers to the Buna area.
During the Kokoda campaign, supplies were carried by Papuan porters, dropped from planes, or brought to airfields and then carried by hand. Building a road for vehicles was too difficult due to the terrain. Supply was limited by the number of planes and bad weather. Civilian planes and pilots were even used to help.
Supplies dropped from the air often landed in the wrong places because of unreliable maps or poor visibility. Packaging was also bad, and about half of the "free dropped" supplies were damaged. In one drop, only about 5 percent was recovered.

Getting supplies by sea was also hard. The Japanese controlled the usual sea routes. The coastal passage from Milne Bay was dangerous and not well-mapped. Small Allied ships, often old and rusty, were used. They faced constant Japanese air attacks at first. These small ships were crucial for bringing supplies and helping to map the dangerous waters. They hid in rivers during the day and moved at night, marking reefs with oil drums.
Oro Bay was the closest good harbor. It was 10 kilometers (about 6 miles) southeast of Dobodura. A 25-kilometer (about 15-mile) road was built to connect them. But without proper docks, supplies had to be moved onto smaller boats or canoes to get ashore.
One convoy of supply boats was attacked by Japanese planes, losing three boats and a barge. Two big guns were lost, and many soldiers and Papuans were killed or wounded. Sea supply from Oro Bay stopped for three weeks. This caused critical shortages just before the battle.
_milner_bunar.jpg)
Allies brought in jeeps by air to help move supplies, which eased the burden on the Papuan porters. Roads were built using logs (corduroy roads) to connect the Allied fronts.
At the start of the battle, the Allies faced severe shortages of ammunition and food. American troops lived on very little food for almost a week. Australian troops faced similar conditions. The supply situation improved as the battle went on, but it remained a major challenge.
Opening the Sea Route
In October, the Allies captured Goodenough Island with little fight. This island was important for protecting the north coast.
The sea route between New Guinea and the D'Entrecasteaux Islands was not well-mapped. It was called "the most dangerous coastline in the world." The small Allied ships helped map this route. Their Australian crews often had to fix engines or hulls damaged by bullets or coral. They moved at night through uncharted waters, marking reefs.

Australian Navy ships, like HMAS Paluma, helped survey and find safe routes for larger ships from Milne Bay to Oro Bay. These efforts made it possible for bigger ships to bring supplies.
The first large ship to deliver supplies to Oro Bay was the SS Karsik on December 11, 1942. It brought four M3 Stuart light tanks and seven days of supplies. This marked the start of regular supply runs by larger ships. These convoys, often escorted by Australian corvettes, brought in much more cargo than planes could.
Allied Command and Pressure
General MacArthur moved his main headquarters to Port Moresby in November 1942. General Blamey, commander of Allied Land Forces, had already taken command there in September. The Australian and US divisions were under Lieutenant General Herring.
MacArthur's Demands and Public Image

MacArthur, after leaving the Philippines, became the Supreme Commander in the Southwest Pacific. He wanted to show quick victories to compete with other Allied commanders. He also wanted to ensure his own position was secure. He even sent General Blamey to New Guinea, which some saw as a way to blame Blamey if Port Moresby fell.
MacArthur often criticized Australian troops, saying they couldn't fight well in the jungle. He pressured commanders to attack "regardless of losses." This led to Australian generals being replaced.
MacArthur also controlled the news about the war. He used this to promote himself, making it seem like he was personally leading battles from the front, even though he was often far away in Australia. He wanted the American public to believe he was winning the war and that American troops were key to victory.
MacArthur never visited the front lines at Buna. He didn't understand the terrible conditions. Yet, he kept demanding quick results. On November 20, he told Blamey to "drive through to the objectives regardless of losses." The next day, he told General Harding to "take Buna today at all costs." Many historians believe MacArthur's distance from the front and his constant demands for speed led to more Allied casualties.

When MacArthur was frustrated with the US 32nd Division's progress, he told General Robert L. Eichelberger to take command. He ordered Eichelberger to "remove all officers who won't fight" and to "take Buna, or not come back alive." MacArthur was worried about his own reputation.
Even after Harding was replaced, MacArthur continued to pressure Eichelberger. On Christmas Day, MacArthur sent a letter saying Eichelberger should be using more troops in attacks and that their casualties were "slight" compared to their total strength. This was very different from what soldiers on the ground were experiencing.
After the battle, MacArthur publicly said there was "no reason to hurry the attack" and that losses were low. This shocked the soldiers who had fought there. Historians say this was a "lie" and that Buna was one of the bloodiest battles for US forces in World War II. Many believe MacArthur's pressure directly caused many Allied casualties.
Some historians offer another view. They suggest MacArthur was also under pressure from his superiors, who saw the situation in Papua as "critical." They point out that the battle at Guadalcanal was still uncertain, and there was a fear the Japanese might send more troops. So, while MacArthur's actions were harsh, they might have been driven by a wider strategic concern at the time.
Fire Support: Guns, Planes, and Tanks
Fire support means using weapons like artillery, air power, or tanks to help attacking soldiers. The goal is to destroy or weaken enemy positions so infantry can move in.

Allied leaders initially thought air support could replace artillery and tanks. This was a big mistake. Air support wasn't effective enough, and attacks often stalled. The Allies couldn't get enough big guns or ammunition to the front. Also, tanks couldn't be transported at first. This lack of firepower made the battle longer and cost more lives.
Artillery: Not Enough Big Guns
At the start of the battle, the Allies had only a few small artillery pieces. These included Australian mountain howitzers and mortars. On November 22, two larger 25-pounder guns arrived. More guns were flown in later, but it was a difficult process.
A typical US infantry division would have many more large artillery guns (like 105 mm and 155 mm howitzers). The Allies at Buna had far fewer. Ammunition was also very limited. For one attack, only 250 artillery rounds were available. For another, only 40.

The 25-pounder guns were not very good at destroying Japanese bunkers. Their shells exploded on impact, not deep inside the bunkers. The Japanese bunkers were very strong. Later, delayed-fuse shells, which exploded after burying themselves, were used. These were much more effective and the Japanese called them "earthquake bombs."
It was also hard to direct artillery fire. The flat, dense jungle offered no good places to observe targets. Forward observers had to climb trees, making them easy targets for Japanese snipers.
To solve this, the Australian Air Force (RAAF) sent "Wirraway" planes. These slow planes helped spot targets and direct artillery fire. They also did reconnaissance and took photos. These planes were so important that the Japanese tried hard to shoot them down.
More guns arrived later in the battle, including 4.5-inch howitzers. One 25-pounder gun, nicknamed "Carson's Gun," was moved very close to the front. It fired solid, armor-piercing shells directly at bunkers, destroying many of them.
Despite more guns, the main problem was still a lack of shells. Commanders had to choose between artillery ammunition and other vital supplies like food and medicine. MacArthur's pressure to attack quickly meant that precious ammunition was used up instead of saved for big, concentrated attacks.
Air Support: Not as Effective as Hoped
.jpg)
Lieutenant General George Kenney, the Allied air force commander, believed air power could replace artillery and tanks in the jungle. He was wrong. Air bombardments were even less effective than artillery at destroying Japanese bunkers. Allied planes dropped thousands of bombs, but the results were disappointing.
It was also hard to use planes to support troops closely. Planes had to drop bombs from a safe distance, meaning Allied soldiers had to pull back. This gave the Japanese a chance to recover.
However, the constant presence of Allied planes did hurt Japanese morale. Japanese soldiers wrote in their diaries about the constant bombing and strafing, wishing their own planes would appear.

Close air support was new, and the jungle made it hard to identify targets and avoid hitting friendly troops. There were several cases of "friendly fire." This led to new procedures for coordinating air and ground forces.
Despite these issues, air power was vital for transport and resupply. It was the first campaign to rely so heavily on air transport. Planes also evacuated thousands of sick and wounded soldiers. Air superiority also prevented the Japanese from sending more troops and supplies by sea.
Australian Wirraway planes were especially important for spotting targets and directing artillery. They also flew reconnaissance missions. One Wirraway even shot down a Japanese Zero fighter plane.
Tanks: Breaking the Stalemate

Since artillery and air power weren't enough, commanders looked to tanks. The Allies had planned to use M3 Stuart tanks, but the first attempt to move them by barge failed when both sank. So, lighter "Bren carriers" were sent instead.
Bren carriers were lightly armored and not meant to be tanks. They were quickly stopped by logs and attacked by Japanese soldiers with grenades and petrol bombs. This showed that carriers were no substitute for tanks.

Later, eight Stuart tanks arrived by ship. These were light tanks, fast and mobile, but not heavily armored. They had a 37mm gun. They were like "race horses harnessed to heavy ploughs" because they were used for a job they weren't designed for.
The tanks were used to support an attack on December 18. Communication between tanks and infantry was very difficult. Soldiers had to climb on the tanks to direct them. The jungle and hidden logs often trapped the tanks. Japanese soldiers bravely attacked the tanks with petrol bombs.

Tanks were crucial for breaking through Japanese positions. When tanks were used, the Allies gained ground with fewer losses. However, tanks could only operate on firm ground. They often got stuck in the mud.
Japanese anti-aircraft guns were also used as anti-tank weapons. On December 24, four Stuart tanks were quickly knocked out by a hidden Japanese 75mm gun. Later, on January 12, three tanks were destroyed on a narrow track by another anti-tank gun.
While some historians debate their overall impact, tanks were very important in destroying Japanese bunkers and allowing infantry to advance.

Naval ships can provide powerful gunfire support for land operations near the coast. However, Allied ships were heavily involved in the Guadalcanal Campaign, which was a major naval battle. Many ships were lost. The remaining destroyers were busy escorting convoys and patrolling.
General Blamey asked MacArthur to get naval support. He pointed out that Japanese ships had operated in these waters. But the Navy was worried about the poorly mapped, reef-filled waters and air attacks. They said smaller ships like corvettes and night approaches were safer.
These requests were mainly for transport and escort, not direct gunfire support. Some historians believe that even a small naval force could have helped capture Buna–Gona much faster. However, a small force would have been at great risk from Japanese planes, ships, and submarines.
Order of Battle: Who Fought?
American forces included many support units but lacked combat support. Australian units were often under strength, especially those coming from the Kokoda Track. Many Australian militia battalions had little or no combat experience. For example, the 49th Battalion had only 505 soldiers, while a full battalion should have had 910.

The Americans sent about 13,645 soldiers to the combat zone. The Australians sent over 7,000. Papuan laborers and porters were also crucial, with over 3,000 helping to carry supplies for the Allies.
US Units
- Headquarters, US I Corps
* Commanding General: Lt Gen Robert L. Eichelberger
- 32nd Division (Maj Gen Edwin F. Harding)
* 126th Infantry Regimental Combat Team * 128th Infantry Regimental Combat Team * 127th Infantry Regimental Combat Team (arrived later)
- 41st Division (Maj Gen Horace H. Fuller)
* 163rd Infantry Regimental Combat Team (arrived late December)

- Artillery:
* Battery 'A', 129th Field Artillery Battalion: One 105-mm howitzer (arrived late November)
Australian Units
- Headquarters 7th Division
* General Officer Commanding: Maj Gen G. A. Vasey
- 2/7th Cavalry Regiment (fought as infantry, arrived mid-December)
- 2/6th Armoured Regiment (19 M3 Stuart tanks)

- Infantry:
* 25th Brigade (fought on Kokoda Track, withdrawn early December) * 2/25th Infantry Battalion * 2/31st Infantry Battalion * 2/33rd Infantry Battalion * 3rd Infantry Battalion (attached) * Chaforce (a composite force from other battalions) * 16th Brigade (fought on Kokoda Track) * 2/1st Infantry Battalion * 2/2nd Infantry Battalion * 2/3rd Infantry Battalion * 18th Brigade (attached to 32nd Division) * 2/9th Infantry Battalion (arrived mid-December) * 2/10th Infantry Battalion (arrived mid-December) * 2/12th Infantry Battalion (arrived late December) * 21st Brigade * 2/14th Infantry Battalion * 2/16th Infantry Battalion * 2/27th Infantry Battalion * 30th Brigade (Militia) * 36th Infantry Battalion * 49th Infantry Battalion (arrived early December) * 55/53rd Infantry Battalion (arrived early December) * 14th Brigade (Militia, HQ arrived late December) * 2/6th Independent Company (attached to 32nd Division, withdrawn mid-December) * 39th Infantry Battalion (arrived early December)


.jpg)


- Artillery:
* One troop 2/5th Field Regiment (four 25-pounders) * One battery 2/1st Field Regiment (twelve 25-pounders) * One troop 13th Field Regiment (four 4.5-inch howitzers) * 1st Mountain Battery (three 3.7-inch mountain howitzers)
- Air:
* No. 4 Squadron RAAF (two detached flights of Wirraway planes)
Images for kids
-
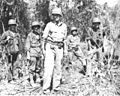
Eichelberger inspects newly taken ground in the Triangle area, near Buna Station. He was conspicuous in his presence close to the forward positions.
