
Battle of Buna–Gona facts for kids
Quick facts for kids Battle of Buna–Gona |
|||||||
|---|---|---|---|---|---|---|---|
| Part of the New Guinea Campaign of the Pacific Theater (World War II) | |||||||
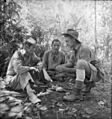
 On 25 December 1942, near Buna, Papuan orderly Raphael Oimbari aids Australian soldier Private George "Dick" Whittington, who died of scrub typhus in February 1943. (Photo by George Silk, AWM104028) |
|||||||
|
|||||||
| Belligerents | |||||||
| Commanders and leaders | |||||||
from 6 December: |
|||||||
| Units involved | |||||||
| See Battle of Buna–Gona: Allied forces and order of battle | See Battle of Buna–Gona: Japanese forces and order of battle | ||||||
| Strength | |||||||
| 20,000+ (total) | 5,500–6,500 (initially) 11,000–12,000 (total) |
||||||
| Casualties and losses | |||||||
| 1,991 killed, 12,300+ injured or sick |
7,000 killed (4,000 in battle, remainder from disease) 1,200 injured (evacuated), 250+ captured |
||||||
The Battle of Buna–Gona was a major fight during World War II. It happened in New Guinea as part of the Pacific War. This battle took place from November 1942 to January 1943. It was fought by soldiers from Australia and the United States against Japan.
The Japanese had set up strong bases at Buna, Sanananda, and Gona. They had used these bases to try and attack Port Moresby. But things changed in another battle, so the Japanese were told to go back and protect these bases.
Allied forces (Australia and the US) wanted to kick the Japanese out of these areas. The Japanese defenders were very skilled and had built strong, hidden defenses. The fighting was incredibly tough and showed how determined the Japanese soldiers were.
Fighting in New Guinea was very hard. The land was difficult, with thick jungles and swamps. The weather was also a big problem, with lots of rain and high humidity. Diseases like malaria were also a huge threat to the soldiers. Getting food and supplies to the troops was a constant struggle.
Allied planes helped by stopping the Japanese from getting more supplies and soldiers. This made it impossible for the Japanese to hold their positions. In the end, many Japanese soldiers were taken away by sea or escaped through the jungle. But most of the remaining defenders fought until they died.
This battle taught the Allies important lessons about jungle warfare. It was a very costly victory, meaning many soldiers were lost. It also showed how fierce the fighting would be for the rest of the war in the Pacific.
Contents
Why the Battle Happened
Japan's Early Moves in WWII

World War II in the Pacific began for Japan with the attack on Pearl Harbor in December 1941. Japan quickly took over many areas in Southeast Asia and the Pacific. Australia was worried after British Malaya and Singapore fell quickly. Thousands of Australian soldiers became prisoners of war.
In March 1942, US President Franklin Roosevelt asked General Douglas MacArthur to plan a defense for the Pacific. Australia's Prime Minister, John Curtin, agreed to have Australian forces led by MacArthur. MacArthur moved his headquarters to Australia.
Japan attacked Rabaul in January 1942. Rabaul became a key Japanese base for their campaigns in New Guinea. Japanese forces first landed on mainland New Guinea in March 1942. They invaded Lae and Salamaua to protect their base at Rabaul.
Plans for Port Moresby
The Japanese never planned to invade mainland Australia. Instead, they wanted to cut off Australia from the United States. Their plan was to capture Port Moresby in Papua and other islands like Fiji and Samoa.
The first part of this plan was to land troops by sea to capture Port Moresby. But the Japanese lost the Battle of the Coral Sea. This made them postpone their sea attack.
So, the Japanese decided to attack Port Moresby by land. They landed at Buna, Gona, and Sanananda in July 1942. This started the Kokoda Track campaign. Japanese soldiers marched over the tough Owen Stanley Range.
While the Kokoda Track fighting was happening, Japanese forces tried to capture Milne Bay in August 1942. But the Battle of Milne Bay was a Japanese defeat. This was their first major land defeat and boosted Allied spirits.
Japanese Withdrawal
By September, the Japanese forces on the Kokoda Track were close to Port Moresby. But the Japanese general decided he couldn't fight two battles at once. He ordered his troops on the Kokoda Track to pull back. This was because of problems in another big battle happening at Guadalcanal.

The Japanese began to withdraw in late September. They fought well as they pulled back, with Australian soldiers chasing them. American troops were also sent to New Guinea and moved to cut off the Japanese.
The Japanese forces were very tired and low on supplies. They suffered heavy losses in battles as they retreated. By November, the Australians were close to Buna–Gona.
The Difficult Land
Climate and Terrain Challenges

The Japanese bases were on a narrow strip of land along the north coast of New Guinea. This area was about 160 kilometers (100 miles) northeast of Port Moresby. The land was low and flat, with thick swamps and jungles.
The few paths through the swamps were very narrow. The ground was often waterlogged, making it hard to dig trenches. Temperatures were high, and the humidity was very uncomfortable.

Areas not covered by water were dense jungle or tall kunai grass. This grass could grow to 2 meters (6 feet) high and had sharp leaves. The battle happened during the wet season, with heavy tropical storms. The rain turned the few tracks into deep mud.
Disease was a Major Enemy
The Buna–Gona area was one of the worst places in the world for malaria. Other tropical diseases like dengue fever, scrub typhus, and dysentery were also common. Poor food and not enough supplies made soldiers even more likely to get sick.
Many Australian soldiers didn't fully understand how to prevent malaria. Supplies of medicine were also hard to get. It was common for soldiers to wear shorts, which exposed them to mosquitoes.
It's believed that 85-95% of all Allied soldiers in the area caught malaria during the battle. For every soldier wounded in battle, nearly five were hospitalized due to sickness. Many soldiers had to keep fighting even with high fevers. Japanese soldiers also suffered greatly from disease.
Supplies and Support
Logistical Problems for Allies
Getting supplies to the front lines was a huge challenge for both sides. Allied forces often had to rely on air drops, but up to half of the supplies were lost or broken. There were constant shortages of food and ammunition.
Once airfields were built closer to the fighting, supplies could be flown in. But bad weather and not enough transport planes still caused problems. A sea route was also opened to Oro Bay, which helped bring in more supplies. However, getting enough supplies remained "extraordinarily difficult."

Local Papuan people were essential to the Allied supply system. More than 3,000 Papuans worked as laborers and porters, carrying vital supplies through the difficult terrain.
Japanese Supply Issues
The Japanese also faced huge supply problems. They couldn't get much help from the air. While they had some food at Gona at the start, Allied air power made it hard for Japanese ships to bring in more.
Some supplies were landed by submarines, but these were small amounts. By late December, the Japanese stopped receiving supplies. This meant their soldiers had very little food, sometimes going days without any.
The Forces Involved
Japanese Defenders

The Japanese positions at Buna–Gona were defended by both naval and army units. Soldiers who had retreated from the Kokoda Track also joined the defense. At the start of the battle, there were about 5,500 to 6,500 Japanese troops. But over time, more Japanese forces were sent to the area, bringing the total to 11,000 to 12,000.
Japanese destroyers tried to bring in more troops and supplies, but Allied air attacks often turned them back. Some troops were landed further away and had to march to the bases.

The Japanese had built very strong defenses. These were some of the toughest the Allies faced in the war. They used the land well, creating hundreds of hidden bunkers and machine gun nests. Each position supported others, making them very hard to attack.
Allied Attackers

The Allied attack on Buna–Gona involved the Australian 7th Division and the US 32nd Infantry Division. As the battle went on, more troops, including other infantry brigades and even tanks, were brought in.
Australian units were often smaller than they should have been due to earlier fighting. American forces were closer to their full strength.
Some people criticized the performance of the US 32nd Division, saying they lacked training. Australian militia units also had limited training.
Allied commanders initially thought the Japanese defenses were weak. They were wrong. Maps were not accurate, and commanders didn't have good aerial photos. They also thought air support could replace artillery and tanks, which was a mistake.
General MacArthur, the overall commander, never visited the front lines. He didn't understand the terrible conditions his troops faced. He kept pushing for a quick victory, which often led to more Allied losses and made the battle last longer.
The Battle Unfolds

The battle began on November 16, 1942. Australian troops chased the retreating Japanese forces. By November 19, Australian and American units were approaching the Japanese bases at Gona, Sanananda, and Buna.
At first, there was only light contact with the Japanese. But soon, the Allied forces met very strong resistance. The thick jungle, lack of heavy weapons, and supply shortages made it hard to fight. The Japanese fought fiercely from their well-prepared defenses. For the next two weeks, the Allies made little progress and suffered many casualties. The fighting was like the "trench warfare" of World War I.

On December 9, after concentrating more troops, the Allies finally cleared the Japanese position at Gona. However, fighting continued nearby as more Japanese forces landed.
American forces attacked the Buna area from both sides. On December 14, they entered Buna village. But the fighting became a stalemate on the eastern side. This changed when the Australian 18th Brigade and Stuart tanks arrived. With their help, steady progress was made. By January 3, the Buna area was cleared.
The Australian 7th Division kept pushing against the Japanese on the Sanananda track. They received more troops, including American soldiers.
On January 12, the Australians attacked Japanese positions south of a key roadblock without success. The ground was too difficult for tanks, and hidden bunkers made artillery support hard.

The Japanese eventually pulled back from some forward positions on the main track. The Australians quickly advanced. A link was made with the US 32nd Division on January 21. The battle officially ended on January 22, but many Japanese soldiers were still in the area.
The Japanese had planned to evacuate, but the Allied advance was too fast. About 1,200 sick and wounded Japanese were taken away by sea. On January 20, the Japanese commander ordered an evacuation. About 1,000 to 1,900 soldiers escaped overland. The rest fought to the death.
Fighting at Buna Village

The Buna area was a long strip of coast with two landing strips. The Japanese had strong defenses at both ends. American forces attacked these positions.
On November 19, American troops attacked the eastern defenses but were met with heavy fire. They made little progress. The next day, they gained only a small amount of ground. Air support was often ineffective and sometimes even hit Allied troops by mistake.
General MacArthur became very impatient with the lack of progress.
Buna Station and the Triangle

American forces also attacked the western flank of Buna, near Buna Station. This area included a strong Japanese position known as "the Triangle." Attacks on November 24 were met with heavy fire, and no gains were made.
By November 30, American troops had managed to get close to Buna village and cut off Japanese communication. But losses were mounting.
Leadership Changes

Due to slow progress, General Robert L. Eichelberger took over command of the US 32nd Division. He replaced the previous commander and many other officers. Eichelberger worked to boost his soldiers' morale. He often went to the front lines, even under fire, to encourage his troops.
On December 5, a brave American platoon leader, Staff Sergeant Herman Bottcher, led 18 men to the sea. This cut off the Japanese in Buna village from supplies. Bottcher and his men fought off attacks for seven days. This action was a turning point for the battle at Buna. Bottcher was recognized for his bravery.
By December 14, after heavy fighting, the American forces captured Buna village. The remaining Japanese positions were cleared in the following days.
Sanananda Track Battles

On November 20, Australian troops approached the Sanananda track. They immediately faced strong Japanese defenses. One Australian company made a brave flanking move and attacked the main Japanese position. They fought desperately through the night.
The Australians pushed forward, but the Japanese defenses were very strong. The Australian brigade had lost many soldiers from earlier fighting. American troops were brought in to help. On November 30, a key position known as "Huggins' Roadblock" was set up on the Sanananda Track. This position cut off Japanese supply lines, but it was also in a dangerous spot.
Gona Village Captured

On November 19, Australian troops reached Gona village. They faced fierce Japanese resistance. The Australians tried to attack from different directions, but the Japanese fought back hard. The Australian brigade was exhausted from fighting along the Kokoda Track.
More Australian troops arrived, though they were also low in numbers. An attack was planned for November 29. The Australians faced determined resistance and made only small gains. The fighting was very costly.

On December 8, a final assault was launched on Gona. Australian artillery fired on the Japanese positions. The 39th Battalion attacked under the barrage. The Japanese position was finally reduced to a small area. The next day, Gona was captured.
Tanks Join the Fight at Buna

On December 14, the Australian 18th Brigade arrived at Buna. They were supported by seven M3 Stuart tanks. On December 18, they attacked the eastern end of Buna. The tanks helped break through the Japanese defenses. Two tanks were destroyed, but the Australians made significant gains.

The Japanese abandoned some positions, and the Allies pushed forward. On December 22, Australian troops crossed a creek and established a bridgehead. Engineers quickly repaired a bridge, allowing more troops to cross.

On December 24, tanks supported an attack up a landing strip, but four tanks were quickly destroyed by a hidden Japanese gun. Despite this, the Allies continued to advance. The fighting was very tough, with Japanese positions resisting fiercely. By December 28, most of the Japanese were trapped in a small coastal area.
On January 1, 1943, a new attack with tanks was launched. By January 2, the last Japanese positions were captured. The 18th Brigade suffered heavy losses in these two days.
Final Push at Sanananda

The "Huggins' Roadblock" on the Sanananda Track remained a key point. American troops tried to attack the Japanese positions around it but failed. Australian reinforcements arrived, but the fighting remained difficult.
On December 18, more Australian troops took over positions on the track. They tried to push through the Japanese defenses but made little progress. Another roadblock, "James' roadblock," was established further north. This helped to isolate more Japanese positions.
The Allies realized they needed more forces to break through at Sanananda. American troops from the 41st Division were on their way.
Buna Government Station Falls

After Buna Village fell, American troops cleared the nearby Coconut Grove. They tried to advance on the Government Station but faced heavy fire. On December 21, American troops crossed a creek in assault boats. By December 24, five companies had crossed.
The Japanese eventually abandoned "the Triangle" position. On December 31, American troops attacked the Government Station. By January 2, the station was captured, and the Americans linked up with the Australians.
Sanananda and Giruwa

With Buna captured, the US 32nd Division moved to attack Sanananda–Giruwa from the east. The Australian 18th Brigade and tanks also joined the fight on the Sanananda Track.
On January 15, the Australian 18th Brigade advanced towards Cape Killerton. The terrain was very difficult, with thick swamps. They reached the coast the next day.
On January 18, the Australians attacked Sanananda village through the swamp. The village fell quickly. They then cleared Sanananda Point. The American 127th Infantry Regiment also advanced, capturing Giruwa on January 21 and linking up with the Australians.
The remaining Japanese positions on the Sanananda Track were finally overcome by January 22. The battle officially ended, though scattered Japanese soldiers still remained.
Aftermath and Lessons Learned
After the main fighting, many Japanese soldiers were still hiding in the area. Allied forces had to spend days clearing them out. New air bases and port facilities were built to support future operations.
The Battle of Buna–Gona was very costly for the Allies. Australian forces suffered 3,471 casualties, with 1,204 killed. American forces had 10,879 casualties, including 671 killed and many more sick. Overall, out of 33,000 Americans and Australians who fought, 3,095 were killed. This means that in New Guinea, one in every 11 soldiers died, compared to one in 37 at Guadalcanal.
General Eichelberger later called Buna a "nightmare." He said that disease was even more dangerous than enemy fire. The battle was one of the costliest Allied victories in terms of casualties compared to the number of troops involved.
The Japanese defenders fought with extreme determination. They would often fight to the death rather than surrender. This level of stubbornness was new to the Allies and would be seen in many future battles in the Pacific.

Estimating Japanese losses is hard, but around 8,000 Japanese soldiers died. Only about 200 prisoners were taken at Gona and Sanananda, and only 50 at Buna. Many able-bodied Japanese soldiers managed to escape.
Some historians have wondered if the Allies needed to fight such a costly battle, or if they could have just surrounded the Japanese and starved them out. But most agree that a battle was necessary, partly because disease was such a threat to the Allied troops.
The battle taught the Allies many valuable, though expensive, lessons about fighting in the jungle. These lessons helped shape the tactics used by the Australian Army for the rest of the war.
Remembering the Battle
The battle honor "Buna–Gona" was given to Australian units that fought there. Other honors were given for specific areas like "Gona" and "Sanananda Road."

Two American soldiers, First Sergeant Elmer J. Burr and Sergeant Kenneth E. Gruennert, were awarded the Medal of Honor for their bravery. Herman Bottcher received the Distinguished Service Cross twice.
A brass memorial plaque was placed at "Huggins' Roadblock" after the war. It honors Captain Meredith H. Huggins and his men for their courage.
The Japanese also built a monument to remember their soldiers who died. Australian units also placed a plaque for their fallen comrades.
Images for kids
-
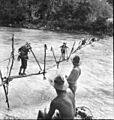
On the road to Buna, Australian troops cross a stream on an improvised bridge.
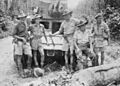
-
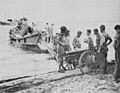
An Australian 3.7-inch mountain howitzer is dismantled before being loaded on a captured Japanese barge.
-
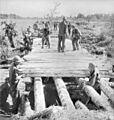
The bridge across the Simemi Creek at Buna being repaired after a bridgehead was established.
-
Vickers machine gunners reloading belts after Gona fell.
-
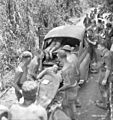
This sedan, converted for service as an ambulance, was captured by the Japanese at Singapore and recaptured by Allied troops at Gona.
-
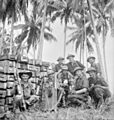
Japanese ammunition captured by Allied forces at Gona.
-
A Stuart tank that was destroyed at Sanananda.
-
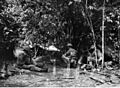
Headquarters 2/7th Cavalry Regiment, Sanananda Track, just 40 yards (37 m) from Japanese positions.
-
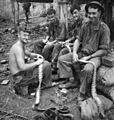
An Australian rolls a cigarette for a Japanese prisoner captured at Sanananda.
-
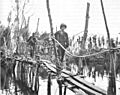
A Japanese-built foot bridge crossing described as: "Entrance Creek to the Buna Station".


.JPG)


