
Battle of Empress Augusta Bay facts for kids
Quick facts for kids Battle of Empress Augusta Bay |
|||||||
|---|---|---|---|---|---|---|---|
| Part of the Bougainville Campaign of the Pacific Theater (World War II) | |||||||
_during_Battle_of_Empress_Augusta_Bay_1943.jpg) View forward from the US light cruiser Columbia towards the US light cruiser Cleveland as both ships fire at Japanese warships during the battle |
|||||||
|
|||||||
| Belligerents | |||||||
| Commanders and leaders | |||||||
| Units involved | |||||||
| Strength | |||||||
| 4 light cruisers 8 destroyers |
2 heavy cruisers 2 light cruisers 6 destroyers 100 aircraft |
||||||
| Casualties and losses | |||||||
| 1 cruiser damaged 2 destroyers damaged 19 killed |
1 light cruiser sunk 1 destroyer sunk 1 heavy cruiser damaged 1 light cruiser damaged 2 destroyers heavily damaged 25 aircraft shot down 198–658 killed |
||||||
The Battle of Empress Augusta Bay was a major naval battle during World War II. It took place on November 1–2, 1943, near Bougainville Island. This battle was part of the larger Bougainville campaign. It was also a key part of a plan called Operation Cartwheel. This plan aimed to cut off and surround the main Japanese base at Rabaul.
The battle happened right after Allied forces landed at Cape Torokina. The goal was to create a safe area (a beachhead) on Bougainville. An airfield would then be built there. The Japanese sent a large naval force from Rabaul to stop these landings. However, the American warships successfully pushed back the Japanese. This allowed the landings at Cape Torokina to succeed.
Contents
Background: Why the Battle Happened
On November 1, 1943, American Marines landed at Cape Torokina. This area is in Empress Augusta Bay on Bougainville Island. The Allies wanted to build airfields here. These airfields would help them attack the Japanese stronghold at Rabaul. Taking Rabaul was a big part of their plan, Operation Cartwheel.
Empress Augusta Bay was chosen for a few reasons:
- It was at the edge of how far Allied fighter planes could fly.
- Most of the Japanese army was in other parts of the island.
The Marines were supported by a group of US Navy ships. This group was called Task Force 39 (TF39). It was led by Aaron S. Merrill, a Rear Admiral. His job was to protect the transport ships and minelayers. These ships were vulnerable to attacks from the air and sea.

The Japanese reacted quickly. They launched air attacks and sent a strong naval force from Rabaul. This force was led by Admiral Sentaro Omori. The Japanese hoped to repeat an earlier success they had at the Battle of Savo Island. Omori's force was put together quickly. Many of the ships and crews had not trained or fought together before.
The Japanese force included:
- Two heavy cruisers: Myōkō and Haguro.
- Two light cruisers: Agano and Sendai.
- Six destroyers: Naganami, Hatsukaze, Wakatsuki, Shigure, Samidare, and Shiratsuyu.
These ships were organized into a cruiser division and two destroyer groups.
The American Task Force 39 was ready for them. The main part of TF39 was Cruiser Division 12. It had four light cruisers:
- USS Montpelier
- Cleveland
- Columbia
- Denver
These ships were called "light cruisers," but they were almost as big as the Japanese heavy cruisers. They had twelve 6-inch guns that used radar to aim. TF39 also had Destroyer Squadron 23, with eight destroyers. Captain Arleigh Burke led one group of destroyers.
The Battle Begins

As the Japanese ships headed towards Cape Torokina, the Americans were already moving their landing craft away. The US transport ships were ordered to leave around 6:00 PM. Meanwhile, US scout planes spotted Omori's Japanese force. In response, Admiral Merrill's ships quickly sailed north to stop them. They arrived before midnight on November 1–2. They took a position to block the entrance to Empress Augusta Bay. The Japanese planned to bombard the invasion force on the shore. At 1:30 AM on November 2, the Haguro was hit by an American air attack. This damage slowed down the entire Japanese fleet.
First Contact and Torpedo Attacks
The Americans made radar contact with the Japanese at 2:27 AM on November 2. Admiral Merrill arranged his ships into three lines. He sent Burke's destroyers to attack the Japanese northern side. The American cruisers turned to stay out of torpedo range. Other destroyers were sent to launch a torpedo attack on the southern side.
Burke's destroyers fired their torpedoes at 2:46 AM. Around the same time, the Japanese Sendai-led division also fired torpedoes. Both sides detected the incoming torpedoes and moved to avoid them. In the confusion, the Japanese fleet split into three groups.
Merrill then ordered another destroyer group to attack. One ship, the Foote, misunderstood the order and got separated. It struggled to rejoin the fight and was in danger of hitting other friendly ships. Around 2:50 AM, the American cruisers opened fire. They quickly hit the Sendai, jamming its steering.
Collisions and Gunfire
After firing its torpedoes, the Japanese destroyer Samidare crashed into the Shiratsuyu. Both ships had to leave the battle. The Myōkō also collided with the Hatsukaze, cutting off its front part. The Myōkō was badly damaged from this crash. Meanwhile, the Haguro was hit by several American shells.
The Japanese cruisers, using their eyes to track targets, found the American cruisers. They opened fire at 3:13 AM. The Japanese fired more torpedoes at the American cruisers. They thought they had hit many ships, but all the torpedoes missed.
The Americans also had problems. The Spence and Thatcher collided but could keep fighting. The Foote was hit by a torpedo. This blew off the back of the ship, killing 19 sailors and wounding 17. The damaged Foote drifted, causing more confusion. It spent the rest of the battle trying to stay afloat and fighting off Japanese planes.
The Japanese relied on flares to light up their targets. The American cruisers kept moving to avoid these flares. But eventually, Japanese scout planes dropped bright flares, lighting up the American ships.
Between 3:20 AM and 3:25 AM, the Denver was hit three times by 8-inch shells. Luckily, they did not explode. The Spence was also hit at the waterline by a shell that did not explode. At this point, the Japanese were firing heavily and accurately. The American cruisers started making smoke screens. This smoke helped block the Japanese gunners' view.
Japanese Retreat
Throughout the battle, the American destroyers had trouble staying in contact with each other. They almost fired on friendly ships several times. This showed how hard night battles were, even with radar.
By 3:37 AM, Admiral Omori believed he had sunk an American heavy cruiser. He was worried about being caught by US aircraft in daylight. So, he ordered his ships to retreat. Merrill's cruisers chased the Japanese ships as they pulled back. They fired at the Hatsukaze from far away but missed.
Around 4:00 AM, the American destroyers fought with the last Japanese ships. They sank the Sendai and chased away the remaining ships. Just before 4:13 AM, the Spence lost speed due to water in its fuel line. It fell out of formation. The American ships reported many hits on the enemy. The American destroyers accidentally fired on the limping Spence, but it caused no damage. The American cruisers and Spence then engaged a Japanese straggler at 5:10 AM. They couldn't tell the difference between the straggler and Spence, so the cruisers stopped firing. By 5:19 AM, the American destroyers came to help the Spence, which was almost out of ammunition. The Japanese straggler, the badly damaged Hatsukaze, exploded and sank.
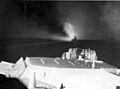
,_in_November_1943_(80-G-44059).jpg)
At daylight, the chase ended. All ships, many low on fuel and ammunition, were ordered to meet up with the damaged Foote. Admiral Merrill was worried about air attacks. His worry was right. A large Japanese air attack, with over 100 planes, was launched from Rabaul. It targeted the US ships gathered around the Foote. American and New Zealand planes from shore helped fight off this attack. Many Japanese planes were shot down. The Japanese ships hit the Montpelier twice, wounding nine sailors. The Foote was later towed away for repairs.
Aftermath: What Happened Next
The Battle of Empress Augusta Bay was a complete victory for the US Navy. They successfully kept the Japanese away from the vulnerable transport ships. They also caused significant damage to the Japanese fleet.
The US Navy lost:
- 19 killed
- 26 wounded
- Three ships damaged
The Japanese lost:
- One light cruiser sunk (the Sendai)
- One destroyer sunk (the Hatsukaze)
- Two cruisers damaged
- Two destroyers heavily damaged
- Between 198 and 658 killed
- Up to 25 aircraft shot down in the air attack
The Japanese later sent a submarine to look for survivors. None were found from the Hatsukaze, but some were rescued from the Sendai.

After the battle, the Japanese ships returned to Rabaul. More cruisers and destroyers joined them there for another attack. However, on November 5, two US aircraft carriers attacked Rabaul. They heavily damaged four Japanese heavy cruisers. These damaged ships had to leave for repairs. This ended the Japanese warship threat to the Allied forces at Bougainville. Admiral Omori was removed from his command because of the failed battle.
On the ground, US forces secured their landing area at Cape Torokina. They then expanded it. A base for small patrol boats (PT boats) was set up. Several airbases were built around Cape Torokina. These airbases were used to attack Rabaul. By early 1944, the US had over 400 aircraft on Bougainville. The Japanese air defenses around Rabaul were defeated before the end of February. On the ground, US Marines and Japanese forces fought several smaller battles. A large Japanese counterattack happened in March 1944, but it was defeated with heavy Japanese losses.
Images for kids
-
View forward from the US light cruiser Columbia towards the US light cruiser Cleveland as both ships fire at Japanese warships during the battle
-
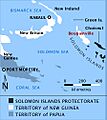
Location of Bougainville
-
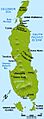
Map showing Empress Augusta Bay on the western coast of Bougainville
-

A Japanese aircraft crashes (upper center) into the ocean near the cruiser Columbia during air attacks on Allied ships off Bougainville, a few hours after the battle
-

Marines board landing craft in Empress Augusta Bay
