
Malibu tile facts for kids

Malibu tile is a special kind of ceramic tile. It gets its unique look from tiles made at Malibu Potteries in Malibu, California, back in the late 1920s. These tiles have a design style called Hispano-Moresque or Arabesque. They feature bright, contrasting colors, often in cool geometric patterns. This style reminds people of ancient tiles from the Middle East, North Africa, and southern Spain.
You can see the biggest collection of original Malibu Potteries tile at the Adamson House in Malibu, California. This house is now the Malibu Lagoon Museum. The Adamson House became a National Register of Historic Places site in 1977. It was also named a California Historical Landmark in 1985.
This type of tile first became popular in America at the Panama–California Exposition in San Diego in 1915. It decorated buildings like the Santa Fe Railroad Depot and the San Diego Museum of Man. These early tiles were made by the California China Products Company. Architects and homeowners loved these tiles right away. They fit perfectly with the popular Spanish Colonial Revival architecture style, which was also shown at the exposition.
Contents
History of Malibu Tile
A big fire hit the Malibu Potteries in 1931. This led to the pottery closing the next year, after only six years of making tiles. Some of the tile makers found new jobs at other tile companies in the Los Angeles area. These companies sometimes made similar products. However, the Great Depression slowed down construction. This meant there was less need for decorative tiles. By the time World War II started, most tile factories had either closed or began making things for the war effort.
Another large wildfire in September 1970 swept through Malibu Canyon. After the fire, a huge collection of Malibu Potteries tiles was found. No one knew about this collection except the owners' family. Most of the tiles were not damaged by the fire. By the mid-1970s, stories about this unique collection spread. Tiles began appearing in public places and private homes. Robert (Bob) Harris, who worked in the movie industry, loved the tiles' beauty. He bought a large part of the collection.
Malibu Ceramic Works: Recreating the Tiles

In 1979, Bob Harris started Malibu Ceramic Works in Topanga Canyon. He used his collection of original Malibu Potteries tiles for inspiration. He began the slow process of figuring out how to make Malibu tile again. The original tiles showed him what made them popular. This included their sizes, patterns, and especially their glaze colors and how they were applied. His goal was to make new tiles that were just as good as the originals.
About a year after Malibu Ceramic Works started, something big happened in Los Angeles. Another tile collector, David Greenberg, had also found tiles after the 1970 fire. He put his collection on display at the Craft and Folk Art Museum in Los Angeles. The exhibit opened in June 1980 and came with a colorful catalog. This event greatly increased public interest in Malibu Potteries and its beautiful ceramic products. This helped Malibu Ceramic Works become very successful.
Over time, Harris was able to copy almost all of the ceramic tiles and other items from Malibu Potteries. He developed new ways and techniques to do this. Some methods used modern technology, while others still relied on old-fashioned artisan skills. Today, many companies that make Malibu-style tiles use the methods and techniques that Harris recreated.
Original Tile Patterns


One famous original pattern is the 'Green Man' or 'Eternal Man' at the Adamson House in Malibu. A copy of this was made by creating a mold from the original fountain. This mold even included a working water spout. That clay mold is still used today to make new Green Man fountains. Many artists in the 21st century have also made their own versions of the 'Peacock' fountain. This is another very popular mural found in the back courtyard of the Adamson House. Even after being outside for many years, these early 20th-century tiles still have much of their original color and beauty.
How Malibu Tiles Are Made
Making the Clay Body

The first step in making ceramic tile is to create the clay body. This is the base on which colorful glazes are applied. Then, the tile is heated to a very high temperature in a special oven called a kiln. For the Spanish Revival style, a dark red clay is usually used. However, Malibu Potteries sometimes used a buff (light brown) colored clay.
Bob Harris later bought a tile factory in Long Beach, California. This factory made smaller "deco" (decorative) tiles. It also produced the traditional red floor tiles, which are a key part of the Malibu style. Malibu Potteries made many types of floor tiles. They came in different shapes and patterns, like hexagons and octagons. These were often arranged in geometric designs, from simple to complex. These patterns were common in old Saracen and Spanish floors. The floor tiles made by Malibu Ceramic Works are very similar to those from Malibu Potteries. Both are very hard and strong. This makes them great for places with lots of foot traffic, like floors, backsplashes, and stair risers.
Extruding Clay Shapes

Another way to make parts of ceramic tile in the Spanish Revival style is through a process called extrusion. In this method, unfired clay, usually dark red, is pushed with high pressure through a special die or mold. This creates a specific shape. After the clay pieces are extruded, they are either glazed and fired, or just fired. If they are just fired, they keep their dark red color.
The original Malibu Potteries catalog showed many shapes made this way. These included quarter rounds and bullnose pieces. These shapes are used to finish the edges of tiles or to help tiles change direction. You can see examples of these in pictures of benches and the Star fountain. Modern artists can make these original extruded pieces using machines like the Western Claymachinery, model SE10 extruding machine.
Silk Screening Patterns

Malibu Potteries was one of the first to use silk screening to apply the black outline (resist) to tiles. By the late 20th century, silk screening technology had improved a lot. This made it easier to copy Malibu tile designs consistently, compared to hand-painting each tile.
To create a silk screen, a black outline of the design is printed onto a clear sheet. This image is then "burned" onto a frame that holds a polyester sheet with a plastic-like liquid (emulsion) on it. When the emulsion is exposed to light, it dries and hardens. However, the emulsion directly under the black lines stays soft. When the silk screen is washed, the soft emulsion under the black lines washes away. This leaves a porous outline. A semi-liquid black line material can then be pushed through this porous outline onto a tile, usually with a squeegee. Good silk screens are very useful. Once made, the pattern can be applied to many tiles, and you can even change the colors for different projects.
Black Line Resist: The Cuerda Seca Style

Malibu Potteries often used hand-painted artwork and brushes to paint tiles. Today, artists have many tools that make creating images on tiles easier. One very useful tool is software like Adobe Photoshop. With these programs, artists can create black and white outlines. These outlines are used for the cuerda seca style of tile.
In the cuerda seca, or 'dry line' technique, an outline of a pattern is made on a tile. Wet ceramic glazes are then applied using squeeze bottles, like an ear dropper for babies. The black line creates a barrier, or "resist." This keeps the glazes inside the lines. When the tile is fired, the black lines also form a nice outline for the pattern. The exact recipe for the black line material is often a secret among artists. However, Malibu Potteries used "a finely pulverized manganese oxide mixed with a medium viscosity mineral oil." Today, many companies offer different water-based and oil-based products that work as a resist for glazes.
Making Glazes: Adding Color
One of the most noticeable things about original Malibu Potteries tiles is their bright and lively colors. Rufus Keller, who tested and created these ceramic glazes, kept his formulas in a personal notebook. He even wrote them in his own secret code!

At Malibu Potteries, the glazes were mixed in a special, secret room. It was known as the "holy of holies."
Today, much more is known about making ceramic glazes. Modern artists have successfully recreated the hundreds of colors and finishes that Rufus Keeler made. They have brought back the bright and vibrant colors often used in Malibu tile. These include bright orange, deep red, lush greens, yellows, and cobalt blue. Even with modern tools, creating custom colors and finishes needs a lot of testing. This is because the clay body and the ceramic glaze react with each other. Malibu Potteries offered many types of glazes, some glossy, some matte, and some crackled. Modern artists have now copied almost all of the glazes originally made by Malibu Potteries, and even created new ones. Some examples of these glazes are shown in the pictures below.
Applying Glazes

Old photographs show workers at Malibu Potteries, usually women, applying glazes to tiles that had resist patterns. Modern artists use almost the same method today. Tiles with resist lines are placed on a Lazy Susan (a spinning tray). Artists use squeeze bottles to apply the wet glaze onto the tile. Unfired glaze does not always look the same color as fired glaze. So, a diagram is usually nearby to show where each glaze color goes on the tile. Artists with steady hands and good focus create tiles with clean edges and few mistakes.
Firing Tiles in Kilns


Malibu Potteries built its factory in a beautiful spot, right next to the Malibu pier on the sandy beach. To make many tiles, Malibu Potteries used a huge kiln that ran on diesel fuel. Their firing process used a lot of fuel. They fired their tiles at 1900°F (about 1038°C) for 24 hours. Then, it took another full day for the tiles to cool down.
With today's technology, there are many types of kilns available, especially electric kilns. These kilns are more efficient and offer better control. Modern kilns use computer-like controllers. These make the firing process more predictable and easier to control than in the past. The user sets things like how fast the temperature rises to reach the final desired temperature. They also set how long the temperature stays at that point. Modern kilns do not need much knowledge of how a kiln works, nor do they need much watching.
Malibu Potteries tiles were fired at a very high temperature for a long time. Today's tiles are often fired at lower temperatures for a shorter time. Temperatures usually range from cone 06 (1816°F or 991°C) to cone 10 (2345°F or 1285°C). Cone 06 tiles are less hard. They are not as resistant to water or freezing. Cone 10 tiles reach vitrification, meaning they become very strong. These are great for floors, showers, and kitchens. For example, the tiles at the entrance to the Adamson House have been exposed to the sun and salty air since 1930. They still look bright and are structurally sound.
Where Malibu Tiles Are Used


Malibu style tiles are used in many different places. They are easy to spot if you know a little about them. The basic decorative tile, called a "deco," is usually square, either 4 by 4 inches or 6 by 6 inches. These tiles are often placed on archways, entryways, towers, balconies, loggias (covered walkways), and fountains. They help create a "Mediterranean ambiance" or feeling. Another type is the linear tile. Its pattern continues to the left and right. You might find these used as a border for a floor or on the top row of a wainscot (paneling on the lower part of a wall).
The poppy tiles show a common difference in how glazed colors are kept separate. One way is the cuerda seca technique, which uses a black line resist. The other is the cuenca or "tub tile" technique. In this method, a raised pattern is stamped into the wet tile. This raised pattern acts as a physical barrier to hold the glaze in place. The black line resist, on the other hand, relies on a chemical reaction between oil and water to keep the glazes separate.
Tile Benches
Malibu tiles are also used on benches. They are perfect for this because their surface is strong and usually smooth. This means the tiles can be used to create benches in many different places. These can be public or private, indoors or outdoors.
Tile Fountains
Fountains are another popular use for Malibu tile. These fountains come in many shapes, like the "star-fountain" at the Adamson House. Malibu tiles are known for their bright colors and patterns. They are also incredibly strong, resisting weather and constant water flow.
Tile Murals
Malibu tiles are also used to create beautiful murals. Malibu Potteries made many different murals. These ranged from the peacock fountain to art showing early Spanish settlers, like Spanish galleons and flamenco dancers. Designs varied from realistic figures to artistic patterns, such as the Spanish galleon at sunset. That mural is a copy of one at the Serra Retreat. The original was damaged by a fire that destroyed much of the retreat. It also ruined a large collection of Malibu Potteries tiles that May Rindge had stored there.
Gallery
-
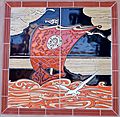
A modern copy of the Spanish Galleon mural.
-
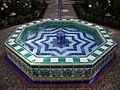
A modern star-fountain showing Islamic influence.
-
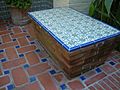
A modern bench using Malibu style tile and red brick.
-
The outdoor patio at the Adamson House.
-

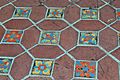
Modern use of terra cotta and small decorative tiles for a floor.
-
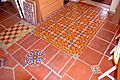
Modern use of mixed patterns in floor tile.


