
Battle of Mount Harriet facts for kids
Quick facts for kids Battle of Mount Harriet |
|||||||
|---|---|---|---|---|---|---|---|
| Part of Falklands War | |||||||
 Selected mountains in East Falkland |
|||||||
|
|||||||
| Belligerents | |||||||
| Commanders and leaders | |||||||
| Units involved | |||||||
|
3 Commando Brigade
|
4th Monte Caseros Regiment 12th Infantry Regiment |
||||||
| Strength | |||||||
| 400 Royal Marines, 170 Welsh Guards | 400 troops | ||||||
| Casualties and losses | |||||||
| 7 killed 30 wounded |
18 killed 300 captured |
||||||
The Battle of Mount Harriet was an important fight during the Falklands War. It happened on the night of June 11-12, 1982, between British and Argentine forces. This battle was one of three major attacks that night, helping the British take control of the high ground around Stanley. This victory was key to ending the war and led to the surrender of Argentine forces on the islands.
Contents
Preparing for Battle
The British forces were led by 42 Commando (42 CDO), a group of Royal Marines under Lieutenant Colonel Nick Vaux. They had help from artillery and engineers. Other groups like the Welsh Guards were ready to assist if needed. The British warship, HMS Yarmouth, also provided fire support from the sea.
The Argentine defenders on Mount Harriet were from the 4th Monte Caseros Infantry Regiment. They had set up strong positions. Before the main battle, soldiers on both sides faced very tough conditions, including bad weather and a lack of supplies.
Early Skirmishes and Patrols
Before the big attack, there were many smaller fights and patrols. British special forces and Royal Marines moved into the area to scout and secure important hills like Mount Kent. These early movements often led to clashes with Argentine patrols.
For example, on May 30, British troops landed near Mount Kent, one of the tallest peaks. They faced mortar fire and tracer rounds from Argentine soldiers. These early fights helped the British understand the Argentine defenses.
The weather was terrible, making it hard for soldiers to move their heavy gear. One corporal, Lou Armour, described it as "psychologically the toughest thing I'd ever done." Soldiers had to walk and fall through steep, slippery hills, carrying heavy loads. They also dealt with little sleep, cold, and sickness.
Tricking the Enemy
The British used clever tricks to confuse the Argentines. Some patrols were sent out to make it seem like the main attack would come from the west. Meanwhile, other secret patrols found a safe path through a minefield on the south side of Mount Harriet.
British snipers and naval guns also fired at the Argentine positions. This was done to bother the defenders and keep them from sleeping, making them tired before the real attack.
Clashes on Mount Wall
On June 3, a British patrol on Mount Wall met Argentine soldiers. Two Argentine soldiers were killed, and one was injured. This fight showed the British where some Argentine troops were hiding.
Later, on June 5-6, Argentine soldiers attacked the British observation post on Mount Wall, forcing the Royal Marines to leave. These small battles were important because they helped both sides learn about each other's strengths and weaknesses.
First Actions and Reinforcements
On June 8, British ships were attacked by Argentine aircraft at Bluff Cove. The Argentine commander, Lieutenant-Colonel Diego Alejandro Soria, wanted to attack the British landing area, but his request was denied.
That day, Argentine forces on Mount Harriet received more machine-gunners and mortar teams. On the night of June 8-9, British patrols tested the defenses on Mount Harriet and another nearby mountain called Two Sisters. The Argentines used radar to detect the British, and artillery fire forced them back.
A Fight at Port Harriet House
On June 9, Argentine soldiers found British troops at Port Harriet House, near Mount Harriet. The Argentines attacked, forcing the British to retreat. The British soldiers had to leave their gear behind and three were wounded.
Over a week, the Argentine 4th Regiment defended the area from several British patrols. Each time the British tried to probe their positions, the Argentines fought back, making the British pull back.
The Attack Plan
On the morning of June 11, the British attack plan was set. K Company of 42 Commando would attack the eastern side of Mount Harriet. L Company would attack the southern side an hour later. J Company would create a loud distraction on the western side. The goal was to capture Mount Harriet quickly.
As night fell on June 11, K and L Companies moved quietly around the mountain, through the minefield, to their starting points. At the same time, J Company, with help from the Welsh Guards, started their noisy "attack" from the west to draw attention away.
The Battle Begins

The battle for Mount Harriet began on the evening of June 11 with a powerful naval bombardment. This heavy shelling killed two Argentines and wounded twenty-five.
A British war reporter, John Witheroe, described the bombardment: "The whole mountain seemed to erupt in flame. It seemed impossible that anybody could survive an attack like that." He added that the shelling went on for over an hour before the Marines moved in.
The Argentines fired back with their own artillery, hitting British Gurkha soldiers in the Bluff Cove area and seriously wounding four.
Finding a Path Through the Minefield
During their patrols, the Royal Marines had found a secret path through a minefield that the Argentines had laid around Mount Harriet. This allowed the British companies to attack the Argentine positions from the rear, which was a big surprise for the defenders.
K Company's Advance
Captain Peter Babbington's K Company moved first. They climbed the mountain without being seen, even quietly taking out two sentries. They were not discovered until they reached the Argentine mortar positions and decided to attack. British warships and mortars helped them by firing on the Argentine positions.
During this fight, one British corporal, Laurence G Watts, was killed. The British fired over 1,000 artillery and mortar rounds to keep the Argentines pinned down. This made it hard for the defenders to aim properly at the attacking Royal Marines.
A British corporal, Steve Newland, bravely charged an Argentine machine gun position. He used grenades to destroy the machine gun and killed three Argentine soldiers. Even though he was shot in both legs, he helped capture 17 Argentines. For their bravery, Newland and two other corporals, Mick Eccles and Chrystie 'Sharky' Ward, received medals.
Many Argentine soldiers began to surrender, but some experienced officers and senior non-commissioned officers continued to fight. The Argentine commander ordered his men to counterattack, and heavy machine gun teams kept fighting from their positions.
L Company's Tough Fight
Captain David Wheen's L Company started their attack shortly after K Company. They immediately faced heavy machine-gun fire from Argentine soldiers defending the lower slopes. Several British soldiers were wounded, including Lieutenant Ian Stafford.
An IRN reporter with L Company, Kim Sabido, reported strong Argentine resistance: "Pinned down on the slopes by heavy machine gun and sniper fire, progress was painfully slow." He saw several men fall and others hit by shell fragments. He noted that the Argentines "were not giving up without a bitter fight."
The Argentine machine guns were finally silenced after being hit by anti-tank missiles and artillery. L Company took five hours to move just 600 meters because of the strong resistance. They faced fire from at least seven machine guns and rifle teams.
Before dawn, Lieutenant Jerry Burnell's 5 Troop of L Company moved towards Goat Ridge. They came under fire from Argentine soldiers covering their retreat and had to pull back. After more British mortar fire, 5 Troop moved forward again and captured three prisoners.
One determined Argentine soldier held up L Company with accurate shooting until he was killed by an anti-tank rocket. L Company continued their advance and captured Goat Ridge after the remaining Argentine soldiers withdrew.
After the Battle
The Battle of Mount Harriet was a success for the British. It showed good planning, clever tricks, and surprise attacks. This victory was another important step towards capturing Stanley.
Two Royal Marines, Corporal Laurence George Watts and Corporal Jeremy Smith, were killed in the battle. Thirty more were wounded. Seven Scots Guards and Gurkhas were also wounded by Argentine artillery fire.
Eighteen Argentine soldiers were killed defending Mount Harriet, including those from earlier patrols and shelling. The night battle lasted longer than expected, so the British couldn't capture Mount William under the cover of darkness as planned.
Some British reporters thought the Argentine soldiers were just young conscripts who gave up easily. However, Royal Marine Warrant Officer 2 John Cartledge, who fought in the battle, said the Argentines were good soldiers who fought well. He noted they used their tactics effectively and were well-prepared for an attack. He also mentioned that the Argentines had better night vision equipment than the British.
The British captured 300 prisoners on Mount Harriet. For their bravery, Lieutenant Colonel Nick Vaux received a high award, the Distinguished Service Order. Other soldiers also received medals for their courage during the attack.
Years later, in 2017, Captain David Wheen from L Company met Lautaro Jiménez-Corbalán, an Argentine officer he had fought against. They exchanged books and paintings about the battle, showing a spirit of reconciliation. In 2019, another British Marine, Andy Damstag, returned a helmet he had kept as a souvenir to an Argentine NCO he had helped during the battle.
Images for kids
-
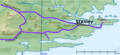
Selected mountains in East Falkland
-
Flag of the British Army
.svg)
