
Battle of Rorke's Drift facts for kids
Quick facts for kids Battle of Rorke's Drift |
|||||||
|---|---|---|---|---|---|---|---|
| Part of the Anglo-Zulu War | |||||||
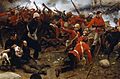
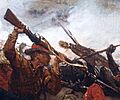
 The Defence of Rorke's Drift, by Alphonse de Neuville (1880) |
|||||||
|
|||||||
| Belligerents | |||||||
| Zulu Kingdom | |||||||
| Commanders and leaders | |||||||
|
Prince Dabulamanzi kaMpande | ||||||
| Strength | |||||||
|
3,000–4,000 Zulus:
|
||||||
| Casualties and losses | |||||||
|
351 confirmed killed about 500 wounded |
||||||
The Battle of Rorke's Drift, also known as the Defence of Rorke's Drift, was a famous fight during the Anglo-Zulu War. It happened on January 22–23, 1879. A small group of British and colonial soldiers defended a mission station called Rorke's Drift. They were attacked by a much larger force of Zulu warriors.
The British soldiers were led by Lieutenants John Chard and Gonville Bromhead. They had just over 150 men. The Zulu force had between 3,000 and 4,000 warriors. Even though the Zulus attacked many times, the small British group managed to hold them off. This battle is remembered for the incredible bravery shown by the defenders. Eleven Victoria Crosses, the highest award for bravery in the British military, were given to soldiers who fought there.
Contents
What Led to the Battle
Rorke's Drift was a mission station run by the Church of Sweden. It was also an old trading post. It was located near a crossing point (a "drift" or "ford") on the Buffalo River. This river was the border between the British colony of Natal and the Zulu Kingdom.
In January 1879, a large British army column, led by Lord Chelmsford, arrived at Rorke's Drift. They set up camp there. On January 11, the British army crossed the river into Zulu land. A small group of soldiers, led by Lieutenant Gonville Bromhead, stayed behind to guard Rorke's Drift. It had become a supply base and a hospital.
On January 20, Lord Chelmsford's main army marched to Isandlwana, about 10 kilometers away. They left the small group at Rorke's Drift. More local troops, called the Natal Native Contingent (NNC), were ordered to stay and help defend the post.

On January 22, Lieutenant John Chard arrived at Rorke's Drift. He was an engineer sent to fix bridges. Around noon that day, two survivors from the Battle of Isandlwana arrived. They brought terrible news: the main British army had been badly defeated by the Zulus at Isandlwana. They also warned that a large group of Zulu warriors was heading towards Rorke's Drift.
Lieutenant Chard, Lieutenant Bromhead, and a supply officer named James Langley Dalton quickly met. They had to decide what to do. Should they try to escape to a safer place, or should they stay and fight? Dalton pointed out that escaping with wounded soldiers would be very difficult. The Zulus would easily catch them in the open. So, they decided to stay and defend Rorke's Drift.
Getting Ready to Fight
Once the officers decided to fight, everyone at Rorke's Drift started working hard. They built a defensive wall using bags of grain (mealie bags), biscuit boxes, and crates of canned meat. This wall connected the storehouse, the hospital, and a strong stone cattle pen (kraal).
They also made the buildings stronger. They poked holes (called loopholes) in the outside walls so they could shoot from inside. They blocked the doors with furniture.
Around 3:30 p.m., about 100 local cavalry soldiers, called the Natal Native Horse (NNH), arrived. They had retreated from Isandlwana. They offered to guard a nearby hill called Oscarberg, where the Zulus were expected to come from.
Chard felt they had enough men to defend the station. He placed the British soldiers and some of the stronger hospital patients along the barricades. The NNC soldiers, who mostly had spears, were placed inside the stone cattle kraal.
The Zulu force coming towards Rorke's Drift was huge. It included three regiments of experienced warriors, plus a regiment of younger, unmarried men. In total, there were 3,000 to 4,000 Zulu warriors. These Zulus had not fought at Isandlwana, so they were fresh. Their goal was to cut off the British escape route back into Natal.

By 4:30 p.m., the Zulus had marched about 20 miles. They were ready to attack. Most Zulu warriors carried a short spear called an assegai and a shield made of cowhide. Some also had old guns, but they weren't very good at shooting. They preferred fighting up close with their spears.
The Zulu force was led by Prince Dabulamanzi kaMpande, who was the half-brother of the Zulu king. The king had ordered his warriors not to cross the border into British territory. But Prince Dabulamanzi was known for being aggressive, and he ignored this order. The attack on Rorke's Drift was an unplanned raid.
Around 4:00 p.m., a missionary and a chaplain came down from the Oscarberg hill. They reported that a large group of Zulus was very close. At this point, the missionary decided to leave to be with his family.
The Battle Begins

Around 4:20 p.m., the battle started. The NNH troopers on Oscarberg briefly fought the first Zulus. But they were tired and low on ammunition, so they rode off to a safer town called Helpmekaar. When the NNH left, many of the NNC soldiers also ran away, which greatly reduced the number of defenders.
With the Zulus almost at the station, the British garrison had only about 150 men left. Lieutenant Chard realized they needed to change their defenses. He ordered a new wall to be built through the middle of the post. This would allow them to abandon the hospital side of the station if needed.
At 4:30 p.m., the Zulus appeared from behind Oscarberg and attacked the south wall. The British soldiers opened fire when the Zulus were about 500 yards away.

Most of the Zulus moved to attack the north wall. Some took cover and fired from the Oscarberg terraces. The British soldiers on the barricades, including Dalton and Bromhead, were soon fighting hand-to-hand. The British wall was too high for the Zulus to climb easily. They tried to grab the defenders' rifles or stab them through the wall with their spears.
Fighting in the Hospital
Chard soon saw that the north wall could not be held. At 6:00 p.m., he pulled his men back into the main yard. This meant giving up the front rooms of the hospital. The hospital was becoming very dangerous. The loopholes, which were meant for shooting out, were now a problem. Zulus were grabbing rifles poking out or sticking their own weapons through the holes to fire inside.
Soldiers like Privates Alfred Henry Hook and John Williams were defending the hospital. They were running low on rifle ammunition, so they switched to revolvers. Private Joseph Williams defended a small window, and 14 dead Zulus were later found outside it.
As the Zulus took over the front of the hospital, John Williams started to break a hole through a wall with his bayonet. He was trying to create an escape route for the patients. As the door to the central room was about to break, he managed to pull two bedridden patients through the hole.

The room John Williams pulled the patients into had Private Hook and nine other patients. Hook bravely held off the Zulus while Williams continued to hack at the wall. An assegai hit Hook's helmet, stunning him.
Williams made the hole big enough for everyone to get into the next room. The roof was now on fire, making things even more urgent. After 50 minutes, the hole was large enough to pull all the patients through. Most of the men were now in the last room, defended by Privates Robert Jones and William Jones. From there, the patients climbed out a window and made their way to the main barricade.
Of the 11 patients, nine survived the escape to the barricade. All the able-bodied men also made it out. Four defenders were killed inside the hospital.
Final Defence
The evacuation of the burning hospital meant the British had a smaller area to defend. As night fell, the Zulu attacks became even stronger. The cattle kraal was attacked again and had to be abandoned by 10:00 p.m. The remaining men gathered in a small area around the storehouse. This was their last stand.
Throughout the night, the Zulus kept attacking. The attacks only started to slow down after midnight, finally ending around 2:00 a.m. After that, the Zulus kept up some harassing fire with their guns until 4:00 a.m.
By then, the British garrison had lost 14 men. Two more were badly wounded and later died, and eight others, including Dalton, were seriously hurt. Almost every soldier had some kind of wound. They were all extremely tired, having fought for about 10 hours. They were also running very low on ammunition. Out of 20,000 rounds they had at the start, only 900 were left.
After the Battle
When dawn broke, the British saw that the Zulus were gone. Only the dead and severely wounded remained on the battlefield. British patrols went out to look for rifles and any survivors.
Around 7:00 a.m., a group of Zulus suddenly appeared again. The British quickly got back into their positions. However, no attack happened. The Zulus had been marching for six days and hadn't eaten properly for two. Many of them were wounded, and they were days away from any supplies. Soon after appearing, the Zulus left.
Around 8:00 a.m., another force appeared. The defenders again prepared to fight. But this time, it was Lord Chelmsford's relief column, coming to help them.
At the end of the fighting, 351 Zulus were found dead on the battlefield. Only 17 British soldiers were killed, but almost every man in the garrison had been wounded.
Awards for Bravery
Eleven Victoria Crosses were given to the defenders of Rorke's Drift. This is the highest award for bravery in the British military. Seven of these went to soldiers of the 2nd/24th Foot regiment. This was the most VCs ever given to one regiment for a single battle. Four Distinguished Conduct Medals (DCMs) were also awarded.
Some people believe that so many awards were given to celebrate the victory at Rorke's Drift. This helped to distract the public from the big defeat at Isandlwana that happened earlier.

Victoria Cross Recipients
- Lieutenant John Rouse Merriott Chard, Royal Engineers
- Lieutenant Gonville Bromhead, 24th (The 2nd Warwickshire) Regiment of Foot
- Corporal William Wilson Allen, 2nd/24th Foot
- Private Frederick Hitch, 2nd/24th Foot
- Private Alfred Henry Hook, 2nd/24th Foot
- Private Robert Jones, 2nd/24th Foot
- Private William Jones, 2nd/24th Foot
- Private John Williams, 2nd/24th Foot
- Surgeon-Major James Henry Reynolds, Army Medical Department
- Acting Assistant Commissary James Langley Dalton, Commissariat and Transport Department
- Corporal Christian Ferdinand Schiess, 2nd/3rd Natal Native Contingent
At the time, the Victoria Cross could not be given to someone who had died. Private Joseph Williams, who fought bravely in the hospital, was killed during the battle. His commanders said he would have received the Victoria Cross if he had lived.
-

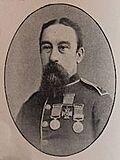
John Chard, VC, as a lieutenant-colonel
-
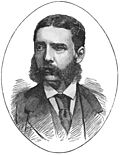
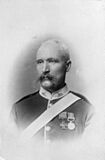
Lieutenant Gonville Bromhead,VC
-
Corporal William Allen,VC [right foreground] handing cartridges to Lt Chard
-
Private Frederick Hitch, VC
-
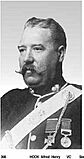
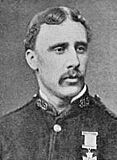
Private Henry Alfred Hook, VC
-

Private Robert Jones, VC
-
Private William Jones, VC
-
Private John Williams,VC
-
Surgeon-Major James Henry Reynolds,VC
-
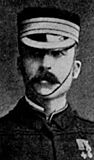
Corporal Ferdinand Schiess, VC


Distinguished Conduct Medal Recipients

- Gunner John Cantwell, Royal Horse Artillery
- Private John William Roy, 1st/24th Foot
- Colour Sergeant Frank Edward Bourne, 2nd/24th Foot
- Second Corporal Francis Attwood, Army Service Corps
Memorials and Legacy
A memorial was built at Rorke's Drift shortly after the battle. A cemetery was also created where the soldiers who died were buried.
Today, the Rorke's Drift Battlefield in KwaZulu Natal, South Africa, is a popular place for tourists to visit. It has guides and set hours.
How Rorke's Drift is Remembered

The Battle of Rorke's Drift has been shown in many artworks and stories. Famous military painters like Elizabeth Butler and Alphonse de Neuville created paintings of the battle in 1880. These paintings were very popular in the British Empire.
The film Zulu (1964), produced by Stanley Baker, tells the story of the Battle of Rorke's Drift. The movie was very popular, but some parts are not completely accurate. For example, the regiment in the movie is called the South Wales Borderers, but the unit wasn't officially called that until two years after the battle. Also, many of the soldiers in the 24th Regiment were English, Irish, or Scottish, not just Welsh.
The Swedish power metal band Sabaton wrote a song called "Rorke's Drift" for their 2016 album The Last Stand. There is also a tabletop war-game based on the battle called Zulus on the Ramparts!.
See also
- Military history of South Africa
- Rorke's Drift Art and Craft Centre
- Rorke's Drift (video game)
