
Battle of the Denmark Strait facts for kids
Quick facts for kids Battle of the Denmark Strait |
|||||||
|---|---|---|---|---|---|---|---|
| Part of Operation Rheinübung | |||||||
 Bismarck firing at HMS Prince of Wales on 24 May 1941 |
|||||||
|
|||||||
| Belligerents | |||||||
| Commanders and leaders | |||||||
|
|
||||||
| Strength | |||||||
|
1 battleship 1 battlecruiser 2 heavy cruisers
Did not participate in combat:
|
||||||
| Casualties and losses | |||||||
|
|
||||||
The Battle of the Denmark Strait was a major sea battle during World War II. It happened on May 24, 1941. Ships from the British Navy (Royal Navy) fought against ships from the German Navy (Kriegsmarine).
The British battleship HMS Prince of Wales and the battlecruiser HMS Hood faced off against the German battleship Bismarck and the heavy cruiser Prinz Eugen. The German ships were trying to get into the North Atlantic Ocean. Their goal was to attack Allied merchant ships carrying supplies to Britain. This plan was called Operation Rheinübung. They planned to go through the Denmark Strait, a narrow sea passage between Greenland and Iceland.
Just under 10 minutes after the British ships started firing, a shell from Bismarck hit Hood. It struck near her rear ammunition storage areas. Soon after, Hood exploded and sank in only three minutes. Almost all of her crew were lost. Prince of Wales kept fighting Bismarck, but her main guns had serious problems. The British battleship was very new, finished only in March 1941. Her new four-gun turrets were not working well. Prince of Wales soon stopped fighting and pulled away.
The battle was a win for the Germans in terms of ships sunk. However, the damage to Bismarck's front fuel tanks forced the Germans to change their plan. They had to try and escape to a dry dock in France to fix the ship. This gave the British a big win in the overall plan. The British were very angry about losing Hood. A large British force chased Bismarck, which led to its sinking three days later.
Contents
Why the Battle Happened

German Plans to Attack Shipping
In April 1941, the German Navy wanted to send their new fast battleship, Bismarck, into the Atlantic Ocean. Their goal was to attack convoys. Convoys were groups of merchant ships traveling together with naval escorts. These convoys carried vital supplies from North America to Britain. This operation was meant to help the U-boat (German submarine) attacks on British supply lines during the Battle of the Atlantic.
Other German battleships like Scharnhorst and Gneisenau had just finished a similar mission. But these ships were now damaged or needed repairs. Bismarck's sister ship, Tirpitz, was not ready for action yet. Heavy cruisers like Admiral Hipper and Admiral Scheer were also being repaired.
Admiral Günther Lütjens was the commander for this mission, called Operation Rheinübung. He wanted to wait until more German warships were ready. But the German Naval High Command told him to start the mission as soon as possible. They wanted to keep pressure on Britain's supply lines. So, the only ship available to support Bismarck was the heavy cruiser Prinz Eugen.
British Plans to Stop the Germans
The British Navy found out about Bismarck's plan. A Swedish cruiser spotted the German ships on May 20. This report reached the British Admiralty (the Navy's headquarters). British spy planes then confirmed the German ships were in Norway.
Knowing that major German warships were trying to get into the Atlantic, the British Navy sent out ships to patrol likely routes. The heavy cruisers HMS Norfolk and Suffolk were sent to guard the Denmark Strait. Another group, led by Vice-Admiral Lancelot Holland on Hood, waited south of Iceland. This group included the battleship Prince of Wales, the battlecruiser Hood, and six destroyers.
Norfolk and Suffolk spotted Bismarck and Prinz Eugen on the evening of May 23. Suffolk had radar, which allowed them to follow the German ships all night. They stayed far enough away to avoid being hit by German guns.
Prince of Wales was a very new battleship. She was similar in size and power to Bismarck. However, she had not been fully tested, and her crew was not very experienced. She still had mechanical problems, especially with her main guns. Shipyard workers were still on board trying to fix things.
For 20 years, Hood was the biggest and heaviest warship in the world. She had eight powerful 15-inch guns and was faster than any battleship. Hood was the pride of the British Navy. But Hood had a weakness: as a battlecruiser, she had less armor than a battleship. Her armor was good against shells hitting her sides. But her deck armor was thin, making her vulnerable to shells falling from above (plunging fire).
Hood was supposed to get an armor upgrade in 1939. This would have doubled her deck armor. But World War II started, so the upgrade never happened. This meant Hood was at a big disadvantage against newer enemy warships.
Admiral Sir John Tovey, Holland's superior, knew about Hood's weak armor. He thought about ordering Prince of Wales to sail in front of Hood. This way, the better-protected Prince of Wales could take the hits from the German battleships. But Tovey decided not to give the order, saying he didn't want to interfere with a senior officer.
Getting Ready for Battle


Plans Go Wrong
The German Navy hoped Bismarck and Prinz Eugen would enter the Atlantic without being seen. They thought they could sneak through the Denmark Strait. However, people watching from Denmark and Sweden spotted the German ships as they left German waters. These reports were sent to British intelligence.
When Bismarck and Prinz Eugen stopped in Norway for fuel, British spy planes kept watch. This meant the British knew exactly where the German ships were and when they were moving.
Admiral Holland's battle plan was for Hood and Prince of Wales to fight Bismarck. Meanwhile, Suffolk and Norfolk would fight Prinz Eugen. Holland thought Prinz Eugen was behind Bismarck. He told Captain John C. Leach of Prince of Wales about his plan. But he did not radio Frederic Wake-Walker, who commanded Suffolk and Norfolk. Holland wanted to keep radio silence so the Germans wouldn't know his location.
Holland hoped to meet the enemy around 2:00 AM. At this time, the sun would be setting, making Bismarck and Prinz Eugen easy to see against the glowing sky. Hood and Prince of Wales could approach quickly in the darkness. This would let them get close enough so Hood wouldn't be hit by plunging fire. The Germans wouldn't expect an attack from this direction, giving the British a surprise advantage.
This plan depended on Suffolk always keeping track of the German ships. But Suffolk lost contact at 12:28 AM. For 90 minutes, Holland didn't see the German ships or hear from Norfolk or Suffolk. Holland reluctantly ordered Hood and Prince of Wales to turn south-southwest. He sent his destroyers to keep searching north.
Even though Suffolk lost contact, it was only for a short time. The German ships were trapped between the Greenland ice and a British minefield near Iceland. The British knew the German ships were coming. So, they had ships waiting at both ends of the Denmark Strait.
Just before 3:00 AM, Suffolk found Bismarck again. Hood and Prince of Wales were about 35 miles away, slightly ahead of the Germans. Holland ordered his ships to steer towards the Germans and speed up. Suffolks temporary loss of contact put the British at a disadvantage. Instead of a fast, head-on approach, they had to approach at a wider, slower angle. This left Hood exposed to Bismarcks plunging shells for much longer.
The situation got worse at 3:20 AM. Suffolk reported that the Germans had turned west. This put the German and British ships almost side-by-side.
At 5:35 AM, lookouts on Prince of Wales spotted the German ships about 17 miles away. The Germans had already detected the British using their underwater listening equipment (hydrophones). They saw the smoke and masts of the British ships 10 minutes later. Holland could have waited for Admiral Tovey's fleet to arrive. But he chose to attack at 5:37 AM. The rough seas meant the destroyers couldn't do much. Norfolk and Suffolk were too far behind to join the main battle.
The Battle Begins
First Shots Fired
Hood opened fire at 5:52 AM from about 26,500 yards away. Holland had ordered his ships to fire at the leading German ship, Prinz Eugen. He thought it was Bismarck. Holland soon changed his order, telling both ships to fire at the rear ship, Bismarck. Prince of Wales had already correctly identified and fired at Bismarck. But Hood is believed to have kept firing at Prinz Eugen for some time.
Holland was an expert in gunnery. He knew the danger of Hoods thin deck armor against plunging fire. So, he wanted to get closer to the German ships quickly. At shorter ranges, Bismarcks shells would fly flatter. This would make them more likely to hit the side armor or bounce off the top deck, instead of going straight through the deck armor.
Holland approached at an angle that meant only 10 of the 18 British heavy guns could aim at the Germans. This also made the British ships a bigger target. One of Prince of Wales' front guns stopped working after the first shot, leaving only 9 guns firing. Suffolk and Norfolk tried to join the fight but were too far away.
The Germans also had an advantage because the British ships were steaming into the wind. Spray from the waves made it hard for the British gunners to see through their rangefinders. Holland kept Prince of Wales close to Hood. This made it easier for the Germans to figure out the range to both British ships.
Prince of Wales hit Bismarck first. She hit Bismarck three times. One shell hit a boat and damaged the seaplane catapult. Another shell went through the bow (front) of the ship without exploding. The third shell hit underwater and exploded inside Bismarck. This caused flooding in a generator room and damaged a wall to a boiler room, partly flooding it too. These hits damaged Bismarck's machinery and caused medium flooding. The hit also cut a steam line and wounded five German crew members.
The damage to Bismarck's bow meant she couldn't use about 1,000 tons of fuel in the front tanks. It also caused Bismarck to leave an oil slick and reduced her speed by 2 knots. Bismarck soon leaned 9 degrees to the left side and sat 2 meters lower in the water at her bow.

The Germans waited until 5:55 AM to fire. Both German ships fired at Hood. Bismarck's captain, Ernst Lindemann, impatiently ordered his ship to open fire.
A shell hit Hood's boat deck, starting a fire in a small ammunition storage area. But this fire did not cause the later explosion. It's possible Hood was hit again near her bridge and radar. There has been debate about which German ship hit Hood. Prinz Eugen was firing at Prince of Wales, but its gunnery officer said they were targeting Hood.
The Sinking of Hood

At 6:00 AM, Holland ordered his ships to turn left again. This would allow the rear main guns on both Hood and Prince of Wales to aim at the German ships. This would give the British 18 large guns (10 on Prince of Wales, 8 on Hood) against Bismarck's 8 guns.
As Hood was turning, a group of shells from Bismarck hit near her mainmast. Bismarck was about 9 miles away. Men on Prince of Wales saw a huge pillar of flame shoot up "like a giant blowtorch" from Hood's mainmast area.
This was followed by a massive explosion. It destroyed a large part of the ship from the middle all the way to the back. Both rear gun turrets were blown into the sea. The ship broke in two, and the stern (back part) sank first. Ted Briggs, one of only three survivors, said Hood leaned 30 degrees, and they knew "she just wasn't coming back." The bow (front part) rose out of the water, pointed up, spun around, and sank shortly after the stern. The front guns fired one last time while the bow was upright, possibly by the doomed gun crew.
Pieces of the explosion rained down on Prince of Wales, which was half a mile away. Hood sank in about three minutes. 1,415 crew members were lost. Only Ted Briggs, Bob Tilburn, and Bill Dundas survived. They were rescued two hours later by the destroyer HMS Electra.
The British Navy later concluded that Hood most likely sank because a 15-inch shell from Bismarck hit her ammunition magazines. This caused the explosion. Recent studies of the wreckage suggest the first explosion was in the rear 4-inch ammunition magazine. This explosion then spread to the 15-inch magazines through ammunition passages.

The wreck of Hood, found in 2001, showed the bow section was missing much of its structure. A huge part of her side was gone. The middle section had its metal plates curled outwards. Also, large parts of the front structure, including the heavy conning tower, were found about 1.1 kilometers away from the main wreckage. This led to theories that the front 15-inch magazines also exploded. However, marine scientists believe the damage to the front hull was caused by the ship sinking very quickly.
Prince of Wales Alone
Prince of Wales found herself heading towards the sinking Hood. Her commanding officer, Captain Leach, ordered an emergency turn to avoid the wreckage. This sudden turn messed up her aim and made her an easier target for the Germans. She then returned to her course but was now being fired at by both German ships.
Prince of Wales was hit four times by Bismarck and three times by Prinz Eugen. One shell went through her upper structure, killing or wounding several crew members. Pieces of another shell hit her radar room, killing the crew inside.
A 20.3 cm shell from Prinz Eugen hit below the rear 5.25-inch gun turrets. A 38 cm shell from Bismarck hit underwater below the armor belt. It went about 13 feet into the ship's hull but was stopped by the anti-torpedo wall. Luckily for Prince of Wales, neither shell exploded. But she still had minor flooding and lost some fuel.
By this time, serious problems with Prince of Wales' main guns had reduced their firing power by 26%. Captain Leach decided that continuing the battle would risk losing Prince of Wales without hurting the enemy more. So, he ordered the ship to make smoke and pull away. Prince of Wales turned away just after 6:04 AM. She fired from her rear turret until it jammed, cutting off ammunition.
Despite efforts to fix the gun, it took until 8:25 AM for all four guns to be working again. Two guns were ready by 7:20 AM. This left only five 14-inch guns working for a while. The last shots fired were messy and likely missed. The ship left the battle around 6:10 AM. Thirteen of her crew had been killed, and nine were wounded. Prince of Wales was lucky to withdraw when she did, as she was about to enter torpedo range of Prinz Eugen.
Ending the Fight
On Bismarck, there was great joy at the sinking of Hood. The crew expected to chase Prince of Wales and sink her too. Captain Lindemann asked Admiral Lütjens for permission to do this. Even if Admiral Tovey's fleet had left the day before, they would still be over 300 miles away.
But Lütjens refused to let Lindemann chase Prince of Wales. He gave no explanation. Lindemann asked again, more strongly. Lütjens had strict orders from the German Naval Commander, Grand Admiral Erich Raeder. These orders told him to avoid unnecessary fights with the British Navy. Especially if it could damage Bismarck and lead to her being caught by the British.
So, Lütjens stopped the battle instead of chasing Prince of Wales. He ordered a course of 270 degrees, due west. Bismarck had fired 93 of her armor-piercing shells during the fight.
This disagreement between the two German officers showed their different roles. Lindemann, as captain of Bismarck, was a tactician. He believed his ship's goal was to destroy Prince of Wales. Lütjens, as fleet commander, thought about the bigger picture. His orders were clear: attack merchant ships, not risk big battles with enemy warships.
However, Raeder had also told Lütjens to be bold and fight hard if a battle couldn't be avoided. The truth was, Lütjens' orders didn't cover such a big success like sinking Hood. So, he stuck to his main instructions: sink merchant ships and avoid fighting warships if possible.
Even if Lütjens had known he was fighting the new Prince of Wales and not the more powerful King George V, he probably would have made the same choice. Chasing Prince of Wales would have meant more gunfire and torpedo attacks from Norfolk and Suffolk. He would have risked his ships for something his orders forbade. Also, Prince of Wales was still able to fight, despite the damage.
Between 6:19 AM and 6:25 AM, Suffolk fired six times at Bismarck's direction. But she was too far away.
What Happened Next

After Holland died, Frederic Wake-Walker on Norfolk took charge of Prince of Wales. He now had to deal with Bismarck until more British warships could arrive. He could either keep fighting Bismarck or make sure she was tracked until other heavy ships could attack. Wake-Walker chose to keep tracking the German ships. He believed more fighting would hurt Prince of Wales more than Bismarck. He also knew Admiral Tovey was on his way. He ordered Prince of Wales to follow Norfolk as fast as possible. At 7:57 AM, Suffolk reported that Bismarck had slowed down and seemed damaged.
All six of Bismarck's damage control teams worked to fix the damage. When it was reported that the tips of the starboard propeller could be seen above water, Lindemann ordered water to be pumped into two rear compartments to balance the ship. He then sent divers to connect the front fuel tanks, which held 1,000 tons of much-needed fuel, to the rear fuel tank using a temporary pipe over the upper deck.
Both these attempts failed. Lindemann then asked to slow Bismarck down and tilt the ship from side to side. This would allow them to weld patches from the inside to the holes in the front hull. Lütjens refused. Eventually, he had to agree to slow the ship to 22 knots. This allowed hammocks and collision mats to be stuffed into the holes of Boiler Room No. 2 and the auxiliary boiler room to stop the growing water leak. This attempt also failed. Boiler Room No. 2 was shut down, reducing the ship's speed to 28 knots.
Besides taking on seawater, Bismarck was leaking fuel oil. Lütjens ordered Prinz Eugen to fall back and see how much of a trail she was leaving. The oil slick was wide, colorful, and smelled strong. All of this helped the British find Bismarck's location.
The damage to Bismarcks front fuel tanks, plus missing a chance to refuel in Norway earlier, left her with less than 3,000 tons of fuel. This was not enough to effectively attack Atlantic convoys. The element of surprise, which was key to the mission, was gone. The German ships were still being followed by Wake-Walker's squadron. Lütjens decided he needed to stop Bismarcks mission and head to a dockyard for repairs.
The question was which dockyard to go to. The closest friendly ports were in Norway, over 1,000 miles away. Going there meant sailing near Iceland, where British air forces were now fully aware of their presence. Lütjens knew his intelligence was not reliable. He had been told Hood was off West Africa, and there were no reports of a King George V-class battleship nearby.
Lütjens ignored Lindemann's advice to return to Norway. He ordered Bismarck to head for the French port of Saint-Nazaire. Prince of Wales chased for several hours and fought again a few times before the German ships got away. Although the French coast was 600 miles further than Norway, Saint-Nazaire offered longer nights and wider seas to shake off Bismarck's followers. It also offered the chance to lure them across a line of U-boats. Once repaired, Bismarck would be close to British trade routes. She could also get support from the battleships Scharnhorst and Gneisenau, which were in France.
Lütjens sent the undamaged Prinz Eugen to continue raiding on her own. The cruiser went further south into the Atlantic. She refueled at sea but then had engine trouble. She gave up her mission without sinking any merchant ships and made it to France.
Reactions to the Battle
German Reaction
News of Lütjens' decision shocked people in Berlin and other German cities. While the Berlin Admiralty was happy about the success, they were worried about Bismarck's damage and the decision to go to France. Grand Admiral Raeder was not sure if Lütjens planned to go to Saint-Nazaire right away or after shaking off his pursuers.
Raeder talked with his chief of staff, Admiral Otto Schniewind. Schniewind then called Admiral Rolf Carls, who commanded Group North. Carls had already written a message to call Lütjens back to Germany, but hadn't sent it. Schniewind pointed out that Lütjens had crossed a line, meaning he was no longer under Carls' command. A call to Admiral Alfred Saalwächter, who commanded Group West, showed he didn't plan to recall Lütjens.
Raeder was against recalling Lütjens himself. He told Schniewind they didn't know enough about the situation. He then called Adolf Hitler. Hitler received the news of Hood's sinking calmly, showing no great joy.
However, Dr. Joseph Goebbels''' Propaganda Ministry used the news of Hoods destruction with great excitement. That evening, it was broadcast to the nation. The German public, already happy about German air force victories, cheered the news of Hoods sinking.
British Reaction
The British public was shocked that their most famous warship had been destroyed so quickly. More than 1,400 crew members were lost. The British Navy sent every available warship in the Atlantic to hunt down and destroy Bismarck. The British forces chased Bismarck and fought her again. The German battleship was sunk on the morning of May 27.
Later, there were talks about putting Wake-Walker and Captain John Leach of Prince of Wales on trial. Some thought they were wrong not to keep fighting Bismarck after Hood sank. Admiral John Tovey, Commander-in-Chief of the Home Fleet, was very upset by this criticism. He argued that the two officers had acted correctly. They made sure the German ships were tracked and didn't risk their own ships unnecessarily. Also, Prince of Wales' main guns had problems and couldn't have matched Bismarck. Tovey threatened to resign and speak as a witness for the defense at any trial. The idea of a court-martial was then dropped.
A British investigation quickly looked into why Hood exploded. After some criticism, a second, more thorough investigation was done. It also concluded that a 15-inch shell from Bismarck caused the explosion of Hood's rear ammunition magazines. This led to older British warships getting more protection for their ammunition magazines and other improvements.
Many naval historians have studied the Bismarck battle. They have discussed the decisions made by the commanders. One of the most debated decisions is Lütjens' choice to continue into the Atlantic instead of keeping up the fight.
Similarities to the Battle of Jutland
There are some similarities between Holland's actions in this battle and those of Admiral David Beatty at the start of the Battle of Jutland in World War I. Holland seemed to feel he had to fight Bismarck right away. He didn't want to just track her and wait for more British ships. Beatty also felt he needed to fight German Admiral Franz Hippers battlecruisers instead of leading them towards Admiral John Jellicoes main fleet.
Both Holland and Beatty had more heavy ships than their opponents. But their ships were not as effective in fighting. Also, how Holland arranged his ships was similar to Beatty at Jutland. Both Beatty and Holland attacked when the German ships were too far forward. This meant the middle and rear guns of their ships could barely fire. Holland's ships couldn't use their rear guns until the final turn just before Hood sank.
Beatty put his less-armored battlecruisers at the front of his line. He kept the more powerful and better-armored battleships in the back. Holland did the same, putting the old and vulnerable Hood ahead of the better-armored (but new and untested) Prince of Wales. Both admirals kept tight control over their ships from their flagships. This stopped Captain Leach from moving Prince of Wales on her own. A different approach might have confused the Germans.
Ships Involved
Note: The British escorting destroyers were ordered to the battle area as part of the forces sent to stop the German ships. They were sent away the evening before the battle.
German Ships
- German battleship Bismarck
- German heavy cruiser Prinz Eugen
British Ships
- The British battleship Prince of Wales.
- The British battlecruiser HMS Hood
- The British heavy cruisers HMS Suffolk, Norfolk
- The British destroyers HMS Achates, Antelope, Anthony, Echo, Electra, Icarus
Images for kids
-
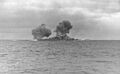
Bismarck firing at HMS Prince of Wales on 24 May 1941
-

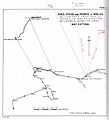
The setting of the battle, at top centre. German movements are in red, British in black, modern boundaries are shown.
-
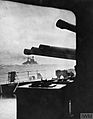
The last picture of Hood as a fighting unit. The four guns in the foreground are those of Prince of Wales's 'A' turret.
-
The original track chart of HMS Prince of Wales for the battle of the Denmark Strait, with manuscript additions
-
A modern reconstruction showing a 14-inch shell from HMS Prince of Wales penetrating Bismarck's bow.
-
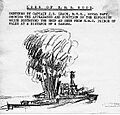
A sketch prepared by Captain JC Leach (commanding HMS Prince of Wales) for the 2nd Board of Enquiry, 1941. The sketch represents the column of smoke or flame that erupted from the vicinity of the mainmast immediately before a huge detonation which obliterated the after part of the ship from view. This phenomenon is believed to have been the result of a cordite fire venting through the engine-room ventilators (see article).
-
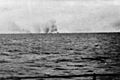
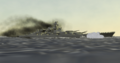
A photo taken from the Prinz Eugen shows the Hood exploding in the far distance with the Prince of Wales nearby
-
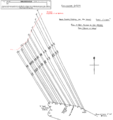
The original gunnery plot of HMS Prince of Wales for the battle of the Denmark Strait. This shows the ranges and bearings of the 18 salvos fired by Prince of Wales under director fire control between 05:53 and 06:02. Three salvos fired by "Y" turret under local control are not shown. The track of Bismarck (in red) is a post-battle estimate.
-
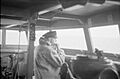
Captain Robert Meyric Ellis of Suffolk remains on the bridge for lunch whilst shadowing Bismarck.

