
British Expeditionary Force order of battle (1940) facts for kids
The British Expeditionary Force, or BEF, was a group of British soldiers sent to France at the start of World War II. This article lists all the different units and their commanders in the BEF on May 9, 1940. This was just one day before Germany launched a huge attack, starting the Battle of France. Knowing how the army was set up helps us understand what happened next.
Contents
- The Main Army Setup
- First Expeditionary Force Details
- Air Component
- Second Expeditionary Force
- Images for kids
- See also
The Main Army Setup

The BEF was led by General John Vereker, 6th Viscount Gort. It was organized into several large groups called Corps, and also included individual divisions and special forces.
- First Expeditionary Force
- 5th Infantry Division (led by Major-General Harold Franklyn)
 I Corps (led by Lieutenant-General Michael Barker)
- 1st Infantry Division (Major-General Harold Alexander)
- 2nd Infantry Division (Major-General Henry Charles Loyd)
- 48th (South Midland) Infantry Division (Major-General Andrew Thorne)
 II Corps (led by Lieutenant-General Alan Brooke)
- 3rd Infantry Division (Major-General Bernard Montgomery)
- 4th Infantry Division (Major-General Dudley Johnson)
- 50th (Northumbrian) Motor Infantry Division (Major-General Giffard Martel)
 III Corps (led by Lieutenant-General Sir Ronald Forbes Adam)
- 42nd (East Lancashire) Infantry Division (Major-General William Holmes)
- 44th (Home Counties) Infantry Division (Major-General Edmund Osborne)
- Saar Force (Major-General Victor Fortune)
- 51st (Highland) Infantry Division (Major-General V. M. Fortune)
- Other formations
- Air Component (the air force part)
- Second Expeditionary Force (units sent later)
First Expeditionary Force Details
General Headquarters (GHQ)
The General Headquarters (GHQ) was like the main control center for the entire BEF.
- The top commander was General John Vereker, 6th Viscount Gort.
- His Chief of Staff, who helped him plan everything, was Lieutenant-General Sir Henry Royds Pownall.
- Other important leaders managed things like soldiers' pay, supplies, and engineering.
GHQ Support Units
The GHQ had many special units to help the army run smoothly. These included:
- Signal units for communication (like radio and telephone).
- Reconnaissance units, like the 12th Royal Lancers, to scout ahead.
- Machine-gun battalions for extra firepower.
- Pioneer battalions, who were like construction workers, building and repairing things.
- Medical units, including field hospitals and ambulance convoys.
- Military Police to keep order.
- Supply and transport companies to make sure food, fuel, and equipment reached the troops.
Armoured Brigades
These brigades were groups of tanks and armored cars.
- 1st Light Armoured Reconnaissance Brigade
- Used fast armoured cars for scouting.
- 2nd Light Armoured Reconnaissance Brigade
- Also used armoured cars.
- 1st Army Tank Brigade
- Used heavier infantry and cavalry tanks for fighting.
Artillery Command
The Commander Royal Artillery was in charge of all the big guns.
- They had many different types of artillery regiments, including:
- Medium and Heavy Regiments: These fired large shells over long distances.
- Super-Heavy Regiments: These had the biggest guns for destroying strong enemy positions.
- They also had Anti-Aircraft Brigades to protect against enemy planes:
- 1st Anti-Aircraft Brigade
- 2nd Anti-Aircraft Brigade
- 3rd Anti-Aircraft Brigade
- 4th Anti-Aircraft Brigade
- 5th Searchlight Brigade: These units used powerful searchlights to spot enemy aircraft at night.
Engineer Command
The Commander Royal Engineers, Major-General Ridley Pakenham Pakenham-Walsh, was in charge of all engineering tasks.
- Their units built bridges, repaired roads, cleared obstacles, and sometimes even dug tunnels.
- They also had special units for things like mapping (Field Survey Company) and chemical warfare defense.
5th Infantry Division
This division was led by Major-General Harold Franklyn.
- It included three main infantry brigades:
- 13th Infantry Brigade
- 17th Infantry Brigade
- Each brigade had several battalions of soldiers, plus an anti-tank company to fight enemy tanks.
- The division also had its own artillery, engineers, medical teams, and supply units to support its soldiers.
I Corps
I Corps was a large group of divisions led by Lieutenant-General Michael Barker.
- It had its own signal units, machine-gun battalions, and various support companies for supplies, transport, and medical care.
- The engineers within I Corps included field companies for construction and repair, and even a "General Construction Group" for bigger building projects.
- The artillery for I Corps included field, medium, and heavy regiments, as well as anti-aircraft units.
1st Infantry Division
This division was led by Major-General Harold Alexander.
- It had three infantry brigades:
- 1st (Guards) Infantry Brigade
- 2nd Infantry Brigade
- 3rd Infantry Brigade
- Like other divisions, it had its own artillery, engineers, and support services.
2nd Infantry Division
Led by Major-General Henry Charles Loyd.
- Its infantry brigades were:
- 4th Infantry Brigade
- 5th Infantry Brigade
- 6th Infantry Brigade
- It also had its own artillery, engineers, and support units.
48th (South Midland) Infantry Division
This division was led by Major-General Andrew Thorne.
- Its infantry brigades included:
- 143rd Infantry Brigade
- 144th Infantry Brigade
- 145th Infantry Brigade
- It had its own artillery, engineers, and support services.
II Corps
II Corps was another large group of divisions, led by Lieutenant-General Alan Brooke.
- It had its own signal units, machine-gun battalions, and a wide range of support services, similar to I Corps.
- The engineers and artillery units within II Corps were also extensive, providing specialized support to the divisions under its command.
3rd Infantry Division
This division was famously led by Major-General Bernard Montgomery, who would become a very important commander later in the war.
- Its infantry brigades were:
- 7th (Guards) Infantry Brigade
- 8th Infantry Brigade
- 9th Infantry Brigade
- It had its own artillery, engineers, and support units.
4th Infantry Division
Led by Major-General Dudley Johnson.
- Its infantry brigades included:
- 10th Infantry Brigade
- 11th Infantry Brigade
- 12th Infantry Brigade
- It also had its own artillery, engineers, and support services.
50th (Northumbrian) Motor Infantry Division
This division was led by Major-General Giffard Martel. It was a "Motor Infantry" division, meaning its soldiers could move quickly using vehicles.
- Its infantry brigades were:
- 25th Infantry Brigade
- 150th Infantry Brigade
- 151st Infantry Brigade
- It had its own artillery, engineers, and support units.
III Corps
III Corps was led by Lieutenant-General Sir Ronald Forbes Adam.
- It also had its own signal units, machine-gun battalions, and various support services like engineers, medical teams, and transport companies.
- The artillery for III Corps included field, medium, and heavy regiments, as well as anti-aircraft units.
42nd (East Lancashire) Infantry Division
This division was led by Major-General William Holmes.
- Its infantry brigades included:
- 125th Infantry Brigade
- 126th Infantry Brigade
- 127th Infantry Brigade
- It had its own artillery, engineers, and support units.
44th (Home Counties) Infantry Division
Led by Major-General Edmund Osborne.
- Its infantry brigades were:
- 131st Infantry Brigade
- 132nd Infantry Brigade
- 133rd Infantry Brigade
- It also had its own artillery, engineers, and support services.
Saar Force
This was a special force led by Major-General Victor Fortune. On May 10, 1940, it was working with the French Third Army near the Maginot Line, a line of defenses built by France.
- It was mainly the 51st (Highland) Infantry Division with some extra units attached, such as:
- Machine-gun battalions
- Pioneer battalions (for construction)
- Artillery regiments
- Engineer companies
- Supply and transport units
51st (Highland) Infantry Division
This division was led by Major-General V. M. Fortune.
- Its infantry brigades were:
- 152nd Infantry Brigade
- 153rd Infantry Brigade
- 154th Infantry Brigade
- It had its own artillery, engineers, and support units.
Training and Labour Units
Some divisions were still training or performing important labor duties (like building and logistics) when the German attack began.
12th (Eastern) Infantry Division
Led by Major-General R. L. Petre.
- It included the 35th Infantry Brigade, 36th Infantry Brigade, and 37th Infantry Brigade, along with engineer companies.
23rd (Northumbrian) Division
Led by Major-General W. N. Herbert.
- It had a motorcycle battalion for reconnaissance and a machine-gun battalion, plus the 69th Infantry Brigade and 70th Infantry Brigade, and engineer companies.
46th Infantry Division
Led by Major-General H. O. Curtis.
- It included the 137th Infantry Brigade, 138th Infantry Brigade, and 139th Infantry Brigade, along with engineer companies.
HQ Lines of Communication
This headquarters, led by Major-General Philip de Fonblanque, managed the supply lines and communications for the BEF. It included various engineer companies and garrison battalions to secure important areas.
3rd Anti-Aircraft Brigade
This brigade was part of the Lines of Communication, helping to protect vital supply routes from air attacks.
Units Arriving After May 10, 1940
After the main German attack started, more British units were sent to France.
1st Armoured Division
This division, led by Major-General R. Evans, was a powerful force with many tanks.
- It included the 2nd Armoured Brigade and 3rd Armoured Brigade, both with tank regiments.
- It also had the 30th Infantry Brigade with infantry and a motorcycle battalion, and the 20th Guards Brigade Group.
Air Component
The Air Component was the part of the RAF that worked directly with the BEF. It was led by Air Vice-Marshal Charles Blount.
- It included fighter squadrons (like those with Hurricane and Gladiator planes) to protect ground troops and fight enemy aircraft.
- It also had reconnaissance squadrons (with Blenheim planes) to gather information, and army co-operation squadrons (with Lysander planes) to support soldiers on the ground.
Second Expeditionary Force
A second British Expeditionary Force was sent to France in June 1940, after the first one had to retreat. This force was led by Lieutenant-General A. F. Brooke. However, it was also evacuated later that month during Operation Aerial.
- It included the 1st Canadian Infantry Brigade from the 1st Canadian Infantry Division.
- It also included the 52nd (Lowland) Infantry Division, led by Major-General J. S. Drew. This division had its own infantry brigades, artillery, and engineers.
Images for kids
-
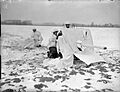
A 2-pdr anti-tank gun of 44 Battery, 13th Anti-Tank Regiment, 2nd Division in the snow near Beuvry, 15 February 1940. The crew wear snow suits and the gun is camouflaged with white sheets.

See also
- Order of battle for the Battle of France
- List of British Empire divisions in the Second World War
