
Charge at Sheria facts for kids
Quick facts for kids Charge at Sheria |
|||||
|---|---|---|---|---|---|
| Part of Middle Eastern theatre of World War I | |||||
 Sheria railway bridge |
|||||
|
|||||
| Belligerents | |||||
|
|||||
| Commanders and leaders | |||||
| Units involved | |||||
|
Egyptian Expeditionary Force
|
Yildirim Army Group
|
||||
The Charge at Sheria was an important event during World War I in the Middle East. It happened on 7 November 1917. Australian and New Zealand soldiers, part of the 4th Light Horse Brigade, bravely charged against Ottoman Empire forces. This charge supported an attack by the British 60th (2/2nd London) Division.
This battle was part of a bigger plan called the Southern Palestine Offensive. The goal was to push back the Ottoman Army in the area. After a big win at the Battle of Beersheba on 31 October, the Ottoman forces still held strong defensive lines. These lines stretched from Gaza on the coast to the hills near Beersheba.
On 6 November, the British-led Egyptian Expeditionary Force (EEF) launched a major attack. They faced tough resistance at Gaza and other key spots. However, the Ottoman soldiers eventually left Gaza during the night. On 7 November, the 60th (London) Division attacked near Sheria. They faced very strong defenses.
That's when the Australian Mounted Division was ordered to attack on horseback. The 11th and 12th Light Horse Regiments charged forward. They faced heavy fire from cannons, machine guns, and rifles. The fire was so intense that they had to stop and fight on foot. Sadly, one group of soldiers missed the signal to stop. They charged right into the Ottoman trenches and were wiped out.
Contents
What Led to the Charge?
The War in Southern Palestine

From April to October 1917, the war in this area was stuck. The EEF had a front line stretching about 22 miles (35 km). It went from Gaza to a riverbed called the Wadi Ghazzeh. Sheria and Beersheba were very strong Ottoman forts.
The EEF had many soldiers, about 80,000 infantry and 15,000 cavalry. The Ottoman forces had about 33,000 infantry, 1,400 cavalry, and 260 cannons. This meant the EEF had more soldiers, especially cavalry.
Preparing for the Attack
After taking Beersheba, the fighting continued. The Ottoman forces fought hard to slow down the EEF. They still held strong positions at Tel Khuweilfe, Sheria, and Gaza. However, their main defense line was getting weaker.
On 6 November, three British divisions attacked the center of the Ottoman line. They advanced about 9 miles (14 km). Only Tel esh Sheria and the main Hareira forts remained in Ottoman hands. The Ottoman commander, Falkenhayn, knew his forces couldn't hold much longer. He ordered his armies to pull back about 10 km (6 mi).
The British had been heavily bombing Gaza since 27 October. This caused the Ottoman soldiers to leave Gaza on the night of 6/7 November. A small group of fresh Ottoman soldiers, called the Zuheilika Group, reinforced the defenders at Sheria.
Orders for the Attack
During the night, British commanders made new plans. The 60th (London) Division was ordered to capture Tel el Sheria. Then, they were to advance towards Huj.
Soldiers from the 60th Division checked the Ottoman positions at Sheria. They planned to cross a riverbed (wadi) and capture the high ground. A machine gun soldier described heavy fire around 4:00 AM. He said it was a "battle of Machine Guns v. Machine Guns."
The Australian and Anzac Mounted Divisions were ordered to advance north. They aimed to capture as many Ottoman soldiers as possible. By 7:30 AM, the Australian Mounted Division was near Tel esh Sheria.
One soldier described the scene: "Everyone rushing on, pushing on, hurrying on – staff cars, wireless, transports, camels, mounted troops... Turks retiring fast. Artillery firing all the time." He also saw "deserted Turkish lines – bivvies, tents, camps, hospitals, ammunition dumps, dead horses and discarded equipment."
Where was Sheria?

Around 7:30 AM, the 12th Light Horse Regiment heard that the 60th London Division had captured Sheria. They were told the Ottoman soldiers were retreating. However, the Londoners' advance was stopped by a strong Ottoman group about 1.5 miles (2.4 km) north. This group had a great view over the open ground.
The Londoners stopped about 1,000 yards (910 m) from this Ottoman position. The Ottoman soldiers had dug in on a strong hill. They could sweep the slope with shrapnel, machine guns, and rifle fire. This delay was a big problem for the British plan.
The light horse regiments were then ordered to make a mounted attack. They had to ride across open, bare ground with no cover. They were to charge directly at the Ottoman fort.
The Attack Plan
At 8:05 AM, orders were given for the Australian Mounted Division to advance. They were to move on the eastern side of the railway. The goal was to meet up with the Anzac Mounted Division.
However, the advance was delayed because the Londoners were stopped at Sheria. The 4th Light Horse and 5th Mounted Brigades were ordered to "clear the enemy from the front of the 60th Division." They were to charge directly at the Ottoman position.
The 11th Light Horse Regiment moved into position by 10:00 AM. The 12th Light Horse Regiment was on their right. The plan was to attack a mud hut at Khurbet Buteihah, behind the Ottoman lines. A delay allowed the Ottoman soldiers to make their position even stronger before the charge.
The Battle Begins

Just before 11:00 AM, the leading squadrons of the 11th Light Horse Regiment reached Tel esh Sheria. They were ordered to attack a "strong horseshoe position." The 4th Light Horse Brigade was to cross the wadi (riverbed) on horseback and attack Khurbet Buteihah.
The 12th Light Horse Regiment moved within 1 mile (1.6 km) of the Wadi Sheria. At 12:00 PM, they received orders to cover the infantry's reorganization. The horses were given a quick drink before they continued.
The 11th Light Horse Regiment advanced on the left. The 12th Light Horse Regiment was on the right. They rode towards the wadi crossing with shells bursting over their trotting horses. The leading squadrons galloped up the steep tracks on the other side. They immediately faced heavy machine gun and rifle fire.
At 12:45 PM, the 12th Light Horse Regiment was stopped by intense fire. Their commander ordered one squadron to dismount and send their horses back. The men then advanced on foot. Another squadron also dismounted and began firing. On the left, two squadrons of the 11th Light Horse Regiment galloped forward. They faced very strong enemy fire.
One soldier described the charge: "The Regiment was attacking a redoubt held by machine guns and rifles... The approach was open, bare and absolutely barren of any cover." He added, "Our troop was ordered to charge the redoubt. The officer led his men straight in at the gallop, and one man only returned." The frontal attack was stopped by very heavy fire. The soldiers dismounted, and their horses were galloped to the rear.
The two light horse regiments continued fighting on foot. But they could only advance a few hundred yards before being stopped again by heavy machine gun fire. They stayed in this position, facing strong counter-attacks.
A Brave, Tragic Charge
One troop of 21 men from the 11th Light Horse Regiment missed the signal to stop. They continued to gallop right up to and over the Ottoman trenches. They only had bayonets. As they dismounted, the Ottoman soldiers fired at them from very close range, killing 11 men.
Around 12:30 PM, a troop led by Lieutenant A.R. Brierty faced strong Ottoman machine guns. After Brierty's troop galloped past them, the Ottoman defenders turned and fired. This caught the troop in a deadly crossfire, almost wiping them out. Lieutenant Bartlett's troop tried to help, firing their Hotchkiss machine guns and rifles. They hit one German officer and 20 Ottoman infantry. Brierty's troop suffered 11 killed and 5 wounded, with only a few survivors.
By 1:00 PM, they were stopped by heavy fire. Lieutenant Brierty's troop galloped over a trench. The Ottoman soldiers in the trench raised their hands, but then fired again once the troop had passed. The entire troop was killed or wounded, except for two soldiers.
One wounded man lay near the enemy's trench. A sergeant and two soldiers managed to escape back to their lines. All the riderless horses started grazing between the two fighting lines. Soldiers on both sides tried to shoot at the other side's soldiers without hitting the horses.
At 2:15 PM, the 11th Light Horse Regiment connected with the 4th Light Horse Brigade. They reported the situation and asked for machine gun and artillery support. When the artillery started shelling the Ottoman position, it also made it dangerous for the wounded Australian soldier near the enemy trench. He tried to run back but was shot by machine gun fire.
A chaplain, Captain Dunbar, and a stretcher bearer ran out to help him. All three were hit. The wounded soldier was killed. The chaplain was badly wounded and died before dusk. The stretcher bearer was wounded in the hand but managed to get back to his lines.
Sheria is Captured
At 2:40 PM, reports said the infantry fight was still going on north of Sheria hospital. It seemed the Ottoman defenders were bringing in more soldiers and an abandoned anti-aircraft gun.
At 3:20 PM, the 179th Brigade (60th Division) approached the left side. This infantry brigade was ordered to capture the strong Ottoman position that had stopped the earlier attacks. At 5:00 PM, an infantry brigade attacked the same position the 11th Light Horse Regiment had been attacking. They moved across the open ground, facing heavy fire.
This attack helped the situation. It pushed back the Ottoman defenders, who then retreated. Two London battalions crossed the Wadi esh Sheria at 5:00 PM. They attacked with bayonets and captured the position just as it got dark. They took the Ottoman position at Sheria and pushed them off the high ground. They had 24 casualties during this attack.

Meanwhile, the 5th Mounted Brigade had taken cover in the Wadi Barrata during the day. At 4:15 PM, permission was given for the 4th Light Horse Regiment to join the 5th Mounted Brigade's attack.
At 5:20 PM, the 5th Mounted Brigade began its advance. However, darkness fell quickly. The sun had set at 4:47 PM, and the moon wouldn't rise for hours. The leading regiment lost its way and was fired on from the west. So, the brigade returned to the Wadi Barrata.
The 4th Light Horse Brigade was ordered to withdraw from the firing line at 6:00 PM. They camped south of the Wadi Sheria. The brigade had 15 killed and 14 wounded. At 6:30 PM, they received orders to withdraw further south of Sheria.
Chaplain Captain Dunbar and 12 soldiers were killed. Major Vernon, Lieutenant Brierty, and 12 soldiers were wounded. Also, 19 horses were killed and three wounded. The 12 wounded soldiers were treated until midnight.
At 7:00 PM, the 12th Light Horse Regiment watered their horses at the Wadi Sheria. Engineers had set up canvas troughs and were pumping water from holes. The regiment finished watering at 10:00 PM and camped 1 mile (1.6 km) south of the Wadi esh Sheria. One soldier from this regiment was killed that day.
What Happened Next?
The Ottoman forces were not completely defeated. They skillfully retreated, showing they could move quickly and smartly. They marched through the night to gain distance and time. They set up new defense lines and fought back against the EEF all day. Their retreats were helped by their railway lines. They eventually took up strong positions in the Judean Hills.
The sacrifice of the Ottoman rearguards helped them escape being surrounded and destroyed. However, the Gaza-Beersheba defense line was finally broken. About 12,000 Ottoman soldiers were captured.
On 8 November, the 4th Light Horse Brigade watered their horses at the Sheria water tower. They also received food and supplies. At 7:30 AM, they were ordered to advance north. They reached Huj at 5:30 PM. The pursuit by the Australian and Anzac Mounted Divisions continued north. It ended about 50 miles (80 km) north, after the Ottoman defense line was broken at Sheria. By 9 December, the EEF advance would reach Jerusalem.
Images for kids
-
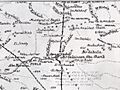
Detail of El Arish to Beersheba Map showing the Sheria position
-
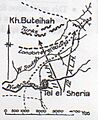
Kh. Buteihah attack


