
Etching facts for kids
Etching is a cool way to make prints! It involves drawing on a metal plate, usually made of copper or zinc. First, the plate is covered with a special protective layer. Then, you scratch your design into this layer, showing the metal underneath. After that, the plate is put into a strong liquid called acid. The acid eats away at the exposed metal, creating your design.
When the design is ready, ink is rolled over the plate. The ink fills the lines that the acid created. The extra ink is wiped off the smooth parts. Finally, the metal plate is pressed onto paper. This transfers the ink from the lines onto the paper, making a print!
Contents
A Look Back: The History of Etching

How Etching Began
People have used etching to decorate metal items for a very long time. This includes things like guns, armor, cups, and plates. This art form has been known in Europe since the Middle Ages. It might even go back to ancient times!
Decorating armor with etching became popular in Germany around the late 1400s. This was just before etching became a way to make prints on paper.

The First Printmakers
The idea of using etching for printmaking probably came from Daniel Hopfer. He lived in Augsburg, Germany, from about 1470 to 1536. Hopfer was a craftsman who decorated armor. He started using this method to make prints on paper. He used iron plates for his prints, and many of them still exist today.
You can see his work on armor too. There's a shield from 1536 in Madrid and a sword in Nuremberg. Hopfer also made decorative prints that other artists used as patterns.
Etching Becomes Popular
Later, artists started using copper plates instead of iron. This change likely happened in Italy. Soon, etching became very popular for artists who made prints. It even started to challenge engraving, another printmaking method.
Etching had a big advantage. With engraving, you need special skills to use a tool called a burin. But with etching, artists who could draw found it much easier to create images on the plate. However, working with the protective layer and the acid still needed skill and practice. It also required care to avoid ruining the plate.
Different Kinds of Etching
Etching has a few different styles and techniques.
Aquatint Etching
Aquatint is a type of etching that creates areas of tone, like shading in a drawing. It uses a special acid-resistant powder or spray. This creates tiny dots on the plate. When the acid bites, it makes many small pits. These pits hold ink and create different shades, from light gray to deep black.
Soft-Ground Etching
Soft-ground etching uses a special protective layer that stays soft. The artist places a piece of paper or fabric over this soft layer. Then, they draw on the paper. The pressure of the drawing tool picks up the soft ground underneath. This exposes the metal plate. When printed, the image looks like a drawing made with a pencil or crayon.
Relief Etching
Relief etching was invented by William Blake around 1788. He was one of the few artists to use it in its original form. In this method, the parts of the plate that you want to print black are covered. The "white" background areas are exposed to the acid. This means the acid eats away the background, leaving the design raised. When printed, the raised parts transfer the ink.
Blake used this technique to print both text and images together. He would write his text and draw lines with an acid-resistant material.
How Etching is Made: Step-by-Step

Making an etching involves several steps.
Preparing the Plate
First, a metal plate is prepared. This is usually copper or zinc, but sometimes steel is used. The plate is covered with a waxy, acid-resistant layer called a "ground." There are two main types: hard ground and soft ground.
- Hard Ground: This can be applied in two ways.
* One way is using a solid block of wax. The metal plate is heated, and the wax block is rubbed onto it. The wax melts and spreads evenly over the plate. * The other way is using liquid hard ground. This comes in a can and is brushed onto the plate. It dries hard when exposed to air. Some artists use asphaltum or bitumen as a hard ground.
After the hard ground cools and hardens, the artist "smokes" the plate. This means holding a flame (often from beeswax candles) close to the plate. This darkens the ground, making it easier to see the lines you scratch. It also adds a little more wax.
- Soft Ground: This also comes in liquid form and is allowed to dry. But it stays soft and impressionable. Artists can place leaves, fabrics, or even their hands on the soft ground. The pressure leaves an impression, exposing the metal underneath.
The ground can also be applied as a fine mist, using powdered rosin or spray paint. This is the process called aquatint, which helps create different tones and shaded areas.
Drawing the Design
Once the plate is covered, the artist uses a sharp tool called an etching-needle or an "échoppe." They scratch through the ground, exposing the metal underneath. The design must be drawn in reverse, as it will print the opposite way. An "échoppe" tool creates lines that vary slightly in thickness, which can make the drawing look more natural.


The Acid Bath (Biting)
Next, the plate is placed into a liquid solution that eats away at the exposed metal. This process is called "biting." For copper or zinc plates, ferric chloride is often used. For zinc or steel plates, nitric acid might be used. The strength of the acid affects how fast the etching happens.
The waxy ground protects the parts of the plate that are covered. The longer the plate stays in the acid, the deeper the lines become.
During biting, tiny bubbles and dissolved metal bits can form on the plate. The artist often uses a bird feather or similar item to gently wave these away. If a bubble stays on the plate, it stops the acid from biting that spot. Zinc plates produce more bubbles than copper or steel.
Testing the Etch
For aquatinting, artists often use a small test strip of metal. They dip it into the acid for different amounts of time. After washing off the acid, they cover parts of the strip and dip it again. Then, they ink and print the strip. This shows them how different etching times affect the darkness of the print.
Cleaning the Plate
After the etching is done, the plate is removed from the acid and washed with water. Then, the protective ground is removed using a solvent like turpentine. Turpentine can be greasy, so it's often cleaned off with methylated spirits.
Special Techniques
- Spit-biting: This is when the artist applies acid directly to certain areas of the plate with a brush. This can be done on an aquatinted plate or directly on exposed metal. It's called "spit-biting" because saliva was once used to dilute the acid. Today, artists usually use gum arabic or water.
Inking and Printing
Finally, the plate is ready for printing. Ink is pushed into the etched lines using a piece of matte board, a plastic card, or a cloth. The surface of the plate is then carefully wiped clean with a stiff fabric called tarlatan. After that, it's wiped with newsprint paper or the palm of a hand. This leaves ink only in the etched lines.
If copper or zinc plates are used, the surface is very clean, so the print's background will be white. If a steel plate is used, its natural texture can give the print a gray background, similar to aquatinting.
A damp piece of paper is placed over the inked plate. The plate and paper are then run through a printing press. The pressure transfers the ink from the etched lines onto the paper, creating the final print!
Images for kids
-
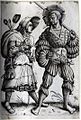
The Soldier and his Wife. Etching by Daniel Hopfer, who is believed to have been the first to apply the technique to printmaking.
-
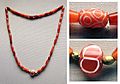
The etched carnelian beads in this necklace from the Royal Cemetery of Ur dating to the First Dynasty of Ur (2600-2500 BCE) were probably imported from the Indus Valley.
-
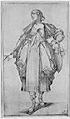
Etching by Jacques Bellange, Gardener with basket around 1612.
-
Colored etching and aquatint on paper.
-

Young Girl in cafe with street-view, etching by Lesser Ury, 1924.
-
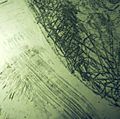
Example of sugar lift and spit bite effect.
-
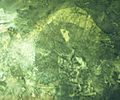
Example of foul bite in acid etching.

.jpg)


See also
 In Spanish: Aguafuerte para niños
