kids encyclopedia robot

Attack at Fromelles facts for kids

Kids Encyclopedia Facts
Quick facts for kids
Attack at Fromelles
Part of the Western Front in the First World War
.

Front line following the Battle of Neuve Chapelle (10–13 March 1915)
Date 19–20 July 1916
Location
Fromelles, Nord, France
50°36′22.5″N 2°51′16.9″E / 50.606250°N 2.854694°E / 50.606250; 2.854694
Result German victory
Belligerents
 German Empire

 British Empire

Commanders and leaders
Gustav Scanzoni von Lichtenfels Richard Haking
Strength
c.  30,000 10,000–15,000
Casualties and losses
1,600–2,000 7,080
The front line near Fromelles had changed little since the Battle of Neuve Chapelle (10–13 March 1915).

The Attack at Fromelles (French pronunciation: [fʁɔmɛl], Battle of Fromelles, Battle of Fleurbaix or Schlacht von Fromelles) 19–20 July 1916, was a military operation on the Western Front during the First World War. The attack was carried out by British and Australian troops and was subsidiary to the Battle of the Somme. General Headquarters (GHQ) of the British Expeditionary Force (BEF) had ordered the First Army (General Charles Munro) and Second Army (General Herbert Plumer) to prepare attacks to support the Fourth Army on the Somme, 80 km (50 mi) to the south, to exploit any weakening of the German defences opposite. The attack took place 16 km (9.9 mi) from Lille, between the Fauquissart–Trivelet road and Cordonnerie Farm, an area overlooked from Aubers Ridge to the south. The ground was low-lying and much of the defensive fortification by both sides consisted of building breastworks, rather than trenches.

The operation was conducted by XI Corps (Lieutenant-General Richard Haking) of the First Army with the 61st (2nd South Midland) Division and the 5th Australian Division, Australian Imperial Force (AIF) against the 6th Bavarian Reserve Division, supported by the two flanking divisions of the German 6th Army. Preparations for the attack were rushed, the troops involved lacked experience in trench warfare and the power of the German defence was significantly underestimated, the attackers being outnumbered 2:1. The advance took place in daylight, on a narrow front, against defences overlooked by Aubers Ridge, with German artillery on either side free to fire into the flanks of the attack. Another attack by the 61st (2nd South Midland) Division early on 20 July was cancelled, after it was realised that German counter-attacks had already forced a retirement by the Australian troops to the original front line.

On 19 July, General Erich von Falkenhayn, head of Oberste Heeresleitung (OHL, the German army supreme headquarters) judged Fromelles to be the offensive he expected against the 6th Army. The attack gained no ground but inflicted some casualties; next day the failure was evident and a captured operation order from XI Corps revealed the limited nature of the operation. In 2012, a study of German records showed that no German division opposite XI Corps moved until four to nine weeks later; Falkenhayn sent divisions from the Souchez–Vimy area, 20 mi (32 km) south instead, which had been misinterpreted in earlier accounts. The attack was the début of the AIF on the Western Front and the Australian War Memorial described it as "the worst 24 hours in Australia's entire history". Of 7,080 BEF casualties, 5,533 were suffered by the 5th Australian Division; the Germans suffered 1,600–2,000 casualties and lost 150 prisoners.

Background

On 5 July, during the Battle of the Somme (1 July – 18 November 1916) GHQ informed the three other British army commanders that the German defences on the Somme might soon fall. The First and Second army commanders were required to choose places to penetrate the German defences, if the attacks on the Somme continued to make progress. Gaps were to be widened to exploit weakness and disorganisation of the German defence. The Second Army commander, General Herbert Plumer was occupied by preparations for an offensive at Messines Ridge but could spare a division for a joint attack with the First Army at the army boundary. On 8 July, General Charles Monro (First Army) ordered the XI Corps commander, Lieutenant-General Richard Haking , to plan a two-division attack; Haking proposed to capture Aubers Ridge, Aubers and Fromelles but the next day Monro dropped Aubers Ridge from the attack, as he and Plumer thought that no great objective could be achieved with the troops available.

On 13 July, after receiving intelligence reports that the Germans had transferred about nine infantry battalions from the Lille area from 9 to 12 July, GHQ informed the two army commanders that a joint attack was to be carried out around 18 July, to exploit the depletion of the German defenders. Haking was ordered to begin a big preliminary bombardment to simulate a large offensive and conduct a local infantry attack on the German front line. On 16 July, discussions about the attack resumed, as the need for diversions to coincide with operations on the Somme had diminished when the Germans had not collapsed after the British success at the Battle of Bazentin Ridge (14 July 1916). Sir Douglas Haig, Commander-in-Chief of the BEF, did not want the attack unless it could succeed and Monro and Haking opposed a postponement or cancellation. The weather had been dull on 15 July and next day, soon after Monro and Haking made the decision to go ahead, it began to rain. Zero hour for the main bombardment was postponed because of the weather and at 8:30 a.m., Haking delayed the attack for at least 24 hours; after having second thoughts, Monro postponed the operation until 19 July.

Prelude

Offensive preparations

Fromelle panoramique1914
Panorama of Fromelles, 1914.

The Second Army provided the 5th Australian Division, the artillery of the 4th Australian Division and heavy guns and trench mortars to XI Corps, for an attack from the Fauquissart–Trivelet road to La Boutillerie, with the 31st Division and 61st (2nd South Midland) Division. Lack of artillery, training and experience in the Australian divisional artilleries and some of the heavy batteries, led to the attack front being reduced to 4,000 yd (2.3 mi; 3.7 km) between the Fauquissart–Trivelet road and Delangre Farm. The ground was waterlogged, flat and visible from Aubers Ridge, behind the German front to the south. The 39th Division and 31st Division moved their boundaries north as the 61st (2nd South Midland) Division concentrated along the Fauquissart–Trivelet road to Bond Street. The 20th (Light) Division moved its boundary south to Cordonnerie Farm on the left of the 5th Australian Division, which concentrated from Bond Street to Cordonnerie Farm. The twelve attacking battalions were supported by more artillery than the Battle of Aubers Ridge in May 1915, more ammunition was available and there were trench mortars for wire cutting. With support from First Army artillery to the south, 296 field guns and 78 heavy guns were ready, which gave a greater concentration of heavy artillery than that of the Fourth Army on the first day of the Somme. After several postponements for rain, visibility was better on 18 July and the artillery bombardment proceeded. The shelling of the German front at La Bassée was repeated and the German artillery retaliated.

Plan

The German salient at Fromelles contained some higher ground facing north-west, known as the Sugarloaf. The small size and height of the salient gave the Germans observation of no man's land on either flank. The 5th Australian Division (Major-General James McCay) was to attack the left flank of the salient by advancing south as the 61st (2nd South Midland) Division attacked on the right flank from the west. Each division was to attack with three brigades in line, with two battalions from each brigade in the attack and the other two in reserve, ready to take over captured ground or to advance further. Haking issued the attack orders on 14 July, when wire cutting began along the XI Corps front. It was intended that the bombardment would inflict mass casualties on the German infantry, reducing them to a "state of collapse". The British infantry were to assemble as close to the German lines as possible, no man's land being 100–400 yd (91–366 m) wide, before the British artillery fire was lifted from the front line; the infantry would rush the surviving Germans while they were disorganised and advance to the German second line. Heavy artillery began registration and a slow bombardment on 16 July and two days of bombardment began either side of La Bassée canal as a diversion. The main bombardment was to begin at midnight on 17/18 July for seven hours (more rain forced a postponement). Over the final three hours, the artillery was to lift and the infantry show bayonets and dummy figures several times, to simulate an infantry advance, then the artillery was to resume bombardment of the front line to catch the German infantry out of cover.

German preparations

Bundesarchiv Bild 146-1994-105-20, Frankreich, Fromelles, Unterstand
A German strongpoint in the Fromelles salient, July 1916.

General Erich von Falkenhayn, the German Chief of the General Staff, had ordered a construction programme on the Western Front in January 1915, to make it capable of being defended indefinitely by a small force against superior numbers. An elaborate, carefully sited and fortified front position was built behind fields of barbed wire, with camouflaged concrete machine-gun nests and a second trench (Wohngraben) close behind the front trench (Kampfgraben), to shelter the trench garrison during bombardments. Communication trenches were built to evade Allied artillery-fire intended to obstruct the movement of reinforcements from the new rear defences. The front position was to be held at all costs as the main line of resistance but in May 1915, Falkenhayn ordered a reserve position to be built along the Western Front, 2,000–3,000 yd (1.1–1.7 mi; 1.8–2.7 km) behind the front position, out of range of enemy field artillery. To contain a breakthrough, the second position was to be occupied opposite a sector broken into and serve as a jumping-off point for counter-attacks. If the front line could not be recovered, the rear position could be connected to the remaining parts of the front line on either side to contain the break-in.

The construction programme was a huge undertaking and was completed in the autumn 1915. The fortification programme had several opponents, notably the 6th Army commander Crown Prince Rupprecht, who claimed that a rear position would undermine the determination of soldiers to stand their ground. The front of the 6th Army had been quiet since the Battle of Loos (25 September – 14 October 1915) and in July 1916, the 6th Bavarian Reserve Division held a 4.5 mi (7.2 km) stretch of the front with four regiments, from east of Aubers village, north to a point near Bois-Grenier, each regiment having one battalion in the front line, one in support and one in reserve. On one regimental front there were 75 shelters with 9–12 in (230–300 mm) of concrete protection. After a British gas attack opposite Neuve Chapelle and Fauquissart late on 15 July, German artillery bombarded the British front line and a raid on the Australian lines by 100 troops of Bavarian Reserve Infantry Regiment 21, caused nearly 100 casualties, taking three prisoners, for a loss of 32 casualties.

Attack

First Army

Patrols during the night reported no movement in the German lines, which appeared to be weakly held. German covering parties stopped Australian raiders on the right flank of the 5th Australian Division front, where the wire appeared to be intact except on the left. It was hazy early on 19 July but the artillery zero hour was fixed for 11:00 a.m., ready for the attack at 6:00 p.m. A special heavy artillery bombardment began on the Sugarloaf at 2:35 p.m., by which time a German counter-bombardment was falling all along the attack front, causing casualties to the Australians and the field gunners of the 61st (2nd South Midland) Division at Rue Tilleloy. Several ammunition dumps were exploded and the decoy lifts by the British artillery failed to deceive the Germans. The Australian and British infantry began to move into no man's land at 5:30 p.m.

In the 61st (2nd South Midland) Division area, infantry of the 182nd Brigade on the right flank, began to move into no man's land through sally ports but some were under German machine-gun fire and became death traps. Two companies of the right-hand battalion managed to get within 50 yd (46 m) of the German parapet, with few casualties, then rushed the breastwork as the artillery lifted, finding the wire cut and the Germans incapable of resistance. Uncut wire held up the advance to the second line and German machine-gun fire from the right flank caused many casualties as the survivors reached the objective. Reinforcements reached the front trench but German flanking fire caused many casualties and German artillery began to bombard the captured area. The left-hand battalion lost more men in no man's land and then found that the wire at the Wick salient was uncut. The few infantry to get through the wire were shot down short of the front trench; reinforcements were also caught in no man's land and pinned down.

In the centre, the 183rd Brigade was bombarded before the advance began and Shrapnel shell-fire prevented the infantry from using the sally ports. After climbing the parapet, both battalions were shot down in no man's land, only a few men getting close to the German wire before being killed or wounded. On the left, the attacking battalions of the 184th Brigade had been in the front line under German artillery-fire all morning. On the right, the sally ports were under fire and only a few troops reached the German wire, finding that it was uncut, before falling back. The attack of the left-hand battalion towards the Sugarloaf salient (which was beyond trench-mortar range) was stopped by German fire on the sally-ports; the British tried to exit along "Rhondda Sap", which was under shrapnel bombardment. Most of the battalion was destroyed but some troops reached the north-east part of the salient and tried to enter the German breastwork, until all became casualties.

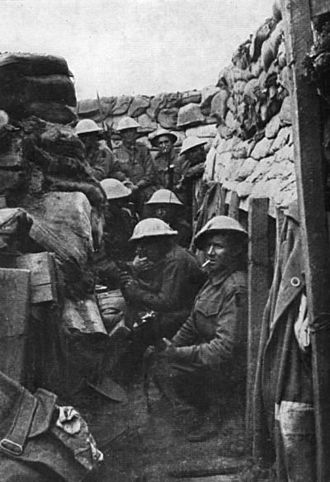
Australian 53rd Bn Fromelles 19 July 1916
Troops of the 53rd Australian Battalion, only three of the men survived the battle, all wounded.

On the 5th Australian Division front, the troops attacked over the parapet, suffering fewer casualties than the 61st (2nd South Midland) Division. The 15th (Victoria) Brigade advanced next to the British 183rd Brigade towards the junction of the German line and Layes Brook, which ran diagonally across no man's land. The right battalion advance was stopped by machine-gun fire from the Sugarloaf after 300 yd (270 m) and the left hand battalion ran into uncut wire, both battalions suffering many casualties as the survivors dug in. In the Australian centre the 14th (NSW) Brigade had fewer casualties, reached the German front line and took a number of prisoners. When the Australians pressed on, they found only flat fields and ditches full of water. A line was selected for consolidation and ten machine-guns were sent forward. The 8th Australian Brigade battalions attacked through machine-gun fire from the front and flanks. A 1,200 lb (540 kg) mine was blown on the outer flank to make a crater lip to screen the attacking infantry but when the Australians reached the German breastwork they kept going, finding the same terrain as the 14th Australian Brigade.

The 32nd Australian Battalion, on the eastern flank, suffered many casualties while attacking a German stronghold in the ruins of Delangre Farm and elements of the 14th Australian Brigade reached a main road 400 m (1,300 ft) south of the German line before withdrawing to the ditch. The 8th and 14th Australian Brigades had gained their objectives, capturing about 1,000 m (3,300 ft) of the German front line. A line was selected for consolidation and a strong point built at the end of the Kastenweg, a German communication trench. Reinforcements with equipment and tools went forward and work began on a communication trench across no man's land in the midst of a German artillery barrage and movement attracting machine-gun fire.

By 7:00 p.m. accurate reports reached Major-General Colin Mackenzie, commander of the 61st (2nd South Midland) Division, of the success on the right, along with erroneous reports of limited success in the centre and a small lodgement on the Sugarloaf on the left. At 7:30 p.m., Haking ordered Mackenzie to attack the Sugarloaf again to assist the Australians, before it was discovered that the 184th Brigade had been held up short of its objective. The 15th Australian Brigade was asked to co-operate with the British attack and the 58th Australian Battalion was sent forward. A renewed bombardment continued as preparations were made to attack all along the front at 9:00 p.m., when at 8:20 p.m., Haking cancelled the attack and ordered that all troops were to be withdrawn after dark. Reinforcements for the 182nd Brigade received the order in time but the troops in the German line were overwhelmed, only a few wounded and stragglers getting away. Troops pinned down in no man's land withdrew under cover of the bombardment and parties went out to rescue wounded. More discussion between Mackenzie and Haking, led to the corps commander ordering the 184th Brigade to attack the Sugarloaf overnight, after a ten-minute hurricane bombardment; German shelling on the British front line then caused a postponement until the morning.

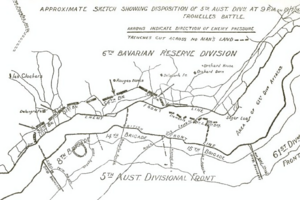
5th Australian Division positions during the Attack on Fromelles (on the Aubers Ridge), 19 July 1916
Approximate location of 5th Australian Division positions during the Attack on Fromelles (on Aubers Ridge), 19 July 1916

The postponement failed to reach the 58th Australian Battalion, which attacked with some of the 59th Australian Battalion and was stopped in no man's land with many casualties, survivors from three battalions finding their way back after dark. Despite reinforcements, the situation of the 14th Australian Brigade in the German lines became desperate. Artillery-fire and German counter-attacks from the open right flank forced a slow withdrawal in the dark. On the left flank, more troops were sent forward, with ammunition, to the 8th Australian Brigade at dusk and at 2:00 a.m. every soldier who could be found was sent forward. Consolidation in the German lines was slow as the troops lacked experience, many officers had become casualties and there was no dry soil to fill sandbags, mud being a poor substitute. German counter-attacks on the front and flanks, with machine-gun fire from Delangre Farm, De Mouquet Farm and The Tadpole, began at 3:15 a.m. on 20 July, forcing a retirement to the German first line and then a withdrawal to the original front line; many Australians were cut off and captured.

News of the retirement by the 8th Australian Brigade reached McCay while at a meeting with Mackenzie, Haking and Monro, to plan the new attack by the 61st (2nd South Midland) Division. Monro ordered the 14th Australian Brigade to be withdrawn and at 5:40 a.m. the artillery began a box-barrage around the brigade. At 7:50 a.m. the order to retire arrived, although it was not received by some parties. German troops had got well behind the right flank and fired at every sign of movement, forcing the Australians to withdraw along the communication trench dug overnight. By 9:00 a.m. the remnants of the 53rd, 54th and 55th Australian battalions had returned; many wounded were rescued but only four of the machine-guns were recovered. Artillery-fire by both sides diminished and work began on either side of no man's land to repair defences; a short truce was negotiated by the Germans and Australians to recover their wounded.

Air operations

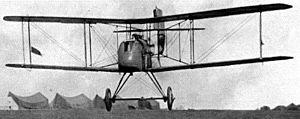
Airco DH2 2
Airco DH.2 at Beauvel, France.

From 14 July the Illies–Beaucamps road, 3 mi (4.8 km) behind the German front line, was kept under air observation by the Royal Flying Corps (RFC). On 16 July 16 Squadron joined 10 Squadron on the attack front along with a kite balloon section, bringing the I Brigade RFC squadrons supporting the attack up to three corps squadrons and two army squadrons. The corps aircraft photographed and reconnoitred the area before the attack and flew artillery-observation and contact patrols during the battle. Army squadrons flew further afield and denied German reconnaissance aircraft view of British troop movements, particularly behind the XI Corps front. On 19 July, aircraft from two squadrons patrolled the area towards Lille and had numerous air engagements, in which two Fokker E.Is and a British DH.2 were shot down. Bombing raids on German army billets, supply dumps and the railways from Lille to Lens, Douai, Cambrai and Valenciennes also took place.

German 6th Army

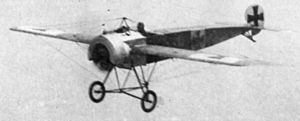
Fokker EIII 210-16
Fokker E.III Eindecker, in service at the time of the battle

Opposite the British right, Bavarian Reserve Regiment 17 lost a switch trench facing Trivelet, a second line was overrun and the garrison was lost. Troops on the left of III Battalion to the south of the Trivelet road bombed to its right and part of I Battalion attacked frontally and from the right, taking 61 prisoners. On the Australian flank, III Battalion, Bavarian Reserve Regiment 21 was pushed back in the centre and on its right, forming a defensive flank at the Kastenweg and in front of Delangre Farm. The right flank of III Battalion, Bavarian Reserve Regiment 16 repulsed the 15th Australian Brigade and was then reinforced by the II Battalion from Rue Delaval, which joined with the left of III Battalion, Bavarian Reserve Regiment 21. A counter-attack ordered by the divisional commander at 8:00 p.m., fell into confusion in the dark, under British artillery-fire and an attack on the 8th Australian Brigade, by part of I Battalion, Bavarian Reserve Regiment 21 was stopped by Australian small-arms fire.

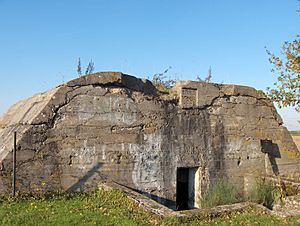
BlockhausFromelles
German blockhouse between Fromelles and Aubers (October 2007)

Later on, two other companies attacked up the Kastenweg as I Battalion, Bavarian Reserve Regiment 21 and half of Bavarian Reserve Regiment 20 attacked from the flank, reaching the old front line at 6:00 a.m. on 20 July. The right flank of the 14th Australian Brigade was counter-attacked by most of I Battalion, Bavarian Reserve Regiment 16, which joined the II Battalion and recaptured the front line step-by-step until dawn, when a pause was ordered due to exhaustion and lack of ammunition and grenades. When the attack resumed, the troops met those of Bavarian Reserve Regiment 21 at around 8:10 a.m. German artillery support was less extensive than that available to the attackers but managed to "smother the British trenches with fire" as the artillery of the 50th Reserve Division and 54th Reserve Division fired from the flanks "thus the backbone of the British (sic) attack was broken before it left the trenches at 5:30 p.m.".

Aftermath

Casualties

The battle caused one of the greatest numbers of Australian deaths in action in 24 hours, surpassed only at the Battle of Bullecourt in 1917. The 5th Australian Division suffered 5,513 casualties, 2,000 men in the 8th Australian Brigade, 1,776 men of the 15th Australian Brigade, 1,717 men in the 14th Australian Brigade and 88 men from the divisional engineers. Two battalions had so many casualties that they had to be rebuilt. Of 887 personnel from the 60th Australian Battalion, only one officer and 106 other ranks survived unwounded and the 32nd Australian Battalion suffered 718 casualties. The 31st Australian Battalion had 544 casualties and the 32nd Australian Battalion lost 718 men killed and wounded. The 61st (2nd South Midland) Division was understrength before the battle and contributed only half as many men as the 5th Australian Division and suffered 1,547 casualties. The 6th Bavarian Reserve Division suffered casualties of 1,600 to 2,000 men. Australian and British soldiers killed in the area that was re-taken by the Germans, were buried shortly after the battle. The burial pits were photographed from a British reconnaissance aircraft on 21 July but marked as dugouts or trench-mortar positions. On 22 July, the bodies were taken by narrow gauge trench railway and buried in eight 10 by 2.2 by 5 m (32.8 by 7.2 by 16.4 ft) pits.

Commemoration

New cemetery

Most war graves on the Western Front were discovered by official surveys during the 1920s; British and Empire dead were reburied in Imperial War Graves Commission cemeteries. Four hundred unidentified Australian soldiers killed in the Attack at Fromelles were re-buried at the V.C. Corner Australian Cemetery and Memorial, 2 km (1.2 mi) north-west of Fromelles (the only large exclusively Australian cemetery in France). Mortal remains of those killed in no man's land were recovered after the war and buried at V.C. Corner British Cemetery. In 2002, Lambis Englezos was inspired by Don't Forget Me Cobber (Corfield, 2000), to search for an unmarked mass grave near Fromelles. The site was found by Englezos and other researchers near Fromelles at le bois au fond du village, Fasanenwäldchen (Pheasant Copse/Pheasant Wood) (50°36′36.36″N 2°51′17.10″E / 50.6101000°N 2.8547500°E / 50.6101000; 2.8547500). The researchers believed that the pits had not been found after the war and gained support for an exploration of the site from the Australian Army and the British All Party Parliamentary War Graves and Battlefield Heritage Group.

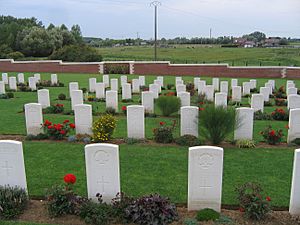
Graves at Fromelles (Pheasant Wood) Miltary Cemetery
Graves at Fromelles (Pheasant Wood) Military Cemetery.

In 2007, a geophysical survey was commissioned by the Australian government. The survey indicated that the pits had been undisturbed since the war and contained the remains of 337 soldiers. From 23 May to 13 June 2008, an exploratory dig found human remains, personal effects, webbing, brass fitments, uniform badges, buttons and British .303 ammunition in five of six pits, which were then refilled. Exhumations took place from May to September 2009, which recovered the mortal remains of 250 soldiers, approximately 173 being Australian, from whom DNA samples were taken.

The original burial site was unsuitable and a new CWGC war cemetery was built about 120 m (130 yd) away. On 30 January 2010, the first body was interred at Fromelles (Pheasant Wood) Military Cemetery and the remaining bodies were buried in individual ceremonies by the Royal Regiment of Fusiliers and the Australian Army. In March 2010, it was reported that 75 Australian soldiers killed at Fromelles had been identified from DNA. On 19 July 2010, the 94th anniversary of the battle, the last soldier (who remained unidentified) was buried. The cemetery was dedicated in a broadcast public ceremony.

Memorials and museum

There are several memorials in the Fromelles area commemorating the battle. The V.C. Corner Australian Cemetery and Memorial was built in the early 1920s, the Australian Memorial Park opened in 1998 and the Fromelles (Pheasant Wood) Military Cemetery was completed in 2010. There are other small cemeteries in the area with burials from the battle. In Fromelles Town Hall, there was a museum (Fromelles Weppes Terre de Mémoire) run by the Association pour le Souvenir de la Bataille de Fromelles (ASBF). The plaque in it pays tribute to the pioneering work of Robin Corfield and Lambis Englezos in gaining wider attention to the battle and the loss of life of so many Australians, as well as British soldiers. To coincide with the unveiling of some new headstones, a new museum was opened in 2014 during an event at the cemetery to mark other soldiers whose remains have been identified.

kids search engine
Attack at Fromelles Facts for Kids. Kiddle Encyclopedia.