
Battle of Beda Fomm facts for kids
Quick facts for kids Battle of Beda Fomm |
|||||||
|---|---|---|---|---|---|---|---|
| Part of Operation Compass, during the Second World War | |||||||
 British pursuit 9 December 1940 – 7 February 1941 |
|||||||
|
|||||||
| Belligerents | |||||||
| Commanders and leaders | |||||||
| Archibald Wavell Richard O'Connor Michael O'Moore Creagh |
Rodolfo Graziani Giuseppe Tellera † Annibale Bergonzoli (POW) |
||||||
| Strength | |||||||
| Western Desert Force (XIII Corps from January 1941) | 10th Army | ||||||
| Casualties and losses | |||||||
| part of 1,928 9 December 1940 – 9 February 1941 |
25,000 PoW | ||||||
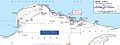
The Battle of Beda Fomm was a key battle during Operation Compass in World War II. This operation took place from December 1940 to February 1941. The battle happened in Libya, a country in North Africa. British and Commonwealth forces fought against the Italian 10th Army.
The British advance was very fast. It forced the Italian army to leave Cyrenaica, which is the eastern part of Libya. In late January 1941, the British found out that the Italians were retreating. They were moving along the main coastal road, called the Via Balbia, from Benghazi.
The British 7th Armoured Division was sent to stop the Italians. They moved through the desert, south of the Green Mountain. At the same time, the 6th Australian Division chased the Italians along the coast. The desert was tough for tanks. So, a special fast group called Combeforce went ahead.
On February 5, Combeforce reached the Via Balbia. They set up roadblocks near Sidi Saleh. This was about 48 kilometers (30 miles) southwest of Antelat. The first Italian soldiers arrived just 30 minutes later and ran into the trap. The Italians attacked on February 6 and 7 to break through. But more British troops arrived. The Australians also pushed them from Benghazi. The 10th Army surrendered later that day.
Between Benghazi and Agedabia, the British captured 25,000 Italian soldiers. They also took 107 tanks and 93 guns. Overall, during Operation Compass, the British captured 133,298 men, 420 tanks, and 845 guns. On February 9, British Prime Minister Winston Churchill ordered the advance to stop. Troops were needed for the war in Greece. The British also couldn't go much further due to vehicle problems and long supply lines. Some Italian soldiers escaped. German troops, including the famous Afrika Korps, soon arrived in Libya to help the Italians.
Background to the Battle
Libya's Situation
In 1936, Italy reorganized its army. They wanted to fight "wars of rapid decision." This meant quick, mobile battles using new technology. But new tanks and radios were slow to arrive. Also, the new equipment was not as good as their enemies'. This made the army less effective.
Cyrenaica was an Italian colony since 1912. Italy prepared to defend its borders with Tunisia and Egypt. The Italian forces in Libya had two main armies. The 5th Army was in western Libya. The 10th Army was in eastern Libya. In mid-1940, they had many divisions, including Italian and Libyan soldiers.
Italian soldiers had high morale. Their navy had fast, well-built ships. But the navy lacked training. The air force was ready in 1936 but had not improved much by 1939. It was not expected to keep up with fast operations.
Egypt's Role
Britain had forces in Egypt since 1882. These forces protected the Suez Canal and the Red Sea route. This route was very important for Britain's connections to its territories. In 1939, General Archibald Wavell became the commander of British forces in the Middle East.
The British had fewer soldiers than the Italians in Libya. But they had the 7th Armoured Division. This was one of Britain's best tank units. In June 1940, the Western Desert Force was formed. Its job was to push back the Italians from their border posts. The 7th Armoured Division was a key part of this force.
Italian forces in Libya were much larger than the British in Egypt. But the Italians had lower morale and some older equipment.
Desert Terrain
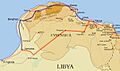
The Western Desert was about 386 kilometers (240 miles) wide. It stretched from Mersa Matruh in Egypt to Gazala in Libya. The only paved road was the Via Balbia. Inland, the desert was a flat, stony plain. It was home to scorpions, snakes, and flies. Only a few nomads lived there.
Desert tracks linked wells. People navigated using the sun, stars, and compass. They also used their "desert sense," which is a good understanding of the environment. In spring and summer, days were very hot and nights were cold. A hot desert wind, called the Sirocco, blew fine sand. This made it hard to see and got everywhere. Vehicles and aircraft needed special filters. All supplies had to be brought in from outside.
Operation Compass Begins
After the Italian army invaded Egypt and advanced to Sidi Barrani, General Wavell ordered a plan. The goal was to push the Italians back. This plan was called Operation Compass. It was first meant to be a short five-day attack. But if it worked, they would continue.
On December 8, 1940, the British attacked Italian camps near Sidi Barrani. The attack was a success. The Italian 10th Army units in Egypt were destroyed or had to retreat. By December 11, the British turned the raid into a full counter-attack. The rest of the 10th Army in Egypt was quickly defeated. The British kept going, chasing the Italians to Sollum, Bardia, and Tobruk. They then moved around the Green Mountain to cut off the Italian retreat at Beda Fomm.
The Battle's Start
Derna and Mechili
The area east of the Green Mountain was defended by the Italian XX Motorized Corps. This included the 60th Infantry Division and the Babini Group, which had tanks. The Babini Group had 120 tanks, but many were new and not ready for battle. A defensive line was set up near Derna. The Babini Group gathered at Mechili Fort, inland from Derna. This fort was important because several desert tracks met there.
On January 22, the British moved towards Derna. The 19th Australian Brigade advanced there. Another Australian brigade reinforced the 4th Armoured Brigade, which was moving towards Mechili. The 10th Army had several commanders during this time. General Giuseppe Tellera took command on December 23, 1940.
On January 23, Tellera ordered a counter-attack near Mechili Fort. He wanted to stop the British from surrounding his troops. But communication was slow among the Italian tanks. The next day, Italian tanks attacked the British 7th Hussars. The British tanks retired quickly. Eventually, the British 2nd RTR joined the fight. They destroyed seven Italian M13 tanks. The British lost one cruiser tank and six light tanks.

Tellera wanted the Babini Group to bother the British. This would cover his army's retreat from Mechili. But General Rodolfo Graziani told him to wait. Babini reported that his group had only 50-60 tanks left. He also heard alarming rumors about 150 British tanks. Graziani then ordered the Babini Group to pull back.
On January 25, the Australians attacked the Italian 60th Infantry Division near Derna airfield. They made slow progress. Italian planes attacked the Australians. The Italians used artillery and machine guns to stop the Australian advance.
The 4th Armoured Brigade was ordered to surround Mechili. But the Babini Group had already left during the night. British planes attacked the group the next day. On January 26, Graziani ordered Tellera to keep defending Derna. He also told him to use the Babini Group to stop British advances. Tellera asked for more tanks, but was refused.
On January 27, the Australians faced heavy Italian artillery fire. They had limited artillery to fire back. The 2/4th Australian Battalion fought off another Italian attack. A British patrol was ambushed by Italian anti-tank guns. Four Australians were killed. The British found a gap at Chaulan, south of Wadi Derna. This threatened to surround the Italians in Derna. So, the Italians retreated on the night of January 28/29. They destroyed roads, planted mines, and set traps to slow the British.
Italian Defenses
Italy's forces in Libya relied on supplies from Italy. These came by road and short railways. The Via Balbia was 965 kilometers (600 miles) long. It often flooded and was now open to British air attacks. Driving off-road to avoid planes caused more vehicle wear.
The Babini Group had escaped destruction at Mechili. But Italian tanks were not as good as British ones. They were also outnumbered. This made the Italians doubt if Derna could be defended. The 10th Army still had about 100 medium and 200 light tanks. About half of these were ready for battle.
Rumors of British spies and rebels in other areas worried the Italians. Graziani soon realized the British wanted to capture all of Cyrenaica. On February 1, he told Benito Mussolini he planned to retreat to Sirte. On February 3, Tellera took command of the retreat. The Australians caught up with the Italians west of Derna on January 31. British planes saw signs of a general Italian withdrawal.
British Plan

In late January 1941, the British learned that the Italians were leaving Cyrenaica through Benghazi. They were using the Via Balbia. The 6th Australian Division chased the Italians along the coast road. The 11th Hussars were on their left flank. Italian reports about the Hussars made Tellera think the 7th Armoured Division was behind the Australians. So, he didn't expect a move through Msus.
The Australians reached Giovanni Berta on February 1. But the Italians retreated too fast for them to trap them. The British commander, O'Connor, had planned to pause and gather supplies. But since the 10th Army wasn't trapped, he decided to keep going. He ignored the lack of supplies and the worn-out tanks.
On February 4, the 7th Armoured Division was ordered to cut off the Italians. They were to move inland about 240 kilometers (150 miles) from Mechili to Msus. This would trap the Italians between Soluch and Ghemines. All British aircraft were to support this move. But many planes were grounded due to engine shortages. This meant the battle had to be won quickly.
Italian radio messages showed that the 11th Hussars were heading for Soluch. Tellera guessed the British tanks would advance on Msus and Sceleidima. He could only retreat faster and plant mines. The rough terrain was hard on British tanks. Broken-down tanks were left behind. On February 4, the 11th Hussars left Mechili. The first 80 kilometers (50 miles) were the worst desert they had seen. By 3:00 p.m., they reached Msus. The Italian garrison quickly left.
Combeforce
Air reconnaissance reported a large Italian convoy south of Benghazi. This meant a general Italian retreat had begun. The British tanks needed more time for repairs. So, General Creagh made a bold decision. He sent a fast group of wheeled vehicles, called Combeforce, southwest. Their job was to block the Via Balbia between Benghazi and Agedabia as quickly as possible. The slower tracked vehicles would follow.
Combeforce was led by Lieutenant-Colonel J. F. B. Combe. It included armored cars, infantry, and artillery. In total, it had about 2,000 men.
The Battle of Beda Fomm
February 5: The Trap is Set
In the Green Mountain area, the 6th Australian Division advanced. They reached Barce on February 5, despite mines and roadblocks. The Australians got to Benghazi by nightfall on February 6. Combeforce reached Antelat in the morning. By 12:30 p.m., they were overlooking the Via Balbia west of Beda Fomm.
An Italian convoy arrived about 30 minutes later. It drove into a minefield and was ambushed. British artillery, anti-tank guns, and armored cars caused chaos. Some Italian soldiers tried to advance, but they had no artillery support. The Italians tried harder to break through. In the afternoon, the British 2nd Rifle Brigade crossed the road. They blocked the route south between the road and the sea. Combe also brought up more troops and artillery. He kept armored cars moving in the desert to prevent the Italians from going around.
Hundreds of prisoners were taken. The first part of the Italian retreat had no tanks or many front-line soldiers. They were trapped. While waiting for the 4th Armoured Brigade, Combe found good hiding spots for tanks. The 4th Armoured Brigade left Msus at 7:30 a.m. They were delayed by mines. They reached Antelat by 4:00 p.m.
Combe told the brigade commander, Caunter, to attack the Italian column. Caunter ordered the 7th Hussars and artillery to speed to the Via Balbia. The 2nd RTR followed. The 3rd Hussars were sent northeast to cut other routes. The tanks moved fast on the flat sand. They soon reached the Via Balbia.
The tanks found the ground good for driving. But some ran out of fuel. The 7th Hussars attacked the Italian column in different places. They caused maximum confusion. The first attackers caught the Italians still. They then drove past the convoy, shooting at everything. The Italians offered little return fire. Many were rear-area staff or civilians. Many drivers tried to escape into the sand dunes and got stuck. Trucks carrying fuel caught fire, lighting up the night. This helped the British gunners. The British artillery wasn't needed for firing. Instead, the crews rounded up 800 prisoners and took Italian vehicles, especially those with fuel.
Seven cruiser tanks from the 2nd RTR arrived. They destroyed an Italian anti-aircraft battery. As night fell, the attacks stopped. The 4th Armoured Brigade had to use fuel from artillery vehicles and captured Italian supplies. They expected a stronger Italian attack in the morning. The tanks pulled back to refuel. Italian movements showed they were getting organized. Reinforcements were arriving from the north.
To the north, the Australians captured Barce. They then moved towards Benghazi. Tellera had to keep some of the Babini Group. He couldn't send all of them south to help Bergonzoli. The 7th Armoured Brigade captured Sceleidima. This fort was defended by the Bignami Group. Tellera sent 30 more tanks from the Babini Group as reinforcements. The Italians couldn't fully reinforce their breakthrough attempts to the south. They also faced Australian attacks from the north.
February 6: Italian Counter-attacks
During the night, Bergonzoli planned an attack down the Via Balbia. This would pin down the British. He also planned a flanking move by the Babini Group through the desert to the east. This would get behind Combeforce. At 8:30 a.m., the Babini Group attacked without artillery support.
Caunter ordered the light tanks to keep bothering the Italian convoy. Cruiser tanks would handle Italian tanks. Artillery would support both. The British had 32 cruisers and 42 light tanks near the Via Balbia. Ten cruisers and eight light tanks were with the 1st RTR to the north. But these were held back as a reserve. The 7th Support Group was held up at Sceleidima by mines and Italian tanks. The 1st RTR lost contact and got lost in a sandstorm. There was no air support because the airfields were too far away.
At dawn on February 6, the Australians continued their attacks on Benghazi. The 1st KRRC made slow progress at Sceleidima. Bignami was ordered to retreat at 10:00 a.m. He sent the Babini Group detachment south. The 7th Support Group followed, occupied Soluch, and sent patrols towards Ghemines and Benghazi.
During the morning, patrols reported the Italian column was many miles long. The 2nd Royal Tank Regiment (2nd RTR) held the Pimple. This was a low hill west of Beda Fomm. From there, they could see the road. The 2nd RTR had 19 cruisers and seven light tanks ready. They were to stop Italian columns by attacking from the east. To the north, the 7th Hussars were sent to find the end of the Italian column. They would attack it from both sides of the road.

At 8:30 a.m., the 2nd RTR faced the Babini Group. The first wave of ten Italian M13 tanks advanced slowly. British cruisers appeared over a ridge and quickly destroyed eight M13s. The cruisers then moved to another ridge and destroyed seven more. Italian artillery fired on the mosque. All remaining Babini Group tanks advanced. The British tanks had radios, unlike most Italian tanks. Italian commanders had to get out of their tanks to receive orders.
At 10:30 a.m., the 7th Hussars tried to cut the road west of Beda Fomm. Another large Italian convoy arrived from the north. It was escorted by M13s. This showed the 10th Army had more than 60 tanks. Support from the 1st RTR was needed. But it had to refuel after getting lost in the sandstorm. The Babini Group M13s mixed with the convoy. They kept the British light tanks away. But the light tanks still caused much damage. The 4th Armoured Brigade moved among the ridges, attacking the column as more M13s arrived. Combeforce could see the fighting. They captured Italians who got through.
By noon, 40 Italian medium tanks were destroyed. About 50 were left. The 2nd RTR had only 13 cruisers left. Three were knocked out by Italian artillery. The Italian rearguard arrived in the afternoon. With more tanks and artillery, the Italians recaptured the Pimple. This opened the road south. The Babini Group's attacks allowed the convoy to move past the Pimple. The British A Squadron chased the Italians, firing into the convoy. Many vehicles caught fire. Drivers abandoned their vehicles or drove into the dunes. There, they faced British artillery and light tank attacks. The British took 350 prisoners.
At 3:00 p.m., the 7th Hussars found the north end of the Italian column and attacked. The 2nd RTR was pushed back from the Pimple. Communication with British artillery failed for an hour. The 1st RTR arrived as night fell. They intercepted the Babini Group trying to break out to the north. But some Italian vehicles and 30 tanks got past the Pimple. Bergonzoli gave up trying to go around the eastern flank. He sent the last of the Babini Group west through the dunes. The 2nd RTR needed to rearm. At 6:00 p.m., they reported they couldn't stop the main column. The column had started moving south through British artillery fire. Caunter ordered the 4th Armoured Brigade to move closer to Combeforce for the night. The 1st RTR was almost complete.
February 7: The Surrender
On February 6, Combeforce faced strong Italian attacks. These were stopped by British artillery and anti-tank guns. Italian infantry used wrecked tanks for cover. But many Italians gave up. During the night, some tanks from the Pimple arrived. Four were destroyed by mines and gunfire. Four got through with some trucks. The rest surrendered.
O'Connor spent February 6 with Creagh at the 7th Armoured Division HQ. They were in touch with the Australian HQ. Advanced Australian troops entered Benghazi unopposed in the afternoon. They were welcomed by the local people. During the night, O'Connor ordered the Australians to send two battalions past Benghazi. They were to attack the end of the 10th Army columns.
Just before dawn on February 7, the 7th Support Group attacked the north end of the Italian convoys. The 2nd RTR moved south along the west side of the Via Balbia. The 1st RTR moved east to cover Combeforce's desert flank. The Italians had only about 30 tanks left. They planned to force their way through Combeforce at dawn.
The Italian attack had artillery support. The British 2nd Rifle Brigade stayed hidden as Italian tanks overran them. The tanks focused on the British anti-tank guns. The British C Battery fired on the Rifle Brigade positions as the tanks passed. The Rifle Brigade then fired on Italian infantry following the tanks. The Italian M13s destroyed all but one anti-tank gun. The last gun was moved by its crew. They fired as the last M13s drove towards the British Officers' mess tent. They knocked out the last tank just 18 meters (20 yards) from the tent.
On the road, the Italians heard British tanks on their flanks and from the rear. Further north, the 4th Armoured Brigade surrounded another group. At this point, the Italians surrendered. The Australians reached El Magrun, about 24 kilometers (15 miles) south of Ghemines. The Beda Fomm area became a 24-kilometer (15-mile) line of destroyed vehicles. There were about 100 guns, 100 destroyed or captured tanks, and 25,000 prisoners. This included General Tellera (who was found badly wounded) and General Bergonzoli.
Aftermath of the Battle
Losses
At the Battle of Beda Fomm, the British captured about 25,000 Italian soldiers. They also took over 100 tanks (many still working), 216 guns, and 1,500 wheeled vehicles. During all of Operation Compass, the British advanced 800 kilometers (500 miles). They destroyed or captured about 400 tanks and 845–1,290 artillery pieces. They took 133,298 Italian and Libyan prisoners. This also included 22 Italian generals.
The British and Commonwealth forces had fewer losses. They suffered about 500 dead, 1,373 wounded, and 55 missing. Some of these losses happened at Beda Fomm.
Next Steps
The defeat of the 10th Army meant the British could hold Cyrenaica with fewer forces. The Navy and Air Force commanders did not want another attack. They had supported two land campaigns and protected Egypt. On February 9, Churchill ordered the advance to stop. Troops were sent to Greece to help in the Greco-Italian War.
On February 11, the first troops of the German Afrika Korps landed in Libya. This was part of Operation Sunflower. With the Germans arriving, the Axis forces became stronger. The British now faced a better-equipped enemy. On March 25, General Italo Gariboldi replaced Marshal Rodolfo Graziani as Governor-General of Libya. On February 14, German Ju 87 Stuka dive-bombers attacked British troops.
Images for kids
-
British pursuit 9 December 1940 – 7 February 1941
-
Tobruk–Agedabia, 1940–1941

