
Battle of Bir Hakeim facts for kids
Quick facts for kids Battle of Bir Hakeim |
|||||||
|---|---|---|---|---|---|---|---|
| Part of the Battle of Gazala | |||||||
 Free French Legionnaires wearing distinctive kepi hats "leap up from the desert to rush an enemy strong point". |
|||||||
|
|||||||
| Belligerents | |||||||
| Commanders and leaders | |||||||
| Strength | |||||||
| 3,703 men | 45,000 men | ||||||
| Casualties and losses | |||||||
| 141 killed 229 wounded 814 captured 53 guns 50 vehicles 110 aircraft |
3,300 killed or wounded 227–845 captured 164 vehicles 49 aircraft |
||||||
| Bir Hakeim was first attacked by the "Ariete" Division early in the Battle of Gazala, then by a mixed force of the "Trieste" and 90th Light divisions. | |||||||
The Battle of Bir Hakeim was a fierce fight that happened in the Libyan Desert during World War II. It took place at Bir Hakeim, an oasis (a place with water in the desert) located south-west of Tobruk. From May 26 to June 11, 1942, the 1st Free French Brigade, led by General Marie-Pierre Kœnig, bravely defended this position. They faced much larger Axis forces, including German and Italian troops, commanded by General Erwin Rommel.
The French defense at Bir Hakeim was very important. It slowed down the Axis attack, which helped the Allies. This delay even caused the Axis to cancel their plan to invade Malta, a key island. Rommel then tried to invade Egypt, but the British forces managed to slow him down. This led to the First Battle of El Alamein in July, where the Axis advance was finally stopped. Both sides used the battle for propaganda. Winston Churchill, the British Prime Minister, called the Free French soldiers "Fighting French" because of their courage.
Contents
The Desert War Begins
The British Eighth Army
In early 1942, the British Eighth Army was fighting Axis troops in Libya. They were positioned about 30 miles (48 km) west of the port of Tobruk. Both sides were gathering supplies for a big attack. The British knew the Axis would likely attack first.
The British commander, Lieutenant-General Neil Ritchie, decided to fight a defensive battle. He thought the Axis might try to go around the British lines from the south. To prepare, the British had received new M3 Grant tanks. These tanks had powerful guns that could damage enemy tanks. They also had strong armor to protect them. New 6-pounder anti-tank guns also arrived, making the British defense stronger.
Rommel's Panzerarmee Afrika
The Axis leaders decided that Rommel's Panzerarmee Afrika (Tank Army Africa) should attack at the end of May. Their goal was to capture Tobruk. The German military intelligence had broken British codes, which gave them important information about British plans.
Air attacks by German and Italian planes on Malta helped the Axis. This made it easier for their supply ships to reach Africa. Rommel's plan, called "Operation Venice," was to send his tanks around the southern end of the British defense line. The Italian "Ariete" Division would attack the Bir Hakeim "box" (a fortified area). Other German tank divisions would go further south, then turn north to cut off British forces. A German battle group would head towards El Adem, south of Tobruk, to block supply routes. They even used trucks with aircraft engines to create dust, making it look like a huge tank force was coming!
The Italian "Trieste" Division would create a path through the minefields north of Bir Hakeim for supplies. Rommel hoped to capture key areas quickly. By late May, the Axis had about 90,000 men, 560 tanks, and 542 aircraft ready for the attack.
Preparing for Battle
The Gazala Line
The British Eighth Army had set up a strong defense line called the Gazala line. It stretched from the coast near Gazala to the old fort of Bir Hakeim in the south. This line was made of several "defensive boxes." Each box was a fortified area for a brigade (a large group of soldiers). These boxes were protected by minefields and barbed wire.
The 1st Free French Brigade was positioned at the very south, at the Bir Hakeim box. The line was stronger near the coast, but deep minefields protected the southern part. Behind the main Gazala line were other fortified areas to block important roads. By late May, the British had about 110,000 men, 843 tanks, and 604 aircraft.
Bir Hakeim Fort
The fort at Bir Hakeim was an old Ottoman fortress. It was later used by Italian camel troops. The wells there had dried up, but Indian troops had rebuilt it into a strongpoint. It was surrounded by 50,000 mines! The fort was shaped like a rough pentagon, about 2.5 by 3 miles (4 by 5 km) wide.
On February 14, the 1st Free French Brigade took over the fort. They had about 3,000 fighting men. The brigade included the 13th Demi-Brigade of the Foreign Legion, a very experienced unit. By mid-May, the fort was like a honeycomb, with 1,200 trenches, foxholes, gun positions, and underground bunkers. Vehicles and supplies were hidden in deep, camouflaged spots. The fort was divided into zones, with General Kœnig's headquarters in the center. French patrols used lanes in the minefields to keep watch.
The Battle of Gazala Begins
On May 26, the Italian X and XXI Corps began a direct attack on the center of the Gazala line. Some German tanks joined in to make it look like the main attack. But after dark, the main German tank forces secretly moved south, circling around the Gazala line.
Early on May 27, the main Axis force, including the German Afrika Korps, went around the southern end of the Gazala line. The "Ariete" Division was briefly stopped by the 3rd Indian Motor Brigade south-east of Bir Hakeim. German tanks then fought the British 4th Armoured Brigade. The new M3 Grant tanks surprised the Germans with their powerful guns. By late morning, the British had pulled back, and Axis tanks had advanced far north. However, the British 1st Armoured Division stopped their advance around noon.
On the right side of the Axis attack, the 90th Light Division pushed the British 7th Motorised Brigade back. Armored cars from the 90th Light Division even overran the headquarters of the 7th Armoured Division. The British commander, Major-General Frank Messervy, was captured but managed to escape by pretending to be a regular soldier! The 90th Light Division reached the El Adem area and captured several supply bases.
The Siege of Bir Hakeim
First Attacks (May 27)
The German and Italian tank divisions began their big circling move south of Bir Hakeim. The 3rd Indian Motor Brigade was surprised and overwhelmed by the Italian "Ariete" Division. They lost many men and most of their equipment.
After this, the Italian "Ariete" Division moved towards Bir Hakeim. One battalion of 60 tanks charged the fort's minefield and barbed wire. They lost 31 tanks and a self-propelled gun. Ten tanks made it through the minefield but were quickly destroyed by the French 75 mm anti-tank guns. The Italians suffered 124 casualties. The remaining Italian tanks pulled back.
Holding the Line (May 28–30)
On May 28, the British Desert Air Force (DAF) tried to attack Axis columns near Bir Hakeim. But in bad visibility, they accidentally bombed Bir Hakeim itself! The French had to destroy Italian tank wrecks nearby to prevent more mistakes. A French group went out and destroyed seven enemy half-tracks.
On May 29, another French group destroyed three German tanks. British planes attacked Axis supply lines. On May 30, 620 Indian soldiers, who had been captured and released in the desert, reached the fort. This made the water shortage worse, as there were already 243 prisoners inside. A French group led by Colonel Dimitri Amilakhvari sealed a breach in the minefields that Axis tanks had made.
Sandstorms and Supply (May 31–June 1)
On May 31, during a two-day sandstorm, 50 supply trucks reached Bir Hakeim with water. They took the Indian soldiers, prisoners, and seriously wounded back to British lines. A French raid destroyed five tanks and a vehicle repair workshop.
The Axis forces had been forced to retreat west into an area called the "Cauldron." They had been attacking the British 150th Infantry Brigade box. On June 1, the 150th Infantry Brigade was overrun. This meant the Axis troops who had been trapped now had a supply route. The next morning, the Axis forces, including the 90th Light Division and "Trieste" Division, again surrounded Bir Hakeim. German and Italian officers approached the fort, demanding that the French surrender, but General Kœnig refused.
Heavy Bombing (June 2–4)
From June 2, both sides exchanged artillery fire. The French guns were outmatched by the German artillery. German and Italian planes, especially Junkers Ju 87 (Stuka) dive-bombers, attacked Bir Hakeim more than 20 times. But the French positions were so well built that they were almost unharmed.
The British could not send reinforcements. The French fought off an attack by the "Ariete" Division. The British Desert Air Force focused on bombing Axis vehicles around the fort. This helped keep the French soldiers' spirits high. On June 4, DAF planes fought off Stuka attacks and bombed Axis vehicles, even blowing up an ammunition wagon in front of the French. General Kœnig sent a message to the British Air Vice-Marshal: "Bravo! Thanks for the RAF!"
Pushing Harder (June 5–7)
From June 5 to 6, the DAF flew fewer missions at Bir Hakeim, focusing on other areas. On June 6, the 90th Light Division attacked with engineers to clear a path through the minefield. The engineers got very close to the fort and managed to clear several paths into the inner defenses during the night. German infantry gained a foothold, but the French in their foxholes fought back fiercely, forcing the Germans to take cover.
On June 7, DAF planes attacked the Germans in the minefields. That night, a last convoy of supplies reached the fort through thick fog. The Germans used the fog to prepare a final assault. Tanks, 88 mm guns, and engineers gathered in front of the fort.
The Final Assault (June 8–9)
On the morning of June 8, Rommel sent more forces, including parts of the 15th Panzer Division, to the siege. He ordered an attack from the north, with artillery firing directly at the fort. German planes made constant attacks, including a raid by 45 Stukas and many other bombers and fighters. The attack began, aiming for a small hill that overlooked the French defenses. The defenders fought bravely despite many casualties. In the afternoon, another 60 Stukas bombed the fort, and attacks came from all sides of the northern defenses. An ammunition dump exploded, and the French perimeter was pushed back.
General Kœnig reported that his soldiers were exhausted, had suffered many losses, and were running out of supplies. He asked for more air support and a rescue operation. The DAF flew a record 478 missions that day, and during the night, planes dropped supplies to the fort.
On the morning of June 9, more German planes attacked Bir Hakeim. German artillery and aircraft bombarded the fort. Then, a two-pronged attack hit the perimeter. Italian infantry fought alongside German units. The objective was a small rise in the ground that the French used to control their firing. The French fought hard but were forced back. In the afternoon, German infantry got within 200 yards (180 m) of the fort. As 130 planes bombed the north side of the fort, German infantry and tanks attacked. The attackers broke through some French lines, but a counter-attack pushed them back.
The British commander, Messervy, suggested that the French might need to break out. Kœnig asked for air protection for an evacuation that night. But it was too short notice, so the garrison had to wait until the night of June 10.
The Great Escape (June 10–11)
On June 10, the French continued to hold on, but they suffered many casualties. They had very little ammunition left. In the afternoon, the biggest air attack of the siege happened: 100 Stukas dropped 130 tons of bombs. The last rounds of ammunition were given out. Rommel predicted Bir Hakeim would fall the next day, but he didn't want to attack with tanks because of the minefields.
As darkness fell, engineers began clearing mines from the western side of the fort. Heavy equipment was prepared to be destroyed. Two companies stayed behind to make it look like the French were still there. A meeting point was set up with the British 7th Motor Brigade, who brought trucks and ambulances about 4 miles (7 km) south of the fort.
Clearing the mines took longer than expected, and only a narrow path was cleared. Vehicles got lost, and the ambulances left 75 minutes late. General Kœnig put the fort under the command of Colonel Amilakhvari and left at the head of the column in his car, driven by Susan Travers, an Englishwoman who was the only female member of the French Foreign Legion.
A flare went up, and Axis troops opened fire. The guide for the headquarters column got lost and hit mines three times. When Kœnig caught up with the main column, it was blocked by German troops. He ordered them to charge forward, even through the mines. Many brave soldiers were killed in the chaos. The British had organized the reception, guiding the ambulances and trucks. Most of the brigade, about 2,700 out of 3,600 men, managed to break out, including 200 wounded. They reached British lines by the morning of June 11.
Aftermath
Who Won and What Was Lost?
The Battle of Bir Hakeim was a tough fight for both sides. The French and their allies lost about 141 soldiers killed, 229 wounded, and 814 captured. They also lost 53 guns and 50 vehicles. The British Royal Air Force lost 86 aircraft in air combat and 24 to anti-aircraft fire.
The Axis forces also suffered heavy losses. They had about 3,300 soldiers killed or wounded, and between 227 and 845 captured. They lost 164 vehicles and 49 aircraft. The Italian Air Force lost 21 planes. Even though the French had to retreat, their brave defense at Bir Hakeim was a major victory for Allied morale and a significant delay for Rommel's plans.
See also
- North African campaign timeline
- List of World War II Battles
Images for kids
-
Map of the Gazala line and Operation Venice, May–June, 1942.
-
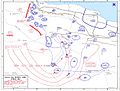
Axis advance, opening of Operation Venice
-
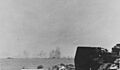
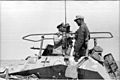
A German 20 mm anti-aircraft gun in the foreground and a German air raid on Bir Hakeim in the background
-

French anti-tank 75 mm gun in action.
-
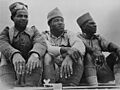
Three soldiers of the French Colonial Artillery who distinguished themselves in the battle at Bir Hakeim, from Senegal, Equatorial Africa and Madagascar, respectively.
-
Erwin Rommel and Fritz Bayerlein near Bir Hakeim.
-

Free French Forces evacuate Bir Hakeim.


.jpg)


