Battle of Wareo facts for kids
Quick facts for kids Battle of Wareo |
|||||||
|---|---|---|---|---|---|---|---|
| Part of the Huon Peninsula campaign of World War II | |||||||
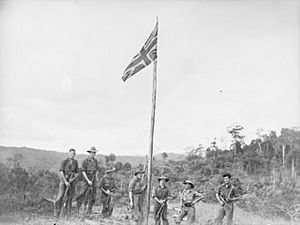
 Troops from the Australian 2/23rd Infantry Battalion raise the Union flag over Wareo, 9 December 1943 |
|||||||
|
|||||||
| Belligerents | |||||||
| Commanders and leaders | |||||||
| Units involved | |||||||
|
|
||||||
| Strength | |||||||
| ~ 13,000 | ~ 4,600 | ||||||
| Casualties and losses | |||||||
| 47 killed, 332 wounded | 451 killed and 1 captured | ||||||
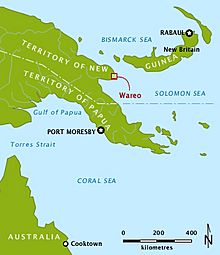
The Battle of Wareo was a series of fights between Australian and Japanese forces. It happened in New Guinea during World War II, from November 27 to December 8, 1943. This battle was part of the larger Huon Peninsula campaign.
After the Australians captured a place called Sattelberg, they pushed north towards Sio. The Australians used many soldiers from four different infantry groups, plus artillery, engineers, and tanks. The Japanese had fewer soldiers, mainly from two infantry groups, with only a little artillery help.
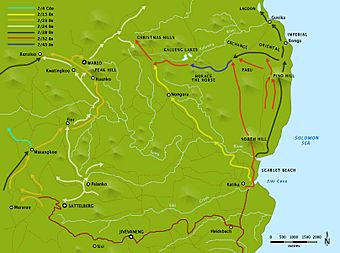
The Australian attack moved in three directions. One group advanced from Sattelberg in the west. Another group moved from North Hill on the coast. A smaller group attacked from Nongora in the middle. Heavy rain and tough jungle made it hard for the Australians to get supplies. Soldiers also got sick or tired, with more falling ill than getting hurt in combat.
The Japanese fought hard, but they also ran out of supplies. They had to pull back further north. Wareo was captured by the Allies on December 8. After this, the Australians kept pushing north into early 1944.
Contents
Why This Battle Happened
In September 1943, Australian forces started a big plan called Operation Cartwheel. This plan was led by General Douglas MacArthur. The goal was to attack the main Japanese base at Rabaul. Things went well at first. The town of Lae was captured on September 16.
Australian soldiers then moved along the coast towards the Huon Peninsula. On September 22, parts of the Australian 9th Division landed at Scarlet Beach. From there, they spread out to capture Finschhafen. They also started moving towards Sio.
The Allies were moving faster than they expected. But at Finschhafen, they faced problems. It was hard to get enough supplies and equipment. Heavy rains stopped them from opening a key road. This meant they couldn't build an airbase as planned. Without air support, another attack had to be delayed.
The Japanese then tried to fight back. A large Japanese force, led by Lieutenant General Shigeru Katagiri, attacked in October. But their attack failed. They then retreated inland to a high peak at Sattelberg.
By November 5, the Allies decided to make Finschhafen a major base. But the Japanese on Sattelberg were a threat. So, on November 16, Australian soldiers were sent to capture Sattelberg. After 10 days of fighting, Sattelberg was taken on November 25. The Japanese had many losses and few supplies. They pulled back north to Wareo to get ready for more Australian attacks.
Getting Ready for Battle
Getting supplies to the soldiers was a huge challenge for both sides. The Allies used special boats to bring supplies from Lae. These boats made many trips, carrying troops and tons of cargo. Larger ships brought tanks and big artillery guns.
Once supplies arrived at Finschhafen, they were moved by jeeps. In areas where jeeps couldn't go, soldiers carried supplies by hand. Many Australian and American troops also arrived to build up the base at Finschhafen.
The Japanese also used boats to move supplies. They used submarines and barges to avoid Allied planes. But these were still often attacked. Moving supplies on land was also hard for the Japanese. They didn't have many local helpers or enough trucks. So, soldiers had to carry supplies themselves.
Before the main battle, Australian soldiers explored the area north of Scarlet Beach. They found important paths and hills. One hill, called "Pabu" by the Australians, was very important. It was close enough for Australian artillery to reach. This meant a small group of soldiers there could stop Japanese supplies.
In October, the Japanese attacked and forced the Australians to leave Pabu. But the Australians wanted it back. In mid-November, Australian soldiers were sent to take Pabu again. After heavy shelling, they captured the hill. They set up machine guns and attacked Japanese supply groups.
The Japanese commander, Katagiri, realized his soldiers were in danger. He decided to try and retake the North Hill–Pabu area. On November 22, strong Japanese forces attacked North Hill. They also attacked the Australians around Pabu. The fighting lasted 10 days. Despite being low on food, the Australians held their ground. They caused many losses for the Japanese. The Japanese general later said losing Pabu Hill was a main reason for their defeat.
After these Japanese attacks failed, the Australians continued their advance. Their plan was a three-part attack with about 13,000 soldiers. One group would go to Wareo. Another group would capture the area from Gusika on the coast to the "Lakes." A third group would advance in the middle towards Wareo from Nongora.
The Battle of Wareo: Key Fights
Pushing Towards Bonga
On the coast, Australian soldiers began clearing the area between Bonga and North Hill on November 27. The Japanese had about 4,670 soldiers in the area. The Australian advance was slow. The jungle was too thick for tanks to move easily. Engineers had to build bridges for the tanks to cross streams.
The Japanese eventually pulled back. By November 29, Bonga was taken. Soon after, Australian patrols found Gusika empty. It was a large Japanese headquarters, but it was abandoned. The fall of Bonga cut off a Japanese supply route. This made it even harder for them to get supplies.
The Australians then planned to capture Gusika and a position called "Horace's Ears." More Australian soldiers arrived to help. The terrain was very difficult. It had steep hills, deep ravines, and thick jungle. This made it hard for vehicles and caused soldiers to get very tired.
Japanese Stand at Horace's Ears
By November 30, the Australian commander, Wootten, had many soldiers ready. The advance continued. Australian tanks and infantry moved forward. They met Japanese resistance but pushed through with artillery support.
The Japanese had built strong defenses at "Horace's Ears." They decided to fight hard there. They used guns and machine guns. The Australians called in heavy artillery fire. They then attacked up a steep, grassy slope. Even though one tank broke down, the Australians captured the position that evening.
Fighting Around Kalueng Lakes
On December 1, Australian patrols explored the area around the "Lagoon." They found a Japanese position and attacked it. Later, they were blocked by another Japanese force. They had to retreat and spent the night in the rain.
On December 2, Australian tanks and infantry moved towards the Lakes. They met strong Japanese resistance in a wooded area. Machine guns pinned them down. Two tanks came forward and destroyed the Japanese position. Another Australian tank got stuck in the mud.
Later, the last tank, named "Costello," was hit more than 50 times by Japanese artillery. The crew was safe, but they had to leave the tank. The Australians then pulled back. The next day, the Japanese left the area. The Australians advanced slowly, facing mines left behind. They finally captured the area around the Lakes on December 3.
Nongora and Christmas Hills
On November 30, Australian soldiers advanced north from Nongora. They crossed a river and met Japanese machine gun fire. The Australians fought through and continued their advance. They set up a defensive position near a high hill.
On December 1, the Australians tried to capture this high ground. They suffered losses and were pushed back. But during the night, the Japanese left the ridge. The next day, the Australians entered Nongora. They then sent patrols towards the Christmas Hills.
The fighting for Christmas Hills was tough. On December 5, the Japanese pulled back from their forward positions. Australian soldiers then pushed towards the Christmas Hills. They found the Japanese well-dug in. A fierce fight happened, but the Australian attack was stopped.
On December 6, the Australians attacked again with heavy artillery. The attack was pushed back. After more shelling, Australian soldiers managed to get a foothold on the hill. That night, the Japanese retreated again. The next day, the Australians captured Christmas Hills.
The Final Push to Wareo
In the west, Australian soldiers began moving north from Sattelberg on November 27. The journey to Wareo was long and difficult due to the terrain. They searched for a way to cross the Song River. The Japanese had strong positions in thick bamboo. They fired on the Australians, stopping their advance.
During the night, the Japanese pulled back across the Song River. They destroyed the bridge behind them. The next morning, the Australians advanced unopposed to Fior. They found the main bridge destroyed. After finding another crossing, they established themselves on the other side of the river.
On November 30, Australian soldiers moved up a steep slope. They attacked Japanese positions from behind, killing many. The rest of the Australian force then crossed the river. They continued to advance north.
Heavy rain made the ground muddy, and tanks couldn't move forward. Supplies became a big problem. Soldiers had to carry supplies themselves. On December 1, Australians cleared more Japanese positions and entered Kuanko. They met more Japanese resistance beyond the village.
The next morning, Australians found strong Japanese positions along a ridge. They called in artillery fire. The Japanese launched a quick attack, pushing the Australians back. A night attack by the Australians failed. The Japanese then tried to surround the Australian position.
By December 5, the Australians had enough supplies to continue. They tried to go around the Japanese positions. On December 6, they found many abandoned Japanese positions. They called in artillery fire on Wareo, which they could see in the distance. They attacked Peak Hill, but the Japanese held their ground.
The Japanese pulled back again during the night. On December 7, the Australians captured Peak Hill. They continued to advance until they were stopped by fire near Wareo. They found Kwatingkoo heavily defended. The Australian soldiers were very tired. But early on December 8, Kwatingkoo was captured without a fight. Soon after, Wareo was also captured.
What Happened After Wareo
The Australians had faced bad weather, tough land, supply issues, and strong Japanese defense. But they had secured the Wareo–Gusika area. The Japanese commander, Katagiri, ordered his tired and hungry troops to retreat north.
The Australians also needed rest. Many soldiers were sick with tropical diseases. These illnesses caused more losses than the fighting itself. Even after Wareo fell, some fighting continued. The Japanese left a small force to protect their main troops as they pulled back.
On December 8, Australian soldiers were attacked near Bazuluo. Eight Australians were killed. A strong group of Japanese also held out on a hill northeast of Wareo. On December 12, a big fight happened there. Australians attacked the Japanese, killing many and capturing the hill.
Meanwhile, other Allied forces landed on New Britain. Australian soldiers also continued their advance up the coast towards Sio. They captured Sio in early January 1944.
After the war, the Australian Army honored these battles. Special awards were given for "Pabu," "Gusika," "Wareo," and "Nongora." During the capture of Wareo and Gusika, 451 Japanese were killed, and one was captured. The Australians lost 47 killed and 332 wounded.


