
First Battle of Gaza facts for kids
Quick facts for kids First Battle of Gaza |
|||||||
|---|---|---|---|---|---|---|---|
| Part of the Middle Eastern theatre of World War I | |||||||
 Ottoman officers who successfully defended Gaza during the first battle |
|||||||
|
|||||||
| Belligerents | |||||||
|
|||||||
| Commanders and leaders | |||||||
| Units involved | |||||||
|
Eastern Force
|
Fourth Army
|
||||||
| Strength | |||||||
| 31,000 | 19,000 | ||||||
| Casualties and losses | |||||||
| 523 killed 2,932 wounded 512 missing |
|||||||
The First Battle of Gaza happened on March 26, 1917, during World War I. It was the first time the British Empire's army, called the Egyptian Expeditionary Force (EEF), tried to capture the city of Gaza in southern Palestine.
British infantry (foot soldiers) and mounted troops (soldiers on horses or camels) attacked Gaza. They almost captured the city. However, as it got dark, and with many Ottoman (Turkish) soldiers arriving to help defend Gaza, the British forces pulled back. This meant the Ottomans won the battle. A few weeks later, the British tried again in the Second Battle of Gaza, but they lost that one too.
Contents
Why Gaza Was Important

By early 1917, the British EEF had secured the Suez Canal and captured the Sinai Peninsula. This brought them close to Gaza. Capturing Gaza was a key step for the British. They wanted to advance further into Palestine and eventually capture Jerusalem. Gaza was a very old city, important for trade and farming. It had strong natural defenses, like hills and thick cactus hedges. The Ottoman army also built trenches and forts around it.
The British commander, General Archibald Murray, wanted more soldiers for this attack, but his request was turned down. The British government decided to focus on the Western Front in Europe first. However, after some political changes and other battles, the British were encouraged to push forward in Palestine.
Getting Ready for Battle
To prepare for the attack, the British built a railway and water pipeline across the Sinai Peninsula. This helped them bring supplies and water to their troops. They also reorganized their mounted units, creating new divisions like the Imperial Mounted Division.
British planes also bombed Ottoman railway lines and supply depots. This was to make it harder for the Ottomans to move troops and supplies.
The Armies Prepare

The British thought the Ottoman forces defending Gaza were weak, with about 2,000 soldiers. However, the Ottomans had secretly brought in many more troops, bringing their total to nearly 4,000 soldiers in Gaza, with more nearby. The Ottoman commander, Friedrich Freiherr Kress von Kressenstein, also planned to send his main forces to attack the British supply lines, hoping to cut them off.
British Attack Plan

The British attack force had about 31,000 soldiers: 12,000 infantry and 11,000 mounted troops. They also had many field guns. The plan was for the infantry to attack Gaza directly from the south and east. Meanwhile, the mounted troops would surround Gaza from the north and east. Their job was to stop Ottoman reinforcements from reaching the city. They also needed to prevent the Gaza defenders from escaping.
General Charles Macpherson Dobell was in charge of the British Eastern Force. General Philip Chetwode commanded the Desert Column, which included the mounted divisions and some infantry.
Moving into Position
On March 25, the British troops began moving. The mounted divisions marched towards the Wadi Ghuzzee, a dry riverbed, to find crossing points. The infantry followed.
On the morning of March 26, a very thick fog covered the area. This made it hard for the British to see and plan. However, most of the infantry managed to cross the wadi. By 7:55 AM, the fog began to lift.
The mounted divisions quickly moved around Gaza, cutting off roads and telegraph lines. They formed a 15-mile-long screen around the city. This surprised the Ottoman commander in Gaza, who reported being attacked from all sides. He was ordered to hold Gaza "to the last man."
The Battle Begins
The British 53rd (Welsh) Division, which hadn't fought in a long time, launched a direct attack on Gaza from the south and east. Their main target was Ali Muntar, a high hill that overlooked the city. The attack was delayed because of the fog and communication issues. When it finally began around noon, the infantry faced strong resistance. The Ottoman defenders were in well-built trenches and had a clear view of the attacking British soldiers. The British suffered many casualties.
Mounted Troops Join In

By early afternoon, the British commander, Chetwode, worried that Gaza wouldn't be captured before dark. He ordered the mounted divisions to join the attack. The Anzac Mounted Division was told to attack Gaza from the north. The Imperial Mounted Division and Imperial Camel Corps Brigade would continue to hold the screen around the city, stopping Ottoman reinforcements.
The Anzac Mounted Division began its attack at 3:40 PM. They faced tough fighting, especially around the thick cactus hedges outside Gaza. The soldiers had to get off their horses to fight.
At the same time, the infantry continued their push. The 160th Brigade captured an area of entrenched gardens. The 161st (Essex) Brigade joined the fight and managed to break into the Ottoman trenches east of the Ali Muntar mosque. They captured German, Austrian, and Ottoman soldiers. By 4:45 PM, the 53rd (Welsh) Division reported that they had captured Clay Hill, very close to Ali Muntar.
Between 4:30 PM and 5:00 PM, the infantry and dismounted New Zealanders captured Ali Muntar. The New Zealanders then pushed into the northern and eastern parts of Gaza, fighting through orchards and cactus hedges. They even captured two Ottoman guns.
Ottoman Reinforcements Arrive

While the British were fighting their way into Gaza, Ottoman reinforcements began to arrive from the east and north. The Imperial Mounted Division and the Imperial Camel Brigade had to fight hard to hold them back. They used armored cars to help stop the Ottoman advance.
The Decision to Retreat

By dusk (around 6:00 PM), the British had captured most of their targets, including Ali Muntar, and were pushing into Gaza. They had taken many prisoners, including an Ottoman general. However, some Ottoman trenches still held out, and large Ottoman reinforcements were getting closer.
Because of the late start to the battle and the threat from these new Ottoman forces, the British commanders, Dobell and Chetwode, decided to pull back. They ordered the mounted forces to withdraw across the Wadi Ghuzzeh. Even though Ali Muntar had been captured, the order to retreat stood.
Many of the British soldiers were confused by this order, as they felt they were close to victory. The withdrawal was difficult, especially for the mounted troops who were far from their horses. The Imperial Mounted Division stayed behind to cover the retreat of the Anzac Mounted Division.
The infantry also began to withdraw. There were some misunderstandings about how far back they should go, leading to some captured positions being abandoned. By the morning of March 27, the Ottomans had reoccupied Ali Muntar and parts of Green Hill. The British tried to retake them but were forced to pull back again. By the evening of March 27, all British forces had retreated to the west bank of the Wadi Ghuzzeh.
Aftermath

The First Battle of Gaza was an Ottoman victory. The British suffered about 4,000 casualties (killed, wounded, or missing), mostly from their infantry divisions. The Ottoman forces had about 2,447 casualties.
Despite the defeat, British commanders tried to present the battle as a success, saying it had forced the Ottomans to fight. However, an Ottoman plane dropped a message saying, "You beat us at communiqués, but we beat you at Gaza." The commander of the 53rd (Welsh) Division resigned after the battle due to health reasons.
The British quickly began preparing for another attack. The Second Battle of Gaza started just a few weeks later, on April 17, 1917.
Images for kids
-
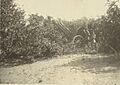
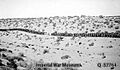
Ottoman gun among the hedges near Gaza
-
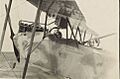
Felmy in his Albatros at Huj
-
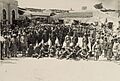
Australian prisoners captured at Shellal
-
British infantry marching on the wire road across the desert between Bir el Mazar and Bardawil in February 1917
-
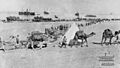
Stores being unloaded and carried to a dump being constructed behind the tent at El Arish. A caravan of loaded camels is in the foreground
-
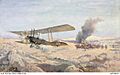
Painting by Septimus Power of Lieutenant Frank McNamara and Captain David Rutherford No. 67 Squadron, 5th Wing Royal Flying Corps, returning from aerial bombing near Gaza on 20 March 1917
-
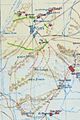
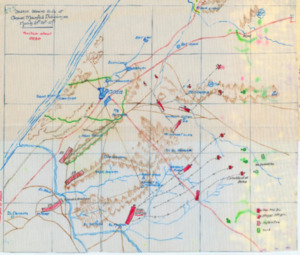
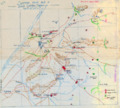
Four arrow headed red dotted lines indicate direction of infantry attack
-
Positions of the attacking force shown in red and hostile force in green at about 14:00
-
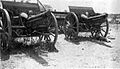
Two Krupp Guns captured by the Wellington Mounted Rifle Regiment
-
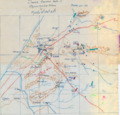
Position at about 18:00


