
Second Battle of Gaza facts for kids
Quick facts for kids Second Battle of Gaza |
|||||||
|---|---|---|---|---|---|---|---|
| Part of the Middle Eastern theatre of World War I | |||||||
 Ottoman machine gun corps defending Tel esh Sheria, and the Gaza line in 1917. |
|||||||
|
|||||||
| Belligerents | |||||||
|
|
||||||
| Commanders and leaders | |||||||
| Units involved | |||||||
| 52nd (Lowland) Division 53rd (Welsh) Division 54th (East Anglian) Division Anzac Mounted Division Imperial Mounted Division Imperial Camel Brigade |
Fourth Army
|
||||||
| Casualties and losses | |||||||
| 509 killed, 4,359 wounded, 1,534 missing Total: 6,444 & 3 tanks |
82–402 killed, 1,337–1,364 wounded, 247 missing, 200 prisoners |
||||||
The Second Battle of Gaza was a major fight during World War I. It happened from April 17 to 19, 1917. This battle took place in Gaza, a city in southern Palestine.
The British and their allies, known as the Egyptian Expeditionary Force (EEF), had tried to capture Gaza once before. That first attempt in March 1917 failed. The Ottoman army, supported by Germany, had made Gaza very strong. They built many trenches and forts around the city.
In this second battle, the EEF attacked these strong defenses head-on. They used many soldiers and even some early tanks. However, the Ottoman defenders were ready. Their strong positions and artillery caused huge losses for the attackers. The battle ended with a victory for the Ottoman forces.
Contents
Why Gaza Was Important
A City with a Long History
Gaza is one of the oldest cities in the world. It has been fought over for thousands of years. Many ancient empires, like the Egyptians and Assyrians, tried to control it. Even Alexander the Great attacked Gaza in 332 BC.
By 1917, Gaza was an important place for trade and farming. It had a large grain depot and a German steam mill. People grew barley, wheat, olives, and oranges there. The city was also a key point in the Ottoman defenses.
After the First Battle
Before the Second Battle of Gaza, the EEF had won some smaller battles. They had pushed the Ottoman army out of the Sinai Peninsula and into southern Palestine. But the First Battle of Gaza was a tough defeat for the British.
After that first battle, the Ottoman army quickly made their defenses around Gaza even stronger. They added more trenches and forts. This made it very hard for the EEF to attack directly. The British commanders knew they needed a big win. Their reputation depended on it.
Getting Ready for Battle
New Plans and Troops
The British army brought in more supplies and built new railway lines. This helped them move soldiers and equipment closer to Gaza. The soldiers' spirits were high, even after the first defeat.
The British also changed how their troops were organized. The Desert Column, which included mounted soldiers (like cavalry), was now focused on fighting on horseback. They were meant to protect the main infantry attack.
Eyes in the Sky
Both sides used airplanes to spy on each other. Airplanes took photos of enemy trenches and positions. This helped commanders plan their attacks. The skies above Gaza became a battleground too. German planes fought British planes. Both sides also dropped bombs from the air.
One soldier wrote about the air battles: "I should think there are at least three hundred smoke wreaths floating above us in the sky... A Taube and an English plane are manoeuvring and occasionally getting in a shot at one another."
Tanks and Artillery
The British brought eight Mark I tanks to Gaza. These were some of the first tanks ever used in war. They were big, slow, and looked like giant metal boxes. The British hoped these tanks would scare the Ottoman defenders and help the infantry break through.
The British also had 170 artillery guns. Some of these were very large. They even used gas shells for the first time in this campaign. However, there were not enough guns to cover the whole battle line.
Helping the Wounded
Moving wounded soldiers was a big challenge. Ambulances and medical teams stayed behind the front lines. Soldiers often had to be rescued under enemy fire. They were then taken to hospitals further away by railway.
The Battle Begins
First Attacks: April 17-18
The battle started on April 17. British infantry divisions attacked Ottoman outposts. They wanted to capture key hills and ridges, like Sheikh Abbas and Mansura Ridge. These positions would give them a better starting point for the main attack on Gaza.
The British soldiers faced strong resistance. Ottoman artillery fired heavily on them. Two tanks tried to help, but one was quickly hit and stopped. Despite heavy fighting, the British managed to capture some of their first goals. They then dug in and prepared for the next day.
The mounted troops, like the Anzac Mounted Division, protected the infantry's right side. They also tried to draw away Ottoman forces from Gaza. They faced bombing from enemy planes and artillery fire.
Main Assault: April 19
On April 19, the main attack on Gaza began. It started with a two-hour artillery bombardment. British and French ships also fired their big guns at Ottoman positions near the coast.
Infantry Attacks
The British planned to attack Gaza from three sides: south, southwest, and southeast.
- Coastal Attack: The 53rd (Welsh) Division attacked along the coast. They aimed to capture Samson Ridge, a large sand dune. They faced heavy machine gun fire and suffered many casualties. Despite this, they captured Samson Ridge after a fierce bayonet charge.
- Eastern Attack: The 52nd (Lowland) Division attacked Ali Muntar, a key hill. They also faced intense fire from Ottoman machine guns and artillery. One of their tanks got stuck in a gully. Soldiers fought hand-to-hand for Outpost Hill, capturing it, losing it, and then recapturing it.
- Southeast Attack: The 54th (East Anglian) Division attacked towards Kh Sihan. Their attack was also met with strong resistance. One tank helped capture a small fort, but it was soon destroyed by Ottoman artillery. Many soldiers were killed or captured. Three British tanks were lost in total during the battle.
Mounted Attacks
The mounted divisions, like the Imperial Mounted Division and the Anzac Mounted Division, attacked Ottoman positions further east. They tried to break through the lines at Atawineh and Hareira.
One soldier described the Ottoman artillery fire as "the heaviest we had experienced." The mounted soldiers often had to fight dismounted, meaning they got off their horses to fight like infantry. They faced strong counterattacks from Ottoman forces, including cavalry. Despite their efforts, they could not break through the strong Ottoman defenses.
After the Battle
Fighting Ends
As night fell on April 19, the fighting stopped. The British had suffered huge losses and had not achieved their main goals. Their soldiers were tired, and they were running low on ammunition. The British commanders decided to stop the attack.
The British forces dug in on the ground they had managed to hold. This line would become the front for the next six months.
Heavy Losses
The Second Battle of Gaza was a clear victory for the Ottoman Empire. The British and their allies suffered 6,444 casualties (killed, wounded, or missing). The 54th (East Anglian) Division alone lost 2,870 soldiers. The Ottoman forces had fewer casualties, with about 82 to 402 killed.
This defeat was a big blow to the British. It showed how strong the Ottoman defenses were. As a result, the British commanders, General Archibald Murray and Lieutenant General Charles Dobell, were removed from their commands.
The battle led to a long period of stalemate, where neither side could advance much. Both sides spent the next few months strengthening their positions. The British would try to capture Gaza again later in the year, in what became known as the Third Battle of Gaza.
Images for kids
-
First Battle of Gaza. Position at about 18:00 on 26 March (Ottomans shown in green)
-
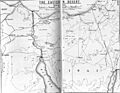
The Eastern Desert (also known as the Negev)
-
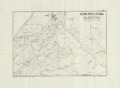
The Battlefield
-
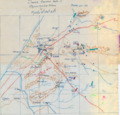
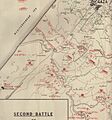
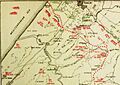
Central operations on 17 April 1917
-
Western operations on 17 April 1917
-
Eastern operations on 17 April 1917
-
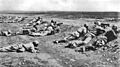
Ottoman machine gunners
-
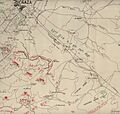
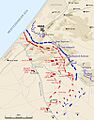
Positions gained by 10:30 on 19 April and positions later consolidated
-
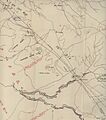
Falls Sketch Map 16 Second Battle of Gaza. Position at 10:30 detail of the western sector
-
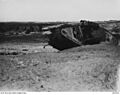
Disabled British Mark I tank
-
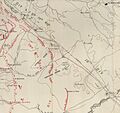
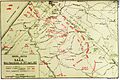
Operations on 19 April 1917 in the middle of the Gaza to Beersheba line
-
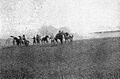
Lieutenant Craven's Vickers Gun Section being shelled while effectively targeting Hairpin redoubt
-
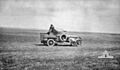
An Australian observing the battle from an armoured car
-
Position at 14:00 Second Battle of Gaza


