
Hohenzollern Redoubt action, 2–18 March 1916 facts for kids
Quick facts for kids Hohenzollern Redoubt action, 2–18 March 1916 |
|||||||
|---|---|---|---|---|---|---|---|
| Part of Local operations December 1915 – June 1916 Western Front, First World War | |||||||
 Hohenzollern Redoubt, Loos battlefield, 1915, site of the 1916 operations |
|||||||
|
|||||||
| Belligerents | |||||||
| Commanders and leaders | |||||||
| Sir Douglas Haig | Erich von Falkenhayn | ||||||
| Strength | |||||||
| 2 brigades | 2 regiments | ||||||
| Casualties and losses | |||||||
| 1,978 | 97 (incomplete) | ||||||
The Hohenzollern Redoubt action was a battle fought during the First World War on the Western Front. It took place from March 2 to March 18, 1916. The Hohenzollern Redoubt was a strong German defensive position. It was located north of Loos-en-Gohelle (Loos), a mining town in France. Both British and German armies fought over this area many times. This happened from the Battle of Loos in September 1915 until the Battle of the Somme began in July 1916.
During the winter of 1915–1916, British engineers dug tunnels under the German lines. These tunnels were part of a special type of warfare called mining. By March 1916, the British held the west side of the redoubt. The Germans held the east side. The area between them was full of large holes called craters. These were caused by earlier mine explosions. The Germans could easily see the British positions from a nearby slag heap (a pile of waste material from mining). The British kept only a few soldiers in their front line. This was to protect them from sudden mine explosions.
The British planned an attack to capture the crater field. They wanted to get a better view of the German defenses. They also aimed to stop German mine attacks. On March 2, 1916, four large British mines exploded. British soldiers then attacked. They captured the new craters and some German-held ones. They also took over a long part of a new German trench called The Chord. The main entrance to the German tunnels was found. British engineers then destroyed it. The Germans tried to take back the captured areas. They managed to recapture Triangle Crater on March 4. This made the British positions unsafe. The British tried to retake Triangle Crater on March 6 but failed.
British tunnellers later entered the German tunnel system. They destroyed it on March 12. This removed the threat of more German mine attacks. Fighting around the craters became less intense. The Germans surprised the British on March 18. They set off five mines. These mines had been dug quietly through a soft clay layer. The German attack pushed the British back to their original front line. But British counter-attacks soon regained some of the craters. After March 19, both sides held the edges of the craters. Commanders decided it was better to hold the edges. Trying to fully occupy the craters was too dangerous.
Contents
What was the Hohenzollern Redoubt?
The Hohenzollern Redoubt was a strong German fort. It was a key part of their defenses. It was located near Loos, a mining town in France. This area was very important during World War I. Both sides wanted to control it. The redoubt changed hands many times. This happened between September 1915 and March 1916.
Underground Warfare: Mining
Mining was a special type of warfare in World War I. Soldiers dug tunnels under enemy lines. The goal was to blow up enemy forts and soldiers. They also wanted to stop the enemy from doing the same. It was very important to keep the digging secret. If the enemy knew, they would dig tunnels too. This was called counter-mining.
The ground in the Loos area was mostly chalk. This made it easy to see the dug-out material. So, soldiers had to carry the chalk away. They dumped it where German observers could not see it. This also hid it from enemy planes.
A deep shaft was dug behind the front lines. Then, a tunnel, called a gallery, was dug forward. Smaller tunnels branched off from it. As the main tunnel got close to enemy lines, silence was very important. This was to avoid being heard by German miners. Both sides were trying to dig tunnels at the same time. Maps of the tunnels were kept. Enemy tunnels were added to these maps. This was based on explosions and listening reports.
When tunnels got close, a small mine called a camouflet was used. This mine was not big enough to break the surface. But it would collapse the enemy's tunnel. Then, the digging could continue. If a tunnel reached its target, a chamber was dug. It was then filled with explosives, ready to be set off.
Being close to enemy tunnels was very stressful. Miners listened for clues. Soldiers on the surface also felt nervous. They knew a mine could explode under them at any moment. To keep soldiers safe, the front line was not continuous. Instead, there were small outposts. Only a few soldiers were in these spots. This reduced the danger from mine explosions.
Preparing for the Attack
British Plans
Over the winter, British mining efforts improved. They planned to destroy the German tunnels. Four large mines were placed under the Hohenzollern Redoubt. These mines would explode just before an attack. The attack aimed to capture The Chord trench. This would give the British control of the crater field. It would also remove the German advantage of seeing British positions from the slag heap. It might also destroy the German tunnel system.
The mines were very powerful. One mine, Chamber A, had 7,000 pounds of ammonal. Chamber B had 3,000 pounds of blastine and 4,000 pounds of ammonal. Chamber C had a huge charge of 10,550 pounds. The Germans seemed unaware of these preparations. British soldiers also prepared for the attack. They gathered hand grenades. They made communication trenches ready. They also planned to bring hot soup to the soldiers after the attack.
Mine Predictions and Support
The British tunnelling company commander predicted the mine effects. Mines A and B were expected to create craters 100 feet wide and 35 feet deep. Crater C was predicted to be 130 feet wide and 35 feet deep. A smaller fourth mine was placed under Crater 2. It was expected to make a slightly larger crater.
British artillery supported the attack. This included large howitzers and guns. There would be no bombardment before the attack. But ten trench mortars would fire on Crater 1 and The Chord. As the attack began, the mortars would fire smoke. This would hide the advancing soldiers. As a safety step, soldiers in the front line were pulled back. This happened before the mines exploded.
German Preparations
The Germans noticed more British activity in late February. There were more patrols and heavy artillery fire. This made them ready for a British attack. The area was defended by two Bavarian infantry regiments. Each regiment had three companies in the front line. One company was kept in reserve.
The Battle Begins
March 2: The Big Explosion
At 5:45 p.m., three mines exploded. They were about 30 feet short of The Chord trench. The explosions created huge crater lips. From these lips, British soldiers could see the German trenches. It had been snowing, sleeting, and raining. The ground was very soft from the explosions. Soldiers sank deep into the mud.
The 9th Royal Fusiliers attacked on the right. The 8th Royal Fusiliers attacked on the left. Other troops provided covering fire. Soldiers from the 9th Royal Fusiliers reached craters 1, 2, and A. They then found Triangle Crater, which was a surprise. A group of soldiers ran down the side of the crater. They caught German soldiers in their underground shelters. They took 80 prisoners. But they ran out of hand grenades. They were slowly pushed back to Triangle Crater.
Another group of soldiers captured The Chord trench. They held it against German counter-attacks. On the left, the 8th Royal Fusiliers captured craters 4, B, and C. But soldiers attacking The Chord were caught by the Germans. Only two men reached their goal. The Chord trench was mostly destroyed. This left little cover. The British eventually fell back to the crater line. They held their positions there.
German counter-attacks happened all night. But they were pushed back. The British began to strengthen their positions. British engineers followed the infantry. They started to blow up the German tunnel entrance found in Triangle Crater. Most of the attack's goals were achieved.
March 3–5: German Counter-attacks
On March 3, the British commander reported success. The craters were captured. The unexpected Triangle Crater was taken. The main entrance to the German tunnels was found there. The British could now see the German lines better. But German artillery fire caused many casualties.
During the day, fresh British battalions took over. German counter-attacks failed at first. But on March 4, a German attack was repelled. More attacks were driven off. Then, at 4:15 p.m., another German bombardment began. Triangle Crater was recaptured by the Germans after three attacks.
Fresh German troops continued counter-attacks. On March 5, new British battalions took over. German attacks on Crater C were pushed back. The German attacks aimed to stop the British from observing their defenses.
March 6: A Difficult Day
The Germans recaptured Triangle Crater. This made the British hold on the new craters risky. The British needed time to clear their tunnels. They also needed to restart their mining. Another attack on Triangle Crater was planned. The goal was to block German trenches.
The attack began at 6:00 p.m. on March 6. Soldiers attacked along the southern edge of Triangle Crater. But they sank deep into the mud. They were caught by machine-gun fire and German hand grenades. The German defenders counter-attacked. They pushed the British back to Crater 2. Fierce fighting happened there for two hours.
Other British groups reached The Chord. But they ran out of hand grenades and had to retreat. The Germans made a strong attack on Crater 1. Only one British soldier with a machine gun was left. He held off the Germans until help arrived. The British attack failed. The British lost 331 men between March 6 and 7.
March 7–15: Tunnels and Mortars
On March 7, British engineers broke into the German tunnel system from Crater 2. They found it empty. This eased fears of a German counter-mine. The German tunnel system was destroyed on March 12. German attacks on the craters continued. But they were defeated.
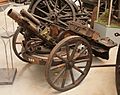
On March 15, the Germans started using a Minenwerfer. This was a very accurate mortar. It fired shells that plunged down into the craters. This destroyed British defenses. It also made the British soldiers feel very tired and worried.
March 18: German Surprise Attack
Fighting continued in bitter cold and snowstorms. German attacks became less frequent. The British thought the Germans had given up trying to get back the lost ground. They believed the Germans were just improving their defenses.
By March 18, British soldiers were very tired. They had held their positions for two weeks. The weather was cold and wet. German artillery fire increased in the morning. Trench mortars caused a lot of damage. A much bigger bombardment happened from 5:15 p.m. to 6:15 p.m. Heavy German mortars made the craters impossible to hold. A nearby village was hit by about 2,000 shells. British communications were also bombarded.
Soldiers in craters 1, 2, and A were killed or buried. The confusion was made worse because trenches were filled with debris. Five German mines exploded at 6:15 p.m. This caused confusion among the German soldiers too. But they quickly regrouped and attacked. The Germans recaptured The Chord. They pushed the British back to the edges of the craters. They also pushed them back to the old British front line.
A British counter-attack was delayed. But three companies of soldiers recaptured the edges of the craters. On the left side, one German mine blew up Crater C. German attackers overran the few remaining men in craters B and 4. They also got into other trenches.
A British counter-attack was quickly organized. They recaptured Crater 4. They also gained a good position over Crater B. Other trenches were blocked and strengthened. Crater 3 had been held during the attack. By the next morning, the edges of craters B and C were recaptured. The British held craters 3 and 4. They also held the edges of craters 1, 2, A, B, and C. The Germans then pulled back to their side of the craters. It was later found that the Germans had dug new tunnels. They dug them quietly through the soft clay layer. This helped their mine explosions be a surprise.
After the Battle
Soldiers Lost
The British 36th Brigade had 898 soldiers lost. The 37th Brigade lost 1,084 soldiers from March 5 to 18. In the March 2 attack, the 8th Royal Fusiliers lost 254 soldiers. The 9th Royal Fusiliers lost 160 soldiers. From March 2 to 19, the 12th (Eastern) Division had over 3,000 soldiers lost. By April 26, their losses had risen to 4,025 men. German casualty numbers are not complete. But one German regiment lost 95 men. It is believed that the German regiment in the path of the first British attack would have had many more losses.
Later Events
The British exploded another mine on March 19. The Germans set off two mines on March 24. More British mines exploded in late March and April. German mines also exploded in late March and April. Each explosion was followed by infantry attacks. Soldiers then tried to strengthen the crater edges. This was costly for both sides. It turned more areas of no man's land into fields of craters.
Gas Attack at Hulluch
A German gas attack happened from April 27 to 29. It was aimed at British positions near Hulluch. This was about 1 mile north of Loos. Just before dawn on April 27, a German gas cloud and artillery bombardment hit British soldiers. German raiding parties briefly entered the British lines.
Two days later, another gas attack happened. But the wind blew the gas back over the German lines. This caused many German casualties. British soldiers also fired at the Germans as they ran. The German gas was a mix of chlorine and phosgene. It was strong enough to get through British gas helmets. The British 16th Division was unfairly blamed for not being careful with gas. It was said that their helmets were poorly made. This was to hide doubts about how well the helmets worked. Production of the Small Box Respirator was sped up. This respirator had worked well during the attack.
Images for kids
-
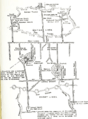
Diagram of mine warfare: tunnels, galleries and ventilation
-

Aerial photograph of the Hohenzollern Redoubt, 1915
-
Example of a German 7.58 cm minenwerfer
-
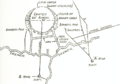
Diagram of crater mine galleries and saps
-
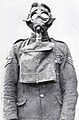
British soldier demonstrates a Small Box Respirator


