
Raid on Jifjafa facts for kids
Quick facts for kids Raid on Jifhafa |
|||||||
|---|---|---|---|---|---|---|---|
| Part of the Middle Eastern theatre of the First World War | |||||||
 Men of the 9th Light Horse Regiment crossing the Suez Canal |
|||||||
|
|||||||
| Belligerents | |||||||
| Commanders and leaders | |||||||
| Units involved | |||||||
| 9th Light Horse Regiment 8th Light Horse Regiment Royal Flying Corps Bikaner Camel Corps Egyptian Camel Transport Corps ANZAC Mounted Division support troops |
2nd Company, 4th Battalion, 79th Regiment | ||||||
| Strength | |||||||
| 320 men 175 horses 261 camels |
42 men 1 Austrian Engineer officer 1 Turkish officer, 25 soldiers 15 Labour Corps |
||||||
| Casualties and losses | |||||||
| 1 dead | 6 dead 36 captured (5 wounded) |
||||||
The Raid on Jifjafa was a military operation that happened between April 11 and 14, 1916. It was part of the Sinai and Palestine Campaign during World War I. This raid involved soldiers from the British Empire who traveled a long distance into the Sinai Desert. Their goal was to attack and destroy a well used by Ottoman forces at a place called Jifjafa.
The Jifjafa well (also known as Bir el Jifjafa) is located about 52 miles (84 km) east of Ismailia on the Suez Canal. The raid was carried out by soldiers from the 3rd Light Horse Brigade, who rode horses. They were supported by other groups, including a large number of men from the Egyptian Camel Transport Corps who used camels to carry supplies. Even though some of the Australian soldiers had fought before in the Gallipoli Campaign, this was the very first attack carried out by Australian forces in the Sinai and Palestine Campaign.
The raid was a big success for the British forces. They lost only one soldier, who was the first Light Horse casualty of the campaign. In return, they killed six enemy soldiers, captured 36 others, and completely destroyed the well and its equipment. The raiding party returned safely to their own lines. The commander of the raid, Major William Henry Scott, was given a special award called the Distinguished Service Order for his excellent leadership.
Contents
Why the Raid Happened
The Jifjafa Well's Importance
The Jifjafa well (Bir el Jifjafa) was an important water source. It was located on the middle of three old routes that crossed the Sinai Desert. This well was about 52 miles (84 km) east of Ismailia on the Suez Canal. It was roughly halfway between Ismailia and Magdhaba, which was close to the border between Egypt and Palestine. This central route, which went through mountains to the well (located at 1,000 feet or 300 meters high), was likely used for travel in ancient times.
Reports of Ottoman Activity
In January 1916, British spies reported that about 25,000 Turkish soldiers were in the Sinai. This made the British leaders believe that the Turkish army was planning to attack the Suez Canal soon. Airplanes from the Royal Flying Corps (RFC) also flew over the area. They reported seeing a large camp at Beersheba where the Turkish Army was digging trenches and other defenses.
Later, the RFC and spies reported that the Turkish forces had set up a new post at the Jifjafa well. Because of this, Brigadier-General John Antill, who led the 3rd Light Horse Brigade, was ordered to send a unit to check this information.
The Mission's Goals
The main goals for the raiding force were:
- To confirm if a Turkish post was at the well.
- To destroy the two wells, which were thought to be protected by heavy guns.
- To capture the position if possible.
They also had secondary goals:
- To find and report on any other wells or water sources in the area.
- To report on any new defenses being built.
- To gather any other useful military information.
- To capture enemy soldiers or local people if possible.
Major William Henry Scott, who was the second-in-command of the 9th Light Horse Regiment (9th LHR), was chosen to lead this important mission.
The Raiding Force
Major Scott's force was made up of many different groups:
- The main fighting group came from the 9th LHR and the 8th Light Horse Regiment (8th LHR), with eight officers and 122 men.
- Engineers from the ANZAC Mounted Division (one officer, eight men) helped with building and destroying things.
- The Royal Flying Corps provided a ground signals unit (two officers, two men) for communication.
- Radio communication was handled by a Royal Engineers Wireless Section (one officer, eight men).
- Medical support came from the 3rd Light Horse Field Ambulance (one officer, eight men).
- The Egyptian Camel Transport Corps (ECTC) provided extra transport with one officer, 31 Light Horse drivers, and 95 Egyptian drivers, along with 261 camels.
- The Australian Army Service Corps provided an officer to help with supplies.
- The Bikaner Camel Corps provided one officer and 24 men to protect the ECTC.
- There were also two guides and an Arabic interpreter.
In total, the force had 18 officers, 302 men, 175 horses, and 261 camels. While Australian and New Zealand soldiers had done some scouting in the desert, this was their first actual attack.
New Information
On April 9, a second RFC reconnaissance flight reported that Jifjafa might have been empty. They saw no men, but tents and equipment were still there. Other intelligence reports said there were 900 Turkish soldiers at Hassana, 50 at Bir el Hamma, and 200 at Nekhel.
The Raid Begins
Journey to Jifjafa

Major Scott's force started their raid just after 2:00 PM on April 11, 1916. They followed a common procedure for mounted troops: they rode for 50 minutes, then walked for 10 minutes each hour to rest their horses. They stopped at 5:00 PM to feed the animals, then started again at 7:30 PM. They finally stopped for the night at Wady um Muksheib at 10:30 PM.
The next day, the force set out at 7:30 AM, heading for a known water source. This source had been found earlier in the year by a patrol from the ANZAC Mounted Division. The horse-mounted troops arrived there at 11:20 AM, but the slower camels took another two hours to catch up. While waiting, patrols were sent out to look for any Bedouin activity and other water sources.
The force then continued, heading north-north-east. They stopped at 2:30 AM on April 13, about 8 miles (13 km) from the well. This camp became their forward base. The Royal Engineers Wireless Section and the camel transport stayed here while the light-horsemen prepared for the attack.
Final Approach
The raiding force left their forward base three hours later, reaching Hill 1082 at 7:30 AM. Here, they waited for an RFC reconnaissance aircraft to check the well. The aircraft appeared 30 minutes later and dropped a message saying the way ahead was clear. During this time, the force also found several water sources in the area, holding about 51,700 imperial gallons (235,000 L).
The raiding force then moved again, setting up their main base at Hill 1080. This spot was just out of sight of the Jifjafa well. The RFC reconnaissance had reported that the well's inhabitants would hide whenever an aircraft appeared. This made the British believe that enemy soldiers were still at the well. The attack was planned for 9:00 AM on April 13.
The Attack

From Hill 1080, Major Scott used field glasses to closely observe the Turkish positions. He then planned his attack carefully.
- One group of soldiers (a troop) would move to a position about 1 mile (1.6 km) north-west of the well.
- Another troop would move around to the south-west of the well.
- A third troop would position itself to the south of the well.
- The fourth troop would launch a direct attack from their current position, supported by a machine-gun section.
Four men from the attacking troop were assigned to protect the engineers, and another four were assigned to the machine-gun section.
When the attack began, a Turkish guard saw the approaching soldiers and quickly retreated back to the well. The rest of the well's defenders then left their positions. Some ran towards the hills, while others headed south-east, away from the well. Those who ran to the hills were cut off by the British troop positioned there, and this is where all the fighting happened.
During the fight, six Turkish soldiers were killed, and five were wounded. Afterward, several prisoners were taken. These included an Austrian Engineer officer and 34 soldiers. The Austrian officer revealed that the Turkish garrison had consisted of one Turkish officer, 25 soldiers, and 15 men from the Turkish labor corps. The soldiers belonged to the 2nd Company, 4th Battalion, 79th Regiment. This meant the attack had dealt with almost the entire garrison, except for two men who were seen riding off towards the east. The raiding force had only one soldier and one horse killed. This soldier was the first Light Horse casualty of the entire Sinai and Palestine Campaign.
After the Fight
The well had three bore holes and equipment for getting water, all of which were destroyed. Other equipment and supplies stored around the camp were also destroyed, including 4,000 rounds of small arms ammunition. When the raiding force looked at the Turkish defenses, they found three trench systems that were not yet finished. They also found a concrete base designed for an anti-aircraft gun.
At 12:00 PM, the raiding force, protected by a rear guard, began their journey back towards the Suez Canal. They made frequent stops to allow the camels to rest and halted for the night at 10:30 PM. The next day, April 14, the raiding force returned safely to their own lines.
What Happened Next
Several men who took part in the raid were mentioned in Major Scott's report for their bravery. For his excellent leadership, Major Scott was awarded the Distinguished Service Order. The award citation praised him, saying: "For conspicuous ability and good work. He led a small column to reconnoitre a distant enemy post, attacked it, killed several of the enemy, and brought in thirty-eight prisoners, including the officer in command. His plans were so well laid that he effected this with the loss of only one man and one horse." The details of the raid, though a small event at the time, were even published in famous newspapers like The London Times and The New York Times.
Images for kids
-
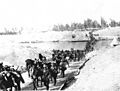
Men of the 9th Light Horse Regiment crossing the Suez Canal
-
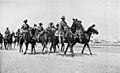
Australian Light Horse in 1916
-
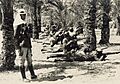
Turkish troops in the Sinai, this image dates to 1915 but their uniform and equipment is what the wells defenders would be equipped with.
