Raster image processor facts for kids
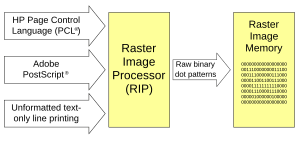
A Raster Image Processor (RIP) is a special part found in some printers. Think of it like a translator for your printer! When you send something to print from your computer, it's usually in a special language like Postscript, PCL, or PDF. The RIP takes this language and turns it into a bitmap or raster image. This is basically a map of tiny dots that the printer can understand and put on paper.
There are two main ways a printer can do this "translation" job. One way is using Software that runs on your computer's operating system. This is often used in simpler, less expensive printers. It's called host-based printing because your computer (the "host") does the hard work. The other way is when the printer has its own special microprocessor inside it, which is the RIP. More advanced printers, especially those that use languages like Postscript, have their own built-in RIP.
Contents
How a Raster Image Processor Works
A Raster Image Processor does a few important steps to get your digital image ready for printing. It's like a mini-factory inside the printer, preparing every detail.
Step 1: Interpretation
The first step is called interpretation. Imagine your printer gets a recipe for a cake, but it's written in a foreign language. The RIP's interpretation stage is like translating that recipe into a language the printer understands. It takes the page description language (PDL) – like Postscript or PDF – and turns it into an internal plan for each page. Most RIPs work on one page at a time. Once a page is finished printing, the RIP clears its memory to get ready for the next page.
Step 2: Rendering
After interpreting the page, the RIP moves to the rendering stage. This is where the internal plan from the interpretation step is turned into a continuous-tone bitmap. A bitmap is like a grid of tiny squares, each with a specific color or shade. It's the digital image made of pixels. In many RIPs, the interpretation and rendering steps happen almost at the same time. Older, simpler printer languages were designed to work very directly with the rendering process.
Step 3: Screening
The final step before printing is screening. Your printer can't actually print continuous shades of color like a photograph. Instead, it prints tiny dots. Screening is the process of converting that smooth bitmap into a pattern of these dots, called a halftone. There are two main ways to do this:
- AM Screening (Amplitude Modulation): In this method, the size of the dots changes. For darker areas, the dots are bigger. For lighter areas, the dots are smaller. These dots are placed in a fixed, organized grid, like a checkerboard.
- FM Screening (Frequency Modulation): With FM screening, the size of the dots stays the same. Instead, to make an area darker or lighter, the RIP changes how many dots are placed and how close they are together. More dots packed closely together make an area look darker, while fewer dots spread out make it look lighter. The placement of these dots is very precise, using complex math.
 | Emma Amos |
 | Edward Mitchell Bannister |
 | Larry D. Alexander |
 | Ernie Barnes |


