Third Battle of Krithia facts for kids
Quick facts for kids Third Battle of Krithia |
|||||||
|---|---|---|---|---|---|---|---|
| Part of The First World War | |||||||
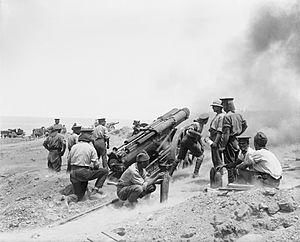
 A large 60-pounder gun firing near Hill 114. Photo by Ernest Brooks. |
|||||||
|
|||||||
| Belligerents | |||||||
|
|
|||||||
| Commanders and leaders | |||||||
| Strength | |||||||
| 30,000 (20,000 in the first wave) | 18,600-28,000, 86 guns and howitzers | ||||||
| Casualties and losses | |||||||
| 3,000 killed | |||||||
The Third Battle of Krithia was a major fight during World War I on the Gallipoli peninsula. It was the last big attack by the Allied forces (like Britain and France) against the Ottoman Empire's defenses. Their main goal was to capture a high point called Alçı Tepe (also known as Achi Baba). This hill overlooked most of the peninsula.
The Allies had tried to take this area twice before, but they failed. This third attempt was planned to be less ambitious. However, it still ended up being another very costly failure for the Allies.
Getting Ready for Battle
By late May 1915, more British soldiers had arrived at the Helles front in Gallipoli. Their forces now included three main divisions and an Indian brigade. Major General Aylmer Hunter-Weston was put in charge of all British units at Helles.
In earlier battles, the ground was not heavily defended. But by late May, both sides had built two lines of trenches. These trenches marked the main battle area. The British secretly moved their front line forward at night. They gained about half a mile of ground. This put them closer to the Ottoman front lines.
The French soldiers were on the right side of the Allied line. They faced some of the strongest Ottoman defenses. These defenses included four strongholds called redoubts. On May 31, the French captured one redoubt. But they could not take another one called Haricot Redoubt. This made it very hard to advance without a lot of artillery support.
The Allies also had problems with their artillery (big guns). The British had only 78 guns and howitzers. They also did not have enough ammunition. Two of their battleships, HMS Triumph and HMS Majestic, were sunk by torpedoes. This made the situation worse. The remaining ships could only fire while moving fast. This made their shots less accurate.
The Battle Plan
General Hunter-Weston's earlier battle plans had not worked well. For this new attack on Krithia, the plans were a bit more thought out. General Sir Ian Hamilton, the overall commander, said the goal should be smaller. They would only try to advance about 800 yards (730 meters).
The attack would happen in two steps. First, they would capture the Ottoman trenches. Second, they would move forward another 500 yards (457 meters) to create a new trench line.
The bombing before the attack also had two parts. The first bombing would stop at 11:20 AM. Then, British troops would pretend to attack. The idea was to make the Ottoman soldiers come out to their firing line. This way, they would be caught by a second bombing starting at 11:30 AM.
A new idea for this battle was using eight armored cars. These cars belonged to the Royal Naval Air Service. They would drive along the main Krithia road. They would help the Royal Naval Division as they advanced.
The Allied troops were spread out from left to right:
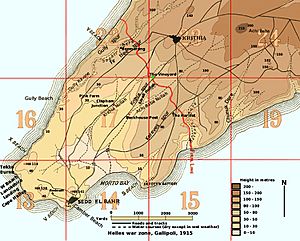
- On the far left, near the Aegean Sea, the Indian Brigade and some British soldiers would attack along Gully Spur and Gully Ravine.
- The 29th Division would attack next to Gully Ravine.
- The 42nd Division would attack in the middle.
- The Royal Naval Division would attack up Achi Baba Nullah (also called Bloody Valley). The armored cars would support them.
- The French soldiers would attack on the far right.
The Fight Begins
The attack started at noon on June 4, after the last bombing ended. There was a short break in the bombing. This made the Ottoman soldiers come out of their trenches. Then, the bombing started again, causing many Ottoman losses. About 6,000 Ottoman soldiers were lost on that first day.
On the left side, the Indian Brigade's attack quickly stopped. Only the Gurkha Rifles managed to move forward along the coast. Another group, the Sikh Regiment, was almost completely wiped out. They lost 380 out of 514 men while attacking along Gully Ravine.
The Hampshire Regiment, part of the 29th Division, also moved forward. But they lost touch with the Sikhs on their left. They had to defend themselves from the side of the ravine as well as from the front. Other parts of the 29th Division were stopped by strong Ottoman defenses. These defenses had not been damaged by the bombing.
The 42nd Division's attack was very successful for Gallipoli. They quickly reached the first Ottoman trenches. They then moved forward about 1,000 yards (914 meters) in total. This attack was led by the Manchester Brigade. They broke through the Ottoman defenses and captured 217 prisoners.
The Royal Naval Division also managed to capture the Ottoman trenches. But when their second wave of soldiers tried to continue, they were hit by gunfire from the side. This happened because the French attack on their right had failed. This group of soldiers, the Collingwood Battalion, was almost completely destroyed. They were never formed again. Other attempts to reach the second goal were successful, but the position was too dangerous. So, within a few hours, the Royal Naval Division units went back to where they started.
With the main attack mostly over, General Hunter-Weston had to decide what to do. The 42nd Division had succeeded in the middle, but everywhere else had failed. He decided to send more troops to the sides and attack again. However, the French said they could not continue their attack. So, any further advances by the Royal Naval Division were stopped. More attacks along Gully Spur and Gully Ravine also failed.
At 4:00 PM, Hunter-Weston told his troops to dig in and hold their positions. But at the same time, Ottoman reserve troops launched a counter-attack against the Manchester Brigade in the center. Within an hour, the brigade was being attacked from three sides. They were eventually ordered to pull back. By the end of the battle, their new front line was only about 200-250 yards (183-229 meters) from where they started. This area was called 'The Vineyard' and saw heavy fighting later.
What Happened Next
The goals for the Third Battle of Krithia were more realistic than before. But the battle still ended in failure. Only small amounts of ground were gained. Both sides were very tired after the fighting. The Ottomans believed they would not have been able to hold if the British had attacked again the next day.
On June 6, the Ottomans launched a counter-attack against the 29th Division. The British soldiers almost broke and ran. Second Lieutenant G.R.D Moor was given a special medal, the Victoria Cross. He stopped his battalion from retreating. He even had to shoot four men who were running away. General Henry De Lisle said that Moor shot "the leading four men and the remainder came to their senses." Moor then led his men back and recaptured a lost trench. This saved a very dangerous situation.
See also


