Second Battle of Krithia facts for kids
Quick facts for kids Second Battle of Krithia |
|||||||
|---|---|---|---|---|---|---|---|
| Part of The First World War | |||||||
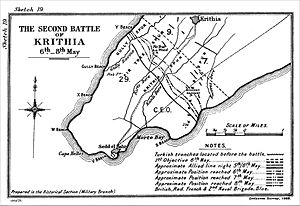
 Map of the Second Battle of Krithia |
|||||||
|
|||||||
| Belligerents | |||||||
|
|||||||
| Commanders and leaders | |||||||
| Strength | |||||||
| 25,000 72 guns |
20,000 | ||||||
| Casualties and losses | |||||||
| 6,500 | 2,000 | ||||||
The Second Battle of Krithia was a major fight during the Battle of Gallipoli in the First World War. It happened from May 6 to 8, 1915. The battle was part of the Allies' plan to capture the village of Krithia and a nearby hill called Achi Baba. These places were important for controlling the Gallipoli peninsula and the Dardanelles straits.
Even after two days of very tough fighting, the Allies only managed to gain a small amount of land. They did not reach their main goals. The battle ended with a victory for the Ottoman forces.
Contents
Preparing for Battle
Who Fought in the Battle?
After the first attempt to capture Krithia failed, the British soldiers were very tired. They had to defend against several attacks from the Ottoman army. Other Allied troops, like those from Australia and New Zealand, also faced strong Ottoman attacks.
Because of these attacks, two brigades (groups of soldiers) from Australia and New Zealand were sent to help. These brigades added about 5,000 more soldiers to the Allied forces. Other British troops, including those from the Royal Naval Division, also joined the fight.
The commander at Helles, Major General Aylmer Hunter-Weston, did not have enough artillery shells. Artillery are large guns used to fire shells. The shells he had were not very good for attacking enemy positions that were dug into the ground.
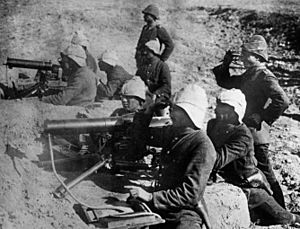
Meanwhile, the Ottoman army and their German officers were making their defenses stronger around Krithia. They built hidden trenches and machine gun positions. Trenches are long, narrow ditches where soldiers can hide and fight. Machine guns are fast-firing weapons.
The Ottoman forces had many soldiers ready to defend Krithia. They also had several artillery batteries (groups of guns) placed around Achi Baba.
Understanding the Land
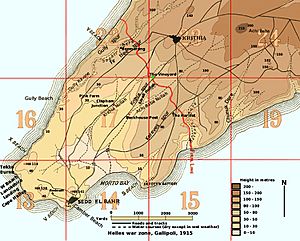
The land around Cape Helles was difficult for the attacking forces. It looked flat but had four large valleys, called deres, that ran from Achi Baba towards the Cape. These valleys and the ridges between them made it hard to move and attack.
For example, Gully Ravine was on the west side, and Fir Tree Spur was another ridge. Krithia Valley and Krithia Spur were also important areas. Krithia Spur was open and exposed, so it was not a good place to attack. Most of the British attacks happened on Gully Spur and Fir Tree Spur, where there was some cover.
The Attack Plan
The plan for the Second Battle of Krithia was similar to the first one. The Allies wanted to attack across a wide area. The attack was divided into three parts.
First, the Allies would advance about one mile. The French soldiers, on the right side of the line, would dig in on Kereves Spur. Second, the British soldiers in the middle and on the left would then move forward. They aimed to capture Fir Tree Spur, Gully Spur, and then Krithia village. The third part of the plan was to capture Achi Baba hill.
However, the Allies never even finished the first part of their plan. After three days of fighting, the biggest advance they made was only about 600 yards.
The British did not know exactly where the Ottoman defenses were. They did not have a continuous system of trenches, and air patrols had failed to find the enemy positions. Because of this, the artillery bombardments (heavy shelling before an attack) did not work well.
General Hunter-Weston also insisted that the attacks happen during the day. He was worried that attacking at night would cause confusion. Even though this approach had failed in the first battle, he stuck with it.
The Battle Begins
The Allied attack started later than planned, around 11:00 AM on May 6. It was quickly stopped by strong Ottoman resistance. Some British soldiers managed to capture Fir Tree Wood, and others advanced along Kanli Dere. However, the gains were never more than 400 yards along the entire line. The Allies never reached the main Ottoman defenses.
The attack continued on May 7, using the same plan. The results were largely the same: small gains and strong resistance.
On the morning of May 8, New Zealand soldiers took over from the British troops. They tried to attack again but failed with many losses. The Wellington, Canterbury, and Auckland Battalions advanced about 400 yards through Fir Tree Wood to a place called the 'Daisy Patch'. But they got stuck there. Ottoman machine guns in Gully Ravine fired at them from the side, making it impossible to move forward or backward. They still could not see the Ottoman positions.
Despite this difficult situation, General Hunter-Weston ordered the New Zealanders to attack again at 5:30 PM. The brigade commander, Colonel Francis Johnston, disagreed, but Hunter-Weston insisted. General Sir Ian Hamilton, the overall commander, also ordered a general attack along the entire front at 5:30 PM. The goal was to capture Krithia and Achi Baba.
The Australian 2nd Infantry Brigade was told to join the attack with only 35 minutes' notice. They had to move about 800 yards just to reach their starting line. The Australians managed to advance another 500 yards beyond the starting line. However, they suffered very heavy losses, with half of their soldiers becoming casualties (killed or wounded).
The New Zealand brigade made another attempt to cross the Daisy Patch. Some troops even managed to see the Ottoman trenches. On the right side, the French soldiers attacked again at 6:00 PM and made good progress. They reached the Ottoman trenches on Kereves Dere and captured a strongpoint called Bouchet Redoubt. But they were forced back everywhere else.
After the Battle
About one-third of all the Allied soldiers who fought in the battle were killed or wounded. General Hamilton could not afford such heavy losses. These losses made it hard to even hold the small amount of land they had gained, let alone capture more.
The planning for helping the wounded soldiers was also very poor. There were not enough stretcher bearers (people who carry wounded soldiers). They often had to carry wounded soldiers all the way to the beach because there were no places in between to collect them and transport them by wagon. The hospital ships were also not ready, so wounded soldiers had trouble finding a ship to take them.
After the failure of the Second Battle of Krithia, General Hamilton asked for four more divisions (large groups of soldiers) from Lord Kitchener, the British Secretary of State for War. He was promised one division, but he would not receive any more until August. Another attempt to capture Krithia would not happen until early June.


