
Battle of Tell 'Asur facts for kids
Quick facts for kids Battle of Tell 'Asur |
|||||||
|---|---|---|---|---|---|---|---|
| Part of the Middle Eastern theatre of World War I | |||||||
_(IWM_Q12647).jpeg) Jerusalem to Nablus Road shows Ain Sinia on left and Yebrud on right. Photo taken by the 230th Brigade, 74th Division. |
|||||||
|
|||||||
| Belligerents | |||||||
| Commanders and leaders | |||||||
| Units involved | |||||||
| XX Corps XXI Corps 1st Light Horse Brigade |
Seventh Army Eighth Army |
||||||
The Battle of Tell 'Asur was an important fight during World War I. It happened from March 8 to 12, 1918. This battle was part of the Sinai and Palestine Campaign in the Middle East. It took place after the British forces won an important victory at the Battle of Jerusalem and captured Jericho.
The fighting covered a large area. It stretched from the Mediterranean Sea all the way to the edge of the Jordan Valley. After capturing Jericho in February 1918, the Egyptian Expeditionary Force (EEF) began to control the Jordan Valley. However, the area they held was not wide enough. It needed to be bigger to support future plans to cross the Jordan River.
So, the EEF pushed its front line further north. This happened after attacks by the XX and XXI Corps. They fought against the Ottoman Seventh Army and Eighth Army. By the end of March, the First Transjordan attack on Amman was launched. The Second Transjordan attack on Shunet Nimrin and Es Salt followed the next month.
Contents
Why the Battle Happened

General Edmund Allenby wanted to make his army's right side stronger. It was not wide enough to support plans to cross the Jordan River. These plans involved attacking the Hedjaz railway.
During these operations, the XX and XXI Corps advanced. They moved forward about 14 to 26 kilometers (9 to 16 miles) wide. The deepest part of their advance was about 5 to 7 kilometers (3 to 4 miles). This push moved Ottoman forces north. They moved away from the River Auja on the Mediterranean coast. They also moved from Abu Tellul and Mussallabeh near the Jordan Valley. The British forces also advanced up the Jerusalem to Nablus road, capturing Ras el Ain.
The XX Corps aimed to capture Kh. el Beiyudat and Abu Telul in the Jordan Valley. They also wanted to control the Jerusalem to Nablus road. This road runs through Mughaiyrir, Sinjil, Jiljliya, and Abwein. The XXI Corps planned to advance to Deir Ballut and Majdal Yaba. This was about 4.5 kilometers (3 miles) north of their current spot at Et Tire.
Getting Ready for Battle
Some early operations started on the night of March 2. These were mainly to get better positions for the cannons. Soldiers from the 53rd (Welsh) Division moved west of the Nablus road. They advanced on a 3-mile (5 km) front. This was from north-west of Rammun to south-west of Bir ez Zeit. The 10th (Irish) Division moved to Beit Ello, about 5 miles (8 km) west of Bir ez Zeit.
On the night of March 6, the 53rd (Welsh) Division took control of Taiyibe village. After this, the artillery (cannons) were brought closer to the front lines.
The Battle Begins
Fighting the Ottoman Seventh Army

The main attack by the XX Corps began on the night of March 8. Soldiers from the 53rd (Welsh) Division led the way. They were joined by the 1st Light Horse Brigade (likely fighting on foot in the rough area). The 74th (Yeomanry) Division and the 10th (Irish) Division also took part.
On the right side, the 181st Brigade of the 60th (2/2nd London) Division helped. They were only involved on the first day. Their job was to secure the Wadi el Auja line. This was in and near the Jordan Valley. They also had to protect the right side of the 53rd (Welsh) Division from attacks. The 60th (2/2nd London) Division pushed Ottoman units back. They moved them away from high ground north of the Wadi Auja. This secured a valuable water supply in the river.
The XX Corps started its advance on the night of March 8. At the same time, the Ottoman XX Corps began to arrive at the Auja. The wadi was 20 yards (18 m) wide but only 3 feet (0.9 m) deep. The 2/22nd and 2/21st Battalions of the London Regiment crossed the wadi easily before 5:00 AM. However, the 2/24th and 2/23rd Battalions in the hills faced problems. A gap of 5 miles (8 km) appeared. This was because an Ottoman division had made their defenses surprisingly strong.
Meanwhile, soldiers from the 53rd, 74th, and 10th Divisions moved north. They advanced on both sides of the Jerusalem to Nablus road. They went from Kefr Malik to Nebi Saleh. This cut off all paths and roads leading to the lower Jordan Valley.
The 53rd (Welsh) Division's goal was to capture Tell 'Asur. This task was given to the 158th Brigade. Tell 'Asur was a very important observation point. From there, one could see far north to the hills of Galilee and Mount Hermon. To the east and south-east, one could see Gilead, Moab, and most of the Dead Sea. To the south, one could see over the Mount of Olives to the heights of Hebron. To the west, the Mediterranean Sea was visible from south of Jaffa to north of Caesarea.
The 5th Battalion, Royal Welch Fusiliers captured Tell 'Asur around 9:30 AM. This happened after heavy shelling by the 91st Heavy Battery. But the position was not safe for long. The Ottomans launched a successful counter-attack soon after. However, the 6th Battalion, Royal Welch Fusiliers drove them back. The Ottoman forces tried four times to retake this hill, but they failed.
The 74th (Yeomanry) Division attacked along the Jerusalem to Nablus road. The 231st Brigade on the right moved towards Mezra ash Sherqiye. This was about 1.5 miles (2.4 km) north-north-west of Tell 'Asur. But the difficult night advance was made even harder by the land and Ottoman machine guns. Even with more soldiers, the infantry were stopped later that day by the deep gorge of the Wadi el Jib.
The 10th (Irish) Division worked in two groups. The right group attacked Atara and Ajul. The left group attacked from Deir es Sudan to Nabi Salih. They started late because of fog but then advanced quickly. The advance continued through the night on most of the front. The bridge over the Wadi el Jib was found to be unbroken. The top of the cliff was won just before dawn. When daylight came, they were on the lower parts of the hills. Ottoman machine gun defenders fought very hard.
During these operations, the soldiers climbed up and down steep cliffs. They also moved through deep gorges. Every Ottoman machine gun was carefully placed in strong defensive spots. These had to be found by careful searching on foot. This was because the land was very rough. Also, low clouds and mist meant that planes could not be used for scouting. The artillery (cannons) also had a very hard time. The rough land made it almost impossible to give good fire support.
Fighting the Ottoman Eighth Army

On the flat land, the XXI Corps' operations went smoothly. They did not face the same problems as the XX Corps. The XXI Corps moved its right side forward from the Wadi Deir Ballut to Ras el Ain. They secured a strong position near Abu Tellul and Musallabeh. This spot overlooked the Jordan Valley and the Beisan to Jericho road.
Their final goal was a line north of the Wadi Deir Ballut. This wadi becomes the Wadi el Jib. They also aimed for the Wadi Abu Lejja, where it joins the Nahr el Auja north of Mulebbis. This was an advance of about 4.5 miles (7.2 km). After crossing the Nahr el Auja, they reached El Haram near ancient Arsuf. This allowed them to attack the Ottoman positions from the side.
The attack was carried out by soldiers from the 232nd Brigade and 234th Brigade of the 75th Division. The 162nd Brigade of the 54th (East Anglian) Division also took part. Artillery closely supported them with a creeping barrage. One part of the artillery followed close behind the infantry. The rest of the cannons kept firing. As soon as the leading part could fire, the other four guns moved forward to join them.
Deir el Ballut was captured around 2:00 PM on March 10. By 11:00 AM on March 11, the Ottoman forces had left all the land south of the Wadi. They left behind 112 soldiers who were taken prisoner. About 40 Ottoman soldiers were killed. The two British infantry divisions had 104 casualties.
What Happened Next
The final line that was captured was overlooked from all sides. So, the British moved back slightly to the higher ground just to the south. They then made their positions stronger. In other areas, not all goals were reached. But the advance in the middle was about 5 miles (8 km) deep. This was across a 14-mile (22 km) front. It cost over 1,300 casualties for the British. Only 169 prisoners were captured from the Ottomans.
The new line set up by these infantry corps stayed almost the same for six months. It remained until the big advance in September 1918. The success of these infantry operations created a large enough base. This base was important to support the operations across the Jordan River. These operations began at the end of the month with the first Transjordan attack on Amman.
Images for kids
-

Jerusalem to Nablus Road shows Ain Sinia on left and Yebrud on right. Photo taken by the 230th Brigade, 74th Division.
-
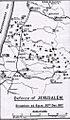
Falls Sketch Map 21 – position of the front line before the capture of Jericho
-
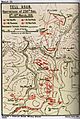
Tell 'Asur operations of 230th Brigade 74th Division
-
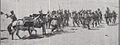
Lewis Gun Section of the 2nd Battalion, Leicestershire Regiment (7th Indian Division) with their mules at Arsuf Coastal Sector, summer 1918
