Battle of Abu Tellul facts for kids
Quick facts for kids Battle of Abu Tellul |
|||||||
|---|---|---|---|---|---|---|---|
| Part of the Middle Eastern theatre of World War I | |||||||
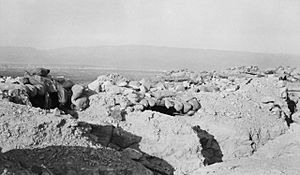 Turkish defences at Abu Tellul |
|||||||
|
|||||||
| Belligerents | |||||||
| Commanders and leaders | |||||||
| Strength | |||||||
| 15th (Imperial Service) Cavalry Brigade 1st Light Horse Brigade B Battery, Honourable Artillery Company |
Ottoman 24th Division (supported by two German battalions) | ||||||
| Casualties and losses | |||||||
| 189 including 23 killed, 46 wounded Australian Light Horsemen | about 1,000; 105 killed, 45 wounded, 425–540 captured | ||||||
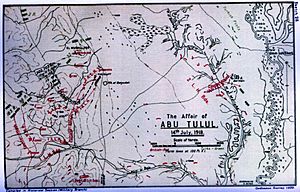
The Battle of Abu Tellul was a fight during World War I. It happened on July 14, 1918, in the Jordan Valley in Palestine. German and Ottoman Empire forces attacked the British Empire's soldiers stationed there.
The British had taken control of the Jordan Valley in February 1918. After two smaller attacks across the River Jordan, the Desert Mounted Corps became responsible for defending the valley.
German and Ottoman troops attacked Australian Light Horse units. These units were defending high ground at Mussallabeh and Abu Tellul. Other German forces attacked near the Wadi Mellaha. At the same time, Ottoman cavalry tried to attack British crossing points on the Jordan River.
However, British and Indian soldiers stopped the Ottoman cavalry before they could attack. These battles were the last major attacks against British forces in this part of the war. The British Empire won the battle.
Contents
Background
Why Abu Tellul Was Important
Abu Tellul was a very important ridge. It was located near the west bank of the Jordan River. Another ridge, Mussallabeh, was to the north. Together, they formed a "salient," which is a part of the battle line that sticks out into enemy territory.
Australian and New Zealand soldiers built many defensive posts here. These posts were like small forts made of stone or dug into the ground. Barbed wire covered the areas between them. British artillery guns were hidden close behind the front line.
The Ottoman and German forces wanted to cut off the British soldiers in the Jordan Valley. They hoped to separate them from other British troops in the Judean Hills. If they succeeded, it would weaken British control of the Jordan and Dead Sea areas. This would also make it harder for the British to launch future attacks.
Problems Between Germany and the Ottoman Empire
There were some disagreements between Germany and the Ottoman Empire. Some Ottoman soldiers believed German units were being moved away from Palestine. This caused bad feelings, even though many German and Ottoman soldiers had worked well together for years.
The Battle Begins
Who Attacked
The attacking force included German battalions and Ottoman divisions. They also had German light infantry and Ottoman cavalry. Some German soldiers carried many automatic rifles.
Who Defended
The Abu Tellul area was defended by two regiments of the 1st Light Horse Brigade. The 2nd Light Horse Regiment held four posts. The 3rd Light Horse Regiment held several posts around Abu Tellul.
The commander of the 3rd Light Horse Regiment was asked if his line could stop a strong attack. He said the posts would hold unless they were completely destroyed. The 1st Light Horse Regiment was kept in reserve.
British artillery batteries also supported the defenders. These included the 1/1st Nottinghamshire Royal Horse Artillery and the 1/B Battery, Honourable Artillery Company.
The 2nd Light Horse Brigade defended the Wadi Mellaha area. The 4th Light Horse Brigade was in reserve further south. The New Zealand Mounted Rifles Brigade was also in reserve.
Indian cavalry units, like the Mysore and Hyderabad Lancers, defended the Jordan River crossings. Other Indian infantry battalions also helped.
Soldiers worked hard to build and strengthen defenses. They often worked at night because the enemy could see them during the day. Temperatures were very high, reaching about 115°F (46°C) on July 14.
The attack started with artillery shelling from both sides during the night. Then, 17 German planes bombed the Jordan Valley at 4:00 AM on July 14. This caused many injuries.
Attack on Abu Tellul and Mussallabeh
Just after 1:00 AM, defenders heard movement near their posts. Ottoman artillery began shelling Mussallabeh and Abu Tellul. The shelling stopped around 2:30 AM, but then more enemy movement was heard.
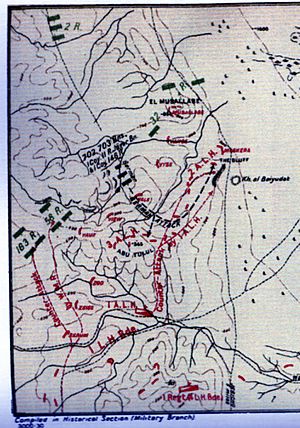
At 3:30 AM, about 1,250 German soldiers attacked the Mussallabeh area. The 2nd Light Horse Regiment commander moved his headquarters just in time. From his new position, he saw many troops coming up the hill. He thought they were his own men at first. But when they started cutting the wire, he ordered his men to open fire.
German battalions pushed forward, circling some posts and reaching Abu Tellul. They set up a post on Abu Tellul East. This move cut off many Light Horse posts, but the isolated soldiers held their ground. They defended their positions successfully from all directions. Only a few posts were forced to retreat, and one was briefly captured before being retaken.
The Germans were caught in crossfire from the British positions. The Ottoman forces on their sides could not support the German attack strongly. On the left, the Ottoman 32nd Regiment attacked Mussallabeh. They captured a post, but the defenders quickly took it back. Three attacks on Mussallabeh were pushed back with heavy losses. About 200 enemy soldiers were killed there.
The British completely restored their positions. They captured 380 German and about 200 Ottoman prisoners. On the right, Ottoman units tried to climb a cliff to attack a post. A sentry shot the leaders, and one burst into flames. By the light of this "human torch," the remaining attackers were shot.
Help Arrives
When the Germans advanced between the Light Horse Regiments, the reserve unit, the 1st Light Horse Regiment, counter-attacked at 4:30 AM. The brigade commander sent squadrons to reinforce the defenders.
An artillery officer found some soldiers from the reserve regiment. He ordered his battery to fire in support of their attack. The shells caused 40 Germans to surrender quickly. Later, six officers and 80 men surrendered to just seven Light Horsemen.
The outer Light Horse posts had held out. They used their machine guns against the attackers. Reinforcements from the 1st Light Horse Regiment and the Wellington Mounted Rifle Regiment pushed along the Abu Tellul Ridge. They quickly drove out the remaining enemy soldiers.
The Germans were scattered and disorganized. They couldn't dig in, so they were quickly pushed back. They retreated into the valley, where they were fired upon from Mussallabeh posts.
The Germans still held a position called The Bluff. At 8:00 AM, the 1st Light Horse Regiment retook it. Only three of the 20 defenders were unwounded, but 100 Germans were captured. The Ottoman 163rd Regiment's attack on Vaux post continued until the Wellington Mounted Rifle Regiment counter-attacked. They drove the Ottomans back and captured 61 prisoners.
Attack on the Wadi Mellaha
On the Wadi Mellaha, the Ottomans shelled the 2nd Light Horse Brigade all night. At dawn, German and Ottoman soldiers were seen digging trenches.
A small group of 15 men from the 5th Light Horse Regiment attacked a much larger enemy force. They got very close to about 150 Germans and captured 15 prisoners. Two hours later, the same officer and 20 men attacked again. They threw bombs and used bayonets. They killed 25, wounded 30, and captured 30 to 45 enemy soldiers.
Results of the Attacks
The German and Ottoman attacks on Abu Tellul and Mussallabeh were stopped. The 1st Light Horse Brigade and the Wellington Mounted Rifle Regiment successfully counter-attacked. After six and a half hours of intense fighting, the British captured 425–448 prisoners. Most of these were German. The Light Horse suffered 108 casualties. They also captured six machine guns and many rifles.
Ottoman Cavalry Attack
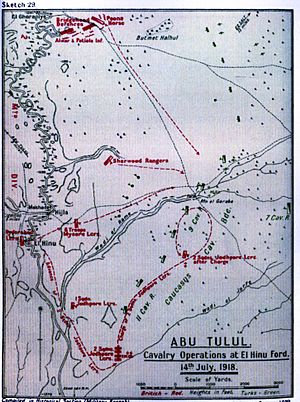
While the attacks were happening on the west side of the Jordan River, Ottoman cavalry gathered on the east bank. They were moving towards El Hinu ford. The Jodhpur and Mysore Lancers galloped out from the fords to attack the Ottoman cavalry.
At 3:30 AM, squadrons of the Jodhpore and Mysore Lancers crossed the Jordan River. They found the Ottoman cavalry spread out over two miles. This Ottoman force was advancing towards El Hinu ford.
Two armored cars helped the British and Indian cavalry in their successful counter-attack.
At 10:30 AM, two squadrons of Jodhpore Lancers crossed the Jordan again. They charged the Ottoman cavalry, using their lances. They captured 50 prisoners and many horses. However, they faced heavy machine-gun fire and suffered 28 casualties.
Later, the Sherwood Rangers Yeomanry and Mysore Lancers also attacked. The Mysore Lancers speared about 30 Ottoman soldiers. The Poona Horse also moved out and attacked the Ottoman positions. This caused the Ottoman forces to retreat.
The Jodhpore and Mysore Lancers and the Poona Horse captured 100 prisoners. They killed more than 90 Ottoman soldiers with lances. However, they lost 80 of their own troopers.
Casualties
The German and Ottoman forces lost a total of 540 prisoners. They also had up to 1,000 casualties (killed or wounded). The British Empire forces suffered 189 casualties.
Many wounded soldiers were brought to the 4th Light Horse Field Ambulance. This was a medical unit that provided emergency treatment. Wounded soldiers were then taken to hospitals in Jerusalem.
German and Ottoman prisoners were brought in, but they had to be kept separate. The Germans blamed the Ottomans for not supporting them. The Ottomans disliked the Germans for their arrogance and better equipment. Ottoman soldiers often had poor equipment and ragged clothes. German soldiers had good uniforms and supplies.
Aftermath
The Battle of Abu Tellul showed the strength of the British Empire's forces in defense. This was the only time during the campaign that German infantry attacked as "storm-troopers." Their defeat was a big blow to German pride.
German prisoners claimed their Ottoman allies had let them down. The Ottoman commander, Von Sanders, noted that his troops' fighting ability had declined.
On July 16, Ottoman artillery heavily shelled the British positions again. Over 1,500 shells were fired, causing many casualties, especially among the horses. The Ottoman artillery was very accurate, helped by spotter planes.
Just two months later, on September 19, the Battle of Megiddo began. This battle eventually ended the war in this region.


