
Battle of Megiddo (1918) facts for kids
Quick facts for kids Battle of Megiddo |
|||||||
|---|---|---|---|---|---|---|---|
| Part of the Middle Eastern theatre of World War I | |||||||
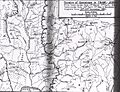
 Map of the battlefield |
|||||||
|
|||||||
| Belligerents | |||||||
|
|||||||
| Commanders and leaders | |||||||
|
|
||||||
| Strength | |||||||
|
|
||||||
| Casualties and losses | |||||||
|
|
||||||
The Battle of Megiddo was a major battle during World War I. It took place from September 19 to 25, 1918. This battle was the final big attack by the Allied forces in the Sinai and Palestine Campaign.
The battle was fought in what is now Israel, Syria, and Jordan. The main forces involved were the Egyptian Expeditionary Force (Allies) and the Ottoman Yildirim Army Group. The Allies won a huge victory. They captured many thousands of soldiers and a lot of land.
General Edmund Allenby, the British commander, led the Allied forces. He used smart tactics to win with few losses. His plan involved surprise attacks and using fast-moving troops. These included cavalry, armored cars, and airplanes. They surrounded the Ottoman armies, cutting off their escape routes. The Arab Revolt forces also helped a lot in this victory.
Background to the Battle
The area around Tel Megiddo was very important. It controlled key routes to the north. Many armies had fought here throughout history. In 1918, it was still a vital strategic location. It connected important valleys in the region.
Allied Forces Prepare
The Allies had been fighting the Ottoman Empire since 1914. The British Egyptian Expeditionary Force (EEF) had pushed the Ottomans back. They secured the Suez Canal, a vital shipping route. General Allenby took command of the EEF in 1917. He led successful attacks, capturing Jerusalem in December 1917.
In 1918, some Allied troops were sent to the Western Front in Europe. This was because Germany launched a big attack there. Allenby still kept pressure on the Ottomans. He sent troops across the Jordan River twice. These attacks helped him set up positions in the Jordan Valley.
Ottoman Empire's Situation
The Ottoman forces in Palestine were led by German General Otto Liman von Sanders. He decided to stop retreating and hold his positions. He believed that more retreat would hurt his troops' morale. It would also encourage the Arab Revolt to spread.
By September 1918, the Ottoman armies were tired. Many soldiers had left or were sick. They also lacked supplies. Their front lines were not as strong as they seemed. Liman von Sanders did not know Allenby's full plans. He spread his troops out evenly, which was a mistake.
Allenby's Clever Plan
General Allenby planned a surprise attack. He wanted to break through the Ottoman lines near the coast. This area was good for his fast-moving cavalry. His horsemen would then rush deep behind Ottoman lines. This would trap the Ottoman Seventh and Eighth Armies.
First, the Arab Northern Army would attack the railway at Daraa. This would cut Ottoman supply lines. It would also distract the Ottoman commanders.
Next, two infantry divisions would attack in the Judean Hills. This was a diversion to draw Ottoman attention. It also helped secure positions to block Ottoman escape routes.
The main attack would happen on September 19. Four infantry divisions would attack the coast. They would create a gap in the Ottoman defenses. Then, the Desert Mounted Corps, with its three cavalry divisions, would ride through. Their goal was to capture Al-Afuleh and Beisan. These towns were key communication centers. Capturing them would cut off all Ottoman troops west of the Jordan River.
Finally, a special force would capture the Jisr ed Damieh bridge. This bridge was a vital link for the Ottoman Fourth Army.
Keeping it a Secret
Secrecy was very important for Allenby's plan. He didn't want the Ottomans to know where he would attack. So, he used many tricks:
- Troops moved towards the coast only at night.
- Troops moved openly towards the Jordan Valley during the day.
- They made fake camps and horse lines.
- They even spread rumors about a horse race on the day of the attack.
These tricks worked. The Ottomans thought the main attack would be in the Jordan Valley. They didn't realize Allenby was gathering a huge force on the coast.
Air Power Helps
The Allied forces had control of the skies. British and Australian planes were much better than Ottoman and German aircraft. They stopped enemy planes from flying reconnaissance missions. This meant the Ottomans couldn't see Allenby's hidden troop movements. Allied planes also bombed Ottoman airfields. This kept enemy planes on the ground.
The Battle Begins
On September 16, Arab forces began attacking railways around Daraa. This caused chaos for the Ottomans. They sent troops to reinforce Daraa, weakening their main front.
On September 19, at 1:00 AM, a British bomber attacked Al-Afuleh. It dropped bombs on the main telephone exchange and railway station. This cut off communications for the Ottoman commanders for two crucial days.
Breaking Through the Lines
At 4:30 AM, Allenby's main attack began on the coast. Hundreds of Allied guns fired a massive barrage. British and Indian infantry quickly broke through the Ottoman lines. The Ottoman defenses collapsed within hours.
The Desert Mounted Corps then moved quickly north along the coast. There were no Ottoman reserves to stop them. By the end of the first day, the British had reached Tulkarm. The Ottoman Eighth Army was in full retreat. Allied planes bombed them from above. The Ottoman commander had fled.
Allied planes also kept German aircraft from taking off from their airfield at Jenin. They bombed the airfield all day, stopping any interference.
Surrounding the Ottoman Armies
On September 20, the Desert Mounted Corps secured passes through the Carmel Range. They captured Al-Afuleh and Beisan. These towns were vital communication centers. A brigade also attacked Nazareth, where the Ottoman commander Liman von Sanders was. He barely escaped. Later, Australian troops captured Jenin, taking many retreating Ottomans prisoner.
The Ottoman Seventh Army, led by Mustafa Kemal Pasha, was now trapped. Their railway escape route was cut. Their only way out was a road down to the Jordan Valley. On September 21, Allied aircraft spotted the Seventh Army retreating. Waves of planes bombed and strafed the column. The entire army was destroyed in about an hour. The road was filled with destroyed vehicles and dead soldiers.
Over the next few days, Allied cavalry rounded up thousands of Ottoman troops. Many who tried to cross the Jordan were captured by Arab forces. On September 25, Australian Light Horse regiments captured Samakh after fierce fighting. This broke the last Ottoman defensive line.
Fighting in the Hills
While the main attack happened, other Allied forces advanced in the Judean Hills. Nablus was captured on September 21. The retreating Ottomans had been largely destroyed by air attacks.
Operations Around Daraa
British aircraft began operating from nearby airfields. They shot down several Ottoman planes. They also bombed Ottoman airfields at Daraa and Mafraq.
Capture of Amman
On September 22, Allied forces attacked the Ottoman 53rd Division. They captured its commander and many prisoners. They also took the Jisr ed Damieh bridge. The Ottoman Fourth Army began to retreat from the Jordan and Amman. British and Australian planes attacked them, causing heavy losses.
On September 25, Allied forces captured Amman. A large Ottoman detachment surrendered to the Anzac Mounted Division on September 28. They chose to surrender rather than face attacks from Arab irregulars.
Aftermath and Victory
General Allenby ordered his cavalry to advance further. Their goal was to capture Daraa and Damascus. Other divisions moved north along the coast towards Beirut and Baalbek.
On September 27, the 4th Mounted Division reached Daraa. Arab forces had already taken it. They then advanced on Damascus. The retreating Ottomans committed terrible acts against Arab villages. In return, the Arab forces took no prisoners. Thousands of Ottoman soldiers were killed.
On September 29, Allied cavalry closed off the exits from Damascus. On September 30, Australians intercepted the Damascus garrison trying to escape. Damascus was captured the next day. The Allies took 20,000 prisoners.
Pushing to Aleppo
After Damascus fell, Allied forces continued north through Syria. They captured Aleppo on October 26. They advanced further until October 31. At this point, the war ended for the Ottomans with the signing of the Armistice of Mudros.
The Battle of Megiddo was a huge success. It led to the capture of 75,000 Ottoman soldiers. This battle showed how effective surprise, speed, and air power could be. It was a major factor in the Ottoman Empire's defeat in World War I.
Images for kids
-
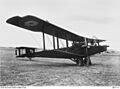
A side view of the Handley–Page 0/400 of No. 1 Squadron, Australian Flying Corps.
-
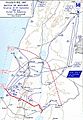
Progress of the battle, 19–24 September 1918.
-
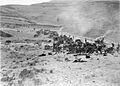
Yildirim Army Group carts and gun carriages destroyed by EEF aircraft on the Nablus-Beisan road.
-
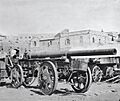
Seventh Army artillery abandoned in Nablus.
-
Transjordan theatre of operations, March to September 1918.


_Destroyed_Turkish_transport.jpg)


