
Battle of Ayun Kara facts for kids
Quick facts for kids Battle of Ayun Kara |
|||||||
|---|---|---|---|---|---|---|---|
| Part of the Middle Eastern theatre of the First World War | |||||||
 Map showing the positions of the Ottoman and New Zealand forces during the battle |
|||||||
|
|||||||
| Belligerents | |||||||
| Commanders and leaders | |||||||
| William Meldrum | Unknown | ||||||
| Units involved | |||||||
|
~1,940 troops New Zealand Mounted Rifles Brigade 4.5in shrapnel artillery battery |
~1,500 troops 18 machine-guns artillery battery 3rd Infantry Division |
||||||
| Casualties and losses | |||||||
| 44 dead 141 wounded |
182 dead (Possibly 400) 300 wounded 34 prisoners of war 5 machine-guns captured 2 Lewis guns recovered |
||||||
The Battle of Ayun Kara happened on November 14, 1917. It was a fight during the First World War in the Sinai and Palestine Campaign. This battle took place between the New Zealand Mounted Rifles Brigade and a group of Turkish soldiers. The Turkish group was from the 3rd Infantry Division.
After winning battles at Beersheba, Gaza, and Mughar Ridge, the Egyptian Expeditionary Force was chasing the Turkish army. The New Zealanders were part of the ANZAC Mounted Division. They were moving towards Rishon LeZion. About nine miles (14 km) south of Jaffa, they met the Turkish soldiers. These Turkish forces had about 1,500 infantry, machine-guns, and artillery.
The battle started in the afternoon. The New Zealanders were caught in the open. Even with heavy Turkish artillery and machine-gun fire, the New Zealanders slowly pushed forward. They fought hard and won the battle.
The New Zealanders lost 44 soldiers and had 81 wounded. The Turkish side lost 182 soldiers, and many more were wounded. This battle was the last time the Turkish army tried to protect their supply routes in this area. That night, the Turks retreated. Soon after, the Egyptian Expeditionary Force took control of Jerusalem.
Why the Battle Happened
At the end of October 1917, the Egyptian Expeditionary Force (EEF) began their third attack to capture the port of Gaza. This port was on the Palestinian Mediterranean coast. Their first goal was to capture Beersheba. This was on the British right side. Then, they planned to move west and break the Gaza–Beersheba defense line. Some of their mounted soldiers were left on the right to chase the Turkish forces north.
The New Zealand Mounted Rifles Brigade was one of the groups left on the right. This brigade included the Auckland Mounted Rifles, the Canterbury Mounted Rifles, the Wellington Mounted Rifles, and the 1st Machine-Gun Squadron. This unit had 1,940 men. When they got off their horses, their rifle power was like a single infantry battalion.
The New Zealanders stayed on the right until November 10. Then, they were told to leave Beersheba and join the ANZAC Mounted Division. This meant moving sixty miles (97 km) across the country. The trip took them two days. They arrived at the division's camp at 10:00 PM on November 12. They were then ordered to chase the Turkish forces north. Their goals were to capture Ramla and Ludd. They also needed to block the road between Jaffa and Jerusalem.
The brigade started moving the next afternoon. They went north and crossed the River Sukerior without any problems. They camped that night on the northern bank. They continued their advance the next morning. Now, they were heading towards Ayun Kara.
The Turkish army knew they would be chased. They tried to stop the EEF from following too closely. About nine miles (14 km) south of Jaffa, about 1,500 Turkish soldiers set up a position. These soldiers were from the 3rd Infantry Division. They had eighteen machine-guns and an artillery battery to help them. This position was on the edge of sand dunes. It was north of El Kubeibeh and west of the villages of Surafend el Harab and Ayun Kara.
The Battle Begins
The Turkish soldiers made a strong stand in a good defensive spot. The fight happened on the edge of sand dunes. These dunes were north of El Kubeibeh and west of the villages of Surafend el Harab and Ayun Kara. The New Zealand Mounted Rifles Brigade attacked the Turkish infantry division.
In the middle of the attack were the Auckland Mounted Rifles and the Wellington Mounted Rifles. They had about 1,000 fighters, plus 200 men holding horses. On the right side, the Canterbury Mounted Rifles were busy fighting in the orange groves of the Wadi Hanein. This was near Nes Ziyona. They fought until late afternoon. They successfully protected the right side of the Auckland and Wellington regiments. They pushed many Ottoman soldiers back through the orchards. Eventually, they won the village.
To the west of the Wadi Hanein, the Auckland and Wellington Mounted Rifles moved quickly at first. They crossed open, hilly land. Their left side was on the edge of the dunes. The Somerset Battery (RHA) supported them from north of El Kubeibeh. But soon, they met a strong Turkish position. This position was on a high ridge. One side of the ridge was steep, leading to orange groves. The other side sloped gently towards the sand dunes.
By noon, the situation had changed. Meldrum, who commanded the New Zealand Brigade, ordered an attack. The Wellington Mounted Rifles in the center were to reach the main Turkish position. The Auckland Mounted Rifles moved on the Wellingtons' left. They faced very heavy machine-gun fire from the long ridge.
By 1:30 PM, the Wellington Mounted Rifles had gained a foothold on the ridge. They quickly captured small positions. They reached their goal by pushing the Turkish defenders back. Major Wilder's 9th Squadron, helped by the 2nd Squadron, charged the first Turkish position with bayonets. They captured one machine-gun and one Lewis gun. These captured guns were then used against the second position. This position was taken with another bayonet charge. Two more machine-guns were captured. The third Turkish position was then attacked. But a place called Red Knoll fired directly at them.
This central position was covered by Turkish artillery. The artillery moved forward under trees and started firing from 1,200 yards (1,100 m) away. This slowed down the New Zealanders' attack. Shortly after 2:00 PM, Turkish soldiers were seen gathering in a hidden area. This was in front of the Auckland and Wellington regiments. More Turkish soldiers were also seen by the ANZAC Mounted Division headquarters. They reported this to the attacking regiments. But the New Zealanders had no extra soldiers or help.
Every available man, including signallers and messengers, formed a group in case they were needed. The 3rd Squadron, led by Major Twistleton, charged forward very close to the enemy line. He was badly wounded in the charge. Around this time, the Turkish defenders were pushed back from the third position. The New Zealanders gained almost the entire long ridge. At 2:30 PM, the Turkish army launched a counter-attack. But the New Zealanders fought them off with crossfire from their machine-guns.
Another counter-attack happened 15 minutes later. Two companies of 200 to 300 Turkish soldiers attacked the Auckland Regiment. They had hand grenades. They charged with bayonets, coming as close as fifteen yards (14 m). They threw their grenades, trying to get around the New Zealanders' left side. A group of Turkish soldiers took back a small hill. All New Zealanders on that hill had been killed or wounded. The fighting was very intense and close. Turkish machine-guns caused heavy losses. The machine-gun on Red Knoll kept causing many deaths. It was finally captured by a group from the 2nd Squadron, Wellington Regiment. They charged on horseback to the base of the knoll. Then, they got off their horses and fought hand-to-hand. After the knoll was captured, the rest of the squadron arrived. They fired heavily on the Turkish soldiers in front of the Auckland Regiment.
After the Battle
By 4:15 PM, the fighting had been going on for almost three hours. A squadron of the Wellington Regiment made a bayonet charge against a close Turkish position. This was too much for the Turkish units. They broke and fell back beyond Ayun Kara. The New Zealanders chased them with rifle and machine-gun fire.
The Turkish 3rd Division left behind about 400 dead soldiers in front of the Auckland's position. Other reports say between 150 and 162 Turkish soldiers died. The New Zealanders captured many machine-guns, including two Lewis guns. The New Zealanders had 175 casualties. This included three officers and 29 other soldiers killed. Eleven officers and 132 other soldiers were wounded. The Auckland Regiment had 89 of these casualties.
Images for kids
-
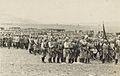
Turkish Army troops, on the Plain of Esdraelon in 1914
-

A memorial for the New Zealanders who died at Ayun Kara on November 14, 1917.


