
Battle of Mughar Ridge facts for kids
Quick facts for kids Battle of Mughar Ridge |
|||||||
|---|---|---|---|---|---|---|---|
| Part of the Middle Eastern theatre of World War I | |||||||
.jpg) 3/3rd Gurkha Rifles holding front line trenches |
|||||||
|
|||||||
| Belligerents | |||||||
|
|||||||
| Commanders and leaders | |||||||
| Units involved | |||||||
| XXI Corps Desert Mounted Corps |
Seventh Army Eighth Army |
||||||
| Casualties and losses | |||||||
| 1,188+ | 10,000 prisoners, 100 guns |
||||||
The Battle of Mughar Ridge was an important fight during World War I. It happened on November 13, 1917, in Palestine. This battle was part of a bigger plan by the British Empire to push back the Ottoman and German armies.
The battle took place after the Battle of Beersheba and the Third Battle of Gaza. British Empire forces, known as the Egyptian Expeditionary Force (EEF), were advancing. They faced the Ottoman Yildirim Army Group, who were retreating.
The fighting covered a large area north of the Gaza to Beersheba line. It was west of the road that goes from Beersheba to Jerusalem. The British Empire won this battle.
Contents
Why the Battle Happened
After capturing Beersheba on October 31, the British Empire forces faced strong Ottoman defenses. These defenses stretched from Gaza to the Judean Hills. The Ottoman army held these positions for about a week.
This delay allowed the Ottoman army to retreat in an orderly way. But on November 8, the main Ottoman base at Sheria was captured. British cavalry also captured guns at Huj. This forced Ottoman units along the entire line to retreat.
The British Empire needed to advance quickly. Winter rains were expected to start soon. These rains would turn the firm ground into thick mud. This would make it very hard for soldiers and vehicles to move.
Getting Ready for Battle

On November 7 and 8, Ottoman rearguard units slowed down the British advance. This included the Desert Mounted Corps and two infantry divisions. The British 52nd (Lowland) Division fought hard near the coast. They crossed the Wadi el Hesi and captured "Sausage Ridge." This ridge was important because it covered a road and railway.
The Ottoman rearguards managed to escape safely during the night of November 8/9. Most British infantry divisions were far from their supply lines. This made it hard for them to follow the retreating Ottomans.
Moving Troops on November 9
.jpg)
The Anzac Mounted Division started moving towards the coast on November 9. They captured many prisoners and supplies. They found that the Ottoman units were very disorganized. Many Ottoman soldiers were suffering from thirst and exhaustion.
The Australian Mounted Division spent most of November 9 looking for water. They found it at Huj. They then marched about 16 miles (26 km) towards the Kastina–Isdud line. They captured more prisoners, guns, and transport.
The Yeomanry Mounted Division was fighting in the hills north of Beersheba. They were ordered to rejoin the Desert Mounted Corps on the coast.
Armies on November 10

The British Empire forces advanced to the Nahr Sukereir river. This was the next natural defense line for the Ottomans. British aircraft bombed and machine-gunned retreating Ottoman columns. They also hit the El Tineh railway station.
The Ottoman army managed to set up a new strong defensive line. This line stretched about 20 miles (32 km) from the Mediterranean Sea to Bayt Jibrin. The Ottoman Eighth Army was on the coast. The Ottoman Seventh Army was further inland.
The Ottoman armies could get supplies and reinforcements easily. Their defensive line was close to their railway and road links.
Infantry Capture Isdud
.jpg)
On November 10, the British 52nd (Lowland) Division advanced. They faced strong Ottoman resistance around Isdud. Two brigades of the Anzac Mounted Division followed. They crossed the Nahr Sukereir and set up a bridgehead. They found plenty of water there.
Mounted Advance Towards Summil
The Australian Mounted Division arrived at Tel el Hesi. They found good water there. The Anzac Mounted Division reported they were "ridden out" and needed to stop for water.
The Australian Mounted Division faced strong Ottoman defenses near Summil. The Ottoman forces had dug trenches. The mounted brigades could not advance further due to heavy Ottoman artillery fire. However, Summil was occupied without a fight on November 11.
Position on November 11
Allenby decided to attack Junction Station from the south-west. This would turn the Ottoman army's right flank on the coast. November 11 and 12 were days of preparation. The Anzac Mounted Division rested and got supplies.
Supplies for the British advance were hard to bring up. The railway was still being built forward. So, the Egyptian Camel Transport Corps worked hard to bring supplies.

The Australian Mounted Division occupied Summil on November 11. But they could not advance further due to strong Ottoman opposition. The New Zealand Mounted Rifles Brigade rejoined the Anzac Mounted Division after a long march.
Allenby Prepares as Ottomans Counterattack
The Ottoman commanders chose a 20-mile (32 km) defensive line. This line was meant to protect the Jaffa to Jerusalem railway and Junction Station. It ran along a high ridge with villages like Al-Maghar and Zernukah.
The Ottoman overall commander, Erich von Falkenhayn, decided to make a stand. He ordered a counterattack against the British right flank. This flank was covered by the Australian Mounted Division. His plan was to overwhelm them and cut their supply lines.
Allenby's plan for November 13 was to turn the Ottoman right flank on the coast. He ordered the Australian Mounted Division to make a big show of force. This would draw Ottoman attention away from the coast.
Infantry Attack Brown Hill, November 12
The British 52nd (Lowland) Division attacked near the coast. They aimed to open the way for the main attack the next day. They attacked an important Ottoman position from Burqa to Brown Hill. The village was taken easily.
But Brown Hill was very hard to capture. It was steep and had a wide view. A battalion of the 156th Brigade captured the top. But they were left with only a few men. An Ottoman counterattack drove them off the hill.
The 3rd Gurkha Rifles were then ordered to attack again. They quickly retook the hill with a bayonet charge. They suffered 50 casualties. The attacking battalion lost over 400 men killed or wounded. The Ottoman defenders also suffered heavy losses. This success opened the way for the main attacks the next day.
Ottoman Counterattack on Australian Mounted Division, November 12
.jpg)
The Australian Mounted Division advanced towards Tel es Safi. They wanted to put pressure on the Ottoman left flank. About 4,000 Australian and British mounted troops moved north.
At first, it seemed the Ottomans had retreated. But then, four Ottoman divisions (about 5,000 soldiers) began advancing south. This was the heaviest counterattack since the British broke through at Sharia.
The British Honourable Artillery Company battery opened fire. But they were outnumbered and outranged by Ottoman guns. The Ottoman attack pushed the British mounted brigades back. The British fought steadily and withdrew skillfully. They eventually held the Ottoman attack in front of Summil.

The Ottoman attackers dug in on a line through Balin and Berkusie. The Australian Mounted Division suffered about 50 casualties. This strong Ottoman counterattack was stopped. It did not force the British to change their plans.
The Battle of Mughar Ridge
On November 13, the weather was clear and fine. The battlefield was mostly open land. The most important feature was a 100-foot (30 m) high ridge. This ridge formed the backbone of the Ottoman army's 20-mile (32 km) long defense.
The Ottoman line was defended by several divisions. Two strong defensive positions were on the ridge: the villages of Qatra and Al-Maghar. These villages were separated by the Wadi Jamus.
Allenby ordered the main attack to be carried out by two infantry divisions. They would attack west towards Junction Station. On their right, the Australian Mounted Division would attack north. The Anzac and Yeomanry Mounted Divisions would cover the left flank. Their first goal was Yibna, then Aqir.
Fighting in the Center
The infantry of the 75th Division attacked first. They captured the villages of Tall al-Turmus, Qastina, and Yazur. The 52nd (Lowland) Division had already taken Bashshit.
But the Ottoman defenses at Mesmiye, Qatra, and El Mughar were very strong. Machine-guns swept all approaches. The 75th Division made slow progress. They eventually pushed the Ottomans back. Towards dusk, the infantry assault was helped by two troops of the 11th Light Horse Regiment. They rode into action and provided valuable fire support.
The infantry drove the Ottoman defenders off the ridge. They occupied Mesmiye esh Sherqiye. The 75th Division pushed on, taking 300 prisoners. They halted just short of Junction Station in the darkness.
On the Flanks
.jpg)
The Australian Mounted Division covered the right flank of the infantry. They were held up by an Ottoman position covering El Tineh. Later, they were ordered to push forward to protect the infantry's right.
The Yeomanry Mounted Division covered the infantry's left flank. They captured Yibna and advanced north. The 6th Mounted Brigade was directed towards El Mughar.
The Charge at El Mughar

Around 11:30 AM, British infantry were stopped by heavy machine-gun fire. They were trying to advance towards Qatra and El Mughar. At about 2:30 PM, it was decided that the 6th Mounted Brigade should attack El Mughar ridge. This would happen with a new assault by the 52nd (Lowland) Division.
Half an hour later, the Royal Buckinghamshire Yeomanry and the Queen's Own Dorset Yeomanry charged. They galloped about 3,000 yards (2.7 km) onto the crest of the ridge. They gained the ridge, but their horses were completely exhausted. They could not chase the escaping Ottoman units.
The charge cost 16 killed, 114 wounded, and 265 horses. This was a high price. However, the Ottoman defenders still held El Mughar village. Two squadrons of the Berkshire Yeomanry (fighting on foot) and two infantry battalions renewed the attack. Fighting continued until 5:00 PM. They finally captured the two important villages of Qatra and El Mughar. This cost them 500 casualties. They captured two field guns and 14 machine-guns. They also took 1,078 prisoners and found more than 2,000 dead Ottoman soldiers.
After the Battle

Junction Station was captured the next morning, November 14. Other villages in the area were found to be empty.
Units of the 75th Division, supported by armored cars, occupied Junction Station. This cut the Jaffa to Jerusalem railway. The British Empire forces had advanced 60 miles (97 km) from Beersheba in 17 days. They had fought major and minor battles on 13 of those days.
Most mounted units had covered at least 170 miles (274 km). They captured 5,270 prisoners and over 60 guns. At Junction Station, they captured two train engines and 60 trucks. They also found a working steam pumping plant with unlimited water. Junction Station was a very important center for both sides' supply lines.
On November 14, the 4th Light Horse Brigade entered El Tineh. They found good wells with plenty of water. The horses had worked incredibly hard. They had carried heavy loads with little food and water.

The Yeomanry Mounted Division and the Anzac Mounted Division continued to push the retreating Ottoman army north.
Battle of Ayun Kara
On November 14, the New Zealand Mounted Rifles Brigade met a strong Ottoman rearguard near Ayun Kara. They attacked and fought fiercely. The New Zealanders eventually won. They went on to occupy Jaffa two days later.
The Anzac Mounted Division was ordered to cut the road linking Jaffa to Jerusalem. They needed to capture Ramleh and Ludd. This was the only main road from the coast to Jerusalem. The New Zealand Mounted Rifles Brigade occupied El Kubeibeh. They then pushed towards the Wadi Hunayn. Here, they met Ottoman rearguards in orange groves.
The 1st Light Horse Brigade drove an Ottoman rearguard from a ridge. They occupied the village of Rehovot. At the same time, the New Zealand Mounted Rifles Brigade fought a strong rearguard at Ayun Kara. The Ottoman soldiers counterattacked but were defeated.
November 15–16, 1917

On November 14, Falkenhayn ordered a general retreat. The Ottoman Seventh Army fell back into the Judean Hills towards Jerusalem. The Eighth Army retreated north of Jaffa across the Nahr el Auja.
The Ottoman armies suffered heavy losses. They lost a lot of territory, between 40 and 60 miles (64-97 km). They left behind 10,000 prisoners of war and 100 guns.
On November 15, the 75th Division and the Australian Mounted Division advanced towards Latron. This is where the Jaffa to Jerusalem road enters the Judean Hills. The Anzac Mounted Division occupied Ramleh and Ludd.
An Ottoman rearguard blocked the Vale of Ajalon. The 6th Mounted Brigade charged and overwhelmed this position. On November 16, Latron was captured. The New Zealand Mounted Rifle Brigade was the first British unit to enter Jaffa. They occupied the city without a fight.
This marked the end of the British Empire's first advance into Palestine. The Ottoman Eighth Army retreated north of the Auja River. The Seventh Army retreated into the Judean Hills. The British Empire had advanced 50 miles (80 km) north into Ottoman territory. They had captured over 10,000 Ottoman prisoners and 100 guns.
Medical Support
The medical teams for the mounted divisions worked hard. They moved wounded soldiers to the rear. But they faced challenges like bad roads and transport problems.
Advance into Judean Hills
The advance towards Jerusalem began on November 19. The city was captured during the Battle of Jerusalem on December 9, three weeks later.
Images for kids
-
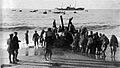
Landing stores near Gaza

