Battle of Jaffa (1917) facts for kids
Quick facts for kids Battle of Jaffa |
|||||||
|---|---|---|---|---|---|---|---|
| Part of the Middle Eastern theatre of World War I | |||||||
 Jaffa surrenders to the New Zealand Mounted Rifles Brigade on 16 November 1917 in front of the Town Hall |
|||||||
|
|||||||
| Belligerents | |||||||
| Commanders and leaders | |||||||
| Lieutenant General Edward Bulfin | Birinci Ferik Cevat Çobanlı | ||||||
| Units involved | |||||||
| XXI Corps | Eighth Army | ||||||
The Battle of Jaffa was an important fight during World War I in the Middle East. It happened in December 1917. The battle was between the British Empire (including forces from places like New Zealand) and the combined armies of the Ottoman Empire and German Empire.
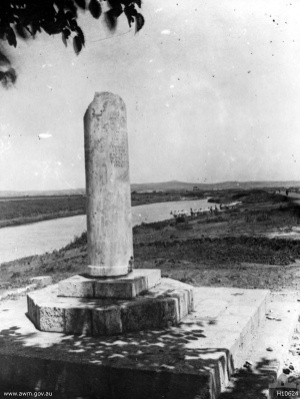
The city of Jaffa (a port city) had been captured by the New Zealand Mounted Rifles Brigade on November 16, 1917. This happened after a big win at the Ayun Kara. However, the Ottoman forces were still very close, just about 3 miles (5 km) away. They were across a river called the Auju River (also known as the Yarkon River).
Because the Ottoman army was so near, their cannons could still reach Jaffa. This made the port unsafe for ships to use. To make Jaffa and its links to Jerusalem safe, the British needed to push the enemy further away.
On the night of December 20–21, 1917, a British group called the 52nd (Lowland) Division made a daring crossing of the river. After they secured the other side, more British troops and their cannons crossed over. They forced the Ottoman defenders to retreat about 5 miles (8 km). This amazing river crossing helped make Jaffa and the roads around it much safer for the British.
Contents
Why the Battle Happened
The British forces had taken Jaffa, a port city on the Mediterranean Sea. But the Ottoman soldiers who had been pushed out were still a threat. They were positioned on the north side of the Yarkon River (Nahr el Auja). From there, they could stop ships and bother British troops.
The British commander, General Edmund Allenby, wanted to create a strong defensive line. This line would stretch from the Mediterranean Sea to the Dead Sea. To make this line secure, he needed to push the Ottoman forces further away from the Nahr el Auja river. These Ottoman forces were part of the Ottoman Eighth Army.
The river was protected by a system of trenches on its northern bank. These trenches stretched from areas called Mulebbis and Fejja to Bald Hill. The river itself was wide and deep in many places. Before this main battle, there was a smaller attack on November 24–25. British battalions tried to cross the river but were pushed back by the Ottoman defenders.
The British Attack
Getting Ready for Battle
Three groups of British soldiers, called infantry divisions, began to get into position on December 7. These divisions were part of the XXI Corps, led by Lieutenant General Edward Bulfin. The 75th Division was on the right, the 54th (East Anglian) Division in the middle, and the 52nd (Lowland) Division was on the left, near the coast.
On December 14, Major General John Hill, who led the Lowland Division, suggested a surprise attack. Instead of a loud cannon bombardment before the attack, he wanted a quiet crossing. His engineers prepared special boats called pontoons and canvas coracles. These boats were big enough to carry about twenty soldiers each.
In the days before the attack, the British cannons fired occasionally. This was mainly to stop Ottoman patrols and to make sure the cannons were aimed correctly if they were needed. The area where the attack would start was low and swampy. Three days of rain made the ground very wet and difficult for the soldiers.
The River Crossing
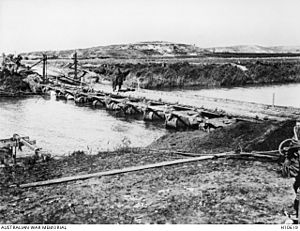
On the night of December 20–21, it was raining heavily. The 52nd (Lowland) Division began their risky river crossing using their pontoon bridges and boats. The 155th (South Scottish) Brigade crossed the river to the east of Jerisheh. Then they turned right to attack the Turkish positions. The 156th (Scottish Rifles) Brigade and the 157th (Highland Light Infantry) Brigade crossed to the west of Jerisheh.
The first soldiers to cross were from the 7th Battalion, Cameronians (Scottish Rifles). Some of their light boats broke, and the men had to wade through the river, which was chest-deep. Once they got across, they set up a small safe area on the Ottoman side. Engineers then started building a pontoon bridge for the main force. By 11:00 PM, nearly three battalions had crossed the river.

By midnight, all of the 156th Brigade had crossed. They attacked an Ottoman position on a hill called Sheikh Muannis. This hill was very important because it overlooked the river and other areas.
The rest of the 157th Brigade faced more trouble. They were targeted by Ottoman cannons as they crossed. However, by 1:30 AM, two more battalions had crossed. By 3:30 AM, they had secured the high ground overlooking their crossing point. They also made sure a river ford was safe for others to cross.
The 155th Brigade used two fake attacks to distract the enemy. Meanwhile, the 5th Battalion King's Own Scottish Borderers used rafts to cross the river. By dawn, the entire brigade had crossed and secured the heights at Khirbet Hadra.
The entire division crossed the river in the dark. The British soldiers used their bayonets (knives attached to rifles) to overcome all Ottoman resistance without firing a single shot. This attack completely surprised the Ottoman defenders. Their front line was pushed back about 5 miles (8 km). By dawn, the British held a new line about 2 miles (3 km) north of the river.
The British had planned for the ANZAC Mounted Division to cross and chase the retreating Ottomans. But the heavy rain made the ground too muddy and swampy. This stopped the mounted troops from following, and the remaining Ottoman soldiers escaped.
With the northern river bank now in British hands, engineers built bridges. This allowed British cannons to cross the river. The next day, December 22, the British position became even stronger. The 54th (East Anglian) Division captured Bald Hill, which was to the right of the 52nd Division. In this action, the Ottomans lost 52 soldiers killed and 44 were taken prisoner.
By dawn, the 54th Division had moved further north, taking Mulebbis and Fejja. Later that day, they also captured Rantieh. The 52nd Division continued to advance on the left side. They were supported by naval gunfire from British warships, including destroyers and monitors. By the end of the day, they had secured areas about 8 miles (13 km) north of Jaffa. During the Battle of Jaffa, the British attacks pushed the Ottoman forces back 5 miles (8 km).
What Happened After
The battle was a big success for the British. They captured 316 Ottoman prisoners and ten machine guns. General Sir Edmund Allenby praised the battle in his report. He said the successful crossing of the Nahr el Auja showed great skill by the 52nd (Lowland) Division. He noted that the wet ground and swollen river made it harder, but the infantry still crossed by dawn. He also mentioned that the enemy was surprised, and all resistance was overcome without firing a shot, showing the division's discipline.
The British official history book also called the river crossing one of the most amazing achievements of the Palestine campaign. It highlighted the bravery, careful planning, and skill of the engineers. It also praised the discipline and speed of the infantry, who completed the operation quietly and won with bayonets.
This battle was one of the last major actions for the 52nd (Lowland) Division in this campaign. In March 1918, they were sent to the Western Front in France. The 54th (East Anglian) Division stayed in Palestine and fought in other battles later that year.
The British military units that fought in this battle were given a special award called the Jaffa battle honour.


