Battle of Salamanca facts for kids
Quick facts for kids Battle of Salamanca |
|||||||
|---|---|---|---|---|---|---|---|
| Part of the Peninsular War | |||||||
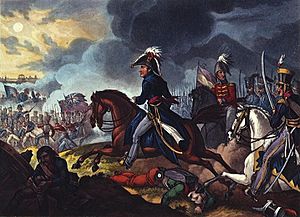
 Wellington at Salamanca by William Heath |
|||||||
|
|||||||
| Belligerents | |||||||
| Commanders and leaders | |||||||
|
|||||||
| Strength | |||||||
| 42,000–49,647 | 46,000–51,949 | ||||||
| Casualties and losses | |||||||
|
6,000–10,000 killed or wounded 12,000–17,000 killed, wounded or captured |
United Kingdom: 3,129 killed, wounded or captured Portugal: 2,038 killed, wounded or captured Spain: 6 killed, wounded or captured Total casualties: 5,000–5,200 killed, wounded or captured |
||||||
The Battle of Salamanca was a major fight during the Peninsular War. It took place on July 22, 1812, near Salamanca, Spain. In this battle, a combined army of British and Portuguese soldiers, led by the Earl of Wellington, defeated the French forces. The French army was under the command of Marshal Auguste Marmont.
The battle was won by clever moves, where Wellington's army attacked the French from the side. This surprise attack caused a lot of confusion for the French. Both Marshal Marmont and his second-in-command were injured early in the fight. This made it hard for the French army to react quickly.
Even though the French tried to fight back, Wellington's forces were too strong. The British and Portuguese armies won a big victory. This win allowed Wellington's army to march into and free Madrid for a short time. It also forced the French to leave a large area of Spain.
Contents
The Battle of Salamanca
What Led to the Battle?
In April 1812, after a successful attack on Badajoz, Wellington moved his army north. His goal was to push back Marshal Marmont's French army, which had entered Portugal. Marmont's forces retreated to Salamanca. Wellington then set up his army behind the Agueda and Coa rivers.
In May, Wellington ordered General Hill to destroy a key bridge at Almaraz. This bridge was important because it connected two large French armies. Breaking it made it harder for them to communicate and help each other.
On June 13, Wellington's army crossed the Agueda River. They advanced towards Salamanca, a town that the French used to store supplies. The French had turned three old convents into strong forts to defend the town. On June 19, the British began attacking these forts. By June 27, two of the forts were badly damaged, and the French soldiers inside surrendered.
For several weeks, Wellington's army was blocked by Marmont's growing French army. The two armies often marched very close to each other. Marmont kept trying to cut off Wellington's supply lines. The French crossed the Tormes river and tried to go around Wellington's army.
On the day of the battle, Wellington was planning to retreat back to Portugal. But he noticed something important. The French army was spread out too much. Marmont had made a mistake by separating his left side from the rest of his army. Wellington quickly saw this chance. He ordered a large part of his army to attack the stretched-out French left wing.
Who Fought in the Battle?
Marshal Marmont's French army had about 50,000 soldiers. They were organized into eight infantry (foot soldier) divisions and two cavalry (horse soldier) divisions. They also had 78 cannons. Some of the key French commanders were Maximilien Foy, Bertrand Clauzel, and Jean Pierre François Bonet.
Wellington's army had about 48,500 soldiers. This army included British, Portuguese, and even some German units. They had eight infantry divisions and two smaller independent groups. They also had five cavalry groups and 54 cannons. Important commanders for Wellington included Edward Pakenham, Lowry Cole, and James Leith. A Spanish division of 3,400 men was also part of Wellington's forces.
How the Battle Unfolded
The Armies Move
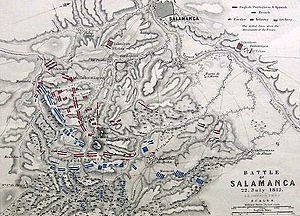
On the morning of July 22, Marmont's army began moving south. Their leading groups reached an area southeast of Salamanca. Marmont saw Wellington's 7th Division on a ridge. He thought most of the British army was retreating and that he only faced a small group. He planned to move his army south and then west to attack the British from their right side.
This was a big mistake. Wellington had most of his soldiers hidden behind the ridge. His 3rd and 5th divisions were also on their way from Salamanca. Wellington had planned to retreat if he was outflanked. But he waited to see if Marmont would make a mistake.
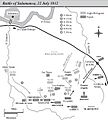
Marmont's army planned to move along an L-shaped ridge. The British army was behind another L-shaped ridge, parallel to the French one. As Marmont moved his soldiers westward, the French army became very spread out. This made them vulnerable.
Wellington's Attack
When the British 3rd Division and D'Urban's Portuguese brigade reached the top of the French L-shape, they attacked the French general Thomières. At the same time, Wellington sent his 5th and 4th divisions to attack the long side of the French L. The 7th and 6th divisions followed to support them.
The 3rd Division attacked Thomières's division. Even though the French fought back at first, they were eventually defeated by a bayonet charge. Thomières was killed. Another French general, Maucune, formed his soldiers into squares to defend against cavalry. But this was a bad idea against infantry. Leith's 5th Division easily defeated Maucune's men with musket fire.
As the French soldiers fell back, Wellington's cavalry charged. Heavy dragoons, led by John Le Marchant, attacked the French. They used their swords to defeat many French battalions. Many French soldiers tried to hide among the British infantry to escape the cavalry. Le Marchant was killed during this attack, but his cavalry had done a great job.
The French army lost its main commander very early. As Wellington's attack began, Marmont realized his army was in danger. He was hit by a British shell, which broke his arm and two ribs. His second-in-command, Bonet, was also wounded soon after. For a while, the French army had no clear leader.
Meanwhile, the British 4th Division attacked Bonet's division. But the French fought back strongly, helped by cannons. These attacks were pushed back.
General Clauzel then took command of the French army. He tried his best to fix the situation. He sent more soldiers to help the damaged left side. He also launched a strong counterattack against the British 4th Division. This attack pushed back the British and hit the 6th Division.
Wellington quickly sent more troops to help. After fierce fighting, the French divisions were defeated. The French army then began to retreat.
The French Retreat
As the French army pulled back, Clauzel ordered General Ferey to hold off the British. Ferey arranged his division in a strong defensive line. The British 6th Division attacked Ferey's men. The French fired a deadly first volley. The battle continued fiercely, and both sides suffered heavy losses. Ferey was killed by a cannonball.
Wellington's soldiers were very tired, but they kept pushing. The French line eventually broke, and they disappeared into the forest. Wellington ordered his troops to chase them, but they were too exhausted to go far.
Foy's division covered the French retreat towards Alba de Tormes. There was a bridge there they could use to escape. Wellington thought the bridge was blocked by Spanish soldiers. So, he sent his army to chase the French on a different road. However, the Spanish unit had left the bridge without telling Wellington. This allowed the French to escape.
The French Army of Portugal lost about 7,000 soldiers killed or wounded. Another 7,000 were captured. Besides Marmont, two French generals were killed, and another was wounded. The British and Portuguese forces lost about 5,200 soldiers.
What Happened After the Battle?
The Battle of Salamanca was a big defeat for the French. After the battle, the British and Portuguese armies entered Madrid on August 6. They then tried to capture the city of Burgos. However, the French gathered more troops, and Wellington's army had to retreat back to Portugal later that year. The French army had sent many experienced soldiers to fight in Russia, which made them weaker.
The victory could have been even bigger. Spanish troops failed to guard a key escape route at Alba de Tormes. This might have been due to a misunderstanding. Because of this, the French army was able to get away.
Wellington's Reputation
The Battle of Salamanca showed that Wellington was a great attacking general. People said he "defeated an army of 40,000 men in 40 minutes." A French general, Foy, wrote in his diary that it was a very clever battle. He said Wellington showed himself to be a master of military moves. He kept his plans secret and used a special attack style, like Frederick the Great.
Action at Garcia Hernandez
The day after the main battle, Wellington's German cavalry did something amazing. They managed to "break a square" of French infantry. A square is a formation soldiers use to defend against cavalry. The German dragoons broke two French squares in just a few minutes. This happened during a smaller fight at the Battle of Garcia Hernandez.
Imperial Eagles Captured
Two Imperial Eagles were captured during the Battle of Salamanca. These were special flags that represented French regiments. One was taken by Ensign John Pratt of the 30th Foot regiment. It is now in a museum in Preston, England. The other was captured by Lieutenant Pearce of the 44th East Essex Regiment. It is now in a museum in Chelmsford, England.
Salamanca Day
Today, July 22 is known as Salamanca Day. It is a special day for The Rifles regiment in the British Army.
Images for kids
See also
 In Spanish: Batalla de los Arapiles para niños


