
Battle of Sheikh Sa'ad facts for kids
The Battle of Sheikh Sa'ad happened between January 6 and 8, 1916, during World War I. It was part of the Mesopotamian Campaign, which took place in what is now Iraq. This battle was fought along the Tigris River between British and Indian troops (called the Tigris Corps) and the Ottoman Army. It was the first big attempt by the British and Indian forces to break through Ottoman lines and rescue their soldiers trapped in the town of Kut.
Quick facts for kids Battle of sheikh Ali |
|||||||
|---|---|---|---|---|---|---|---|
| Part of the Mesopotamian Campaign of World War I | |||||||
 A 1924 British map showing action at the battle. |
|||||||
|
|||||||
| Belligerents | |||||||
|
|||||||
| Commanders and leaders | |||||||
|
|
|
||||||
| Strength | |||||||
|
13,330 men total
|
9,000 infantry 20 artillery pieces 1 brigade of cavalry |
||||||
| Casualties and losses | |||||||
| 4,262 casualties: 1,962 dead 2,300 wounded |
1,200 casualties: Unknown dead, 512 prisoners 2 artillery pieces captured |
||||||
Contents
Background to the Battle
When the Ottoman Empire joined World War I in October 1914, British forces from India (called Indian Expeditionary Force D) were sent to protect oil fields in Persia (modern-day Iran). They also captured the city of Basra in Mesopotamia.
After some early victories, British commanders wanted to capture Baghdad, a major city. They thought it would show the strength of the British Empire. British intelligence believed the Ottoman forces nearby were weak.
However, officials in London were worried. They thought capturing Baghdad would be difficult to hold onto without more troops. After much debate, the decision was made to go ahead with the advance.
By late 1915, the main British and Indian force, the 6th (Poona) Division, fought a tough battle at Ctesiphon. They won, but it was a very costly victory. The division then had to retreat to the town of Kut. The Ottoman army followed them and began a siege, trapping the British and Indian soldiers inside.
The Situation in Late 1915
Trapped in Kut
The biggest problem for the soldiers trapped in Kut was food. The Ottoman army decided to starve them out instead of attacking directly. The British commander, Major-General Charles Townshend, reported that his food supplies would only last until January 15, 1916.
Feeding the troops was complicated because the Indian Army had soldiers from different religious and ethnic groups. Each group had specific dietary rules. For example, Hindus would not eat beef, and Muslims needed halal meat. British troops had their own diet. Getting the right food to everyone was very hard, especially with long supply lines.
Townshend said he would defend Kut actively, but he mostly dug his troops in and waited for help. He even destroyed a bridge connecting parts of the town to prevent the Ottomans from using it. This made it harder to move men and supplies.
Gathering a Rescue Force
Downriver from Kut, Lieutenant-General Fenton Aylmer was gathering troops to rescue the trapped soldiers. He started with a few brigades and was soon joined by the 7th (Meerut) Division. Under pressure, Aylmer began his advance on January 4, 1916. His force included about 9,900 infantry, 1,340 cavalry, and 42 artillery guns. Four gunboats also supported them on the Tigris River.
The Meerut Division was experienced, having fought in France earlier in the war. However, they had suffered many casualties. It was hard to find new, trained Indian soldiers and especially British officers to lead them. British policy required British officers to hold senior positions in Indian Army units. These officers needed to know Indian languages and cultures, which took time to learn.
Indian units also had less artillery and older weapons compared to British European divisions. When the Meerut Division left France, much of their modern equipment was left behind.
Aylmer's staff for this rescue force, called the Tigris Corps, was very small and inexperienced. Despite these challenges, Aylmer ordered his troops to move upriver.
Ottoman Preparations
Upriver, the Ottoman Sixth Army was led by Field Marshal Colmar Freiherr von der Goltz. After failing to capture Kut by direct attack, he decided to starve the British and Indian troops instead.
Von der Goltz had two main groups of soldiers: XIII Corps and XVIII Corps. XVIII Corps stayed to maintain the siege around Kut. XIII Corps, led by Colonel Khalil Pasha, moved downriver to stop Aylmer's rescue force.
XIII Corps had two divisions, the 35th and 52nd. The 52nd Division was experienced. The 35th Division had been badly hurt in earlier battles and included some Arab and Kurdish soldiers whose loyalty was uncertain. Together, these divisions had about 9,000 infantry, 20 artillery pieces, and some cavalry and Arab fighters.
The Ottomans chose to fortify a position at Sheikh Sa'ad, building trenches to wait for the British and Indian advance.
The Battle: January 6–8, 1916
Aylmer ordered Major-General George Younghusband to advance on January 3, 1916, with three brigades. Aylmer stayed behind to wait for more troops. Younghusband was told not to get into a major fight until Aylmer arrived.
Younghusband had no cavalry or airplanes to scout ahead, and the flat, muddy land made it impossible to see far. He later wrote that the only way to find the Ottomans was to "march on, till we bumped into them." On January 5, local Arabs told them Ottoman forces were dug in nearby. The next day, Younghusband's troops found them.
January 6, 1916
The area around Sheikh Sa'ad was flat and open, and the Ottoman positions were well hidden. Around 10:30 a.m., Younghusband's troops ran into Ottoman defenses. Without waiting for Aylmer or concentrating his forces, Younghusband ordered an attack on both sides of the river.
The 28th Brigade attacked on the right bank, while the 19th and 35th Brigades attacked on the left. The British and Indian troops had little idea where the Ottoman lines were. Younghusband struggled to control the battle on both sides of the river. On the right bank, Kemball's forces tried to go around the Ottoman defenses but ended up attacking the center. On the left bank, Rice's brigade was only supposed to test the Ottoman lines.
The Ottoman 35th Division, though outnumbered, defended stubbornly. On the left bank, they held their ground. On the right bank, the Ottomans began to give way in the afternoon, and Kemball's brigade captured some forward trenches.
Around 4 p.m., Younghusband called off the attack and ordered his units to regroup. This meant Kemball's troops had to leave the captured trenches, allowing the Ottomans to take them back that night. Younghusband's command suffered 600 dead that day.
As Younghusband's troops regrouped, reinforcements arrived for both sides. Aylmer arrived with more British and Indian brigades and support troops. The Ottomans also brought up the rest of their 35th and 52nd Divisions and a cavalry brigade. Both sides now had about 9,000 men.
January 7, 1916

With Aylmer now in command, the British planned a coordinated attack for January 7. On the left bank, Younghusband would lead three brigades. On the right bank, Kemball would lead his brigade, reinforced by other units. The Ottoman 35th Division defended the right bank, and the 52nd Division held the left.
Aylmer's plan was to keep the Ottomans busy on the left bank with a fake attack, while other brigades attacked their left flank. This meant a long march for the attacking brigades. On the right bank, Kemball's troops would try to retake the ground they had lost.
The day started with a heavy fog. On the left bank, Younghusband's brigades advanced slowly. Around midday, the fog cleared, and the day became unusually hot. As the British and Indian soldiers were cooking lunch, the Ottomans launched a surprise attack. This delayed the British attack even more. When Younghusband's troops finally attacked, they hit the center of the Ottoman defenses instead of the flank. They made little progress, facing heavy fire from rifles, machine guns, and artillery. Few units got closer than 300 yards.
On the right bank, Kemball's forces had a better idea of where the Ottomans were. They waited for the left bank attack to start. Around 2:30 p.m., Kemball was allowed to attack. Unlike the left bank, his reinforced brigade quickly captured the Ottoman outposts. The 92nd Punjabis broke through the main Ottoman lines, followed by other units.
By the end of the day, Kemball's brigade controlled the right bank defenses. With their flank now open to fire from the right bank, the Ottoman positions on the left bank became impossible to hold. Throughout the night and the next day, the XIII Corps began to withdraw. They retreated seven miles to new positions at the Wadi, a small river that flowed into the Tigris. On January 9, the Tigris Corps occupied the left bank positions.
Aftermath of the Battle
.jpg)
The Tigris Corps had captured Sheikh Sa'ad, but it came at a very high cost. Aylmer's forces suffered 1,962 dead and 2,300 wounded out of 13,300 men. The medical support for the rescue force was very poor. Most medical units were still far behind, trying to catch up.
At the time of the battle, the Tigris Corps could only treat about 250 wounded soldiers. By the end of January 7, they had almost ten times that number. Some wounded soldiers had to wait up to ten days before they could be moved to hospitals further downriver.
Even though Aylmer's force captured Sheikh Sa'ad, it cost them nearly 4,400 dead and wounded. The Ottoman forces on the left bank of the Tigris were not completely defeated. While Kemball's force on the right bank was successful, the attacks on the left bank were not. Many reports said that the British artillery fire was not effective because of poor observation and good Ottoman camouflage. When the Ottomans realized their right bank defenses had fallen, they retreated in good order, taking all their artillery with them. They moved seven miles upriver to new defenses at the Wadi.
Despite the heavy casualties, Aylmer could not wait long for more reinforcements. Every step forward took him further from his supply base and closer to the Ottoman base at Baghdad. Although the British considered it a victory, it was a very costly one. The Ottoman forces achieved their goal of delaying the Tigris Corps. They had hurt Aylmer's forces, using up valuable time that the trapped soldiers in Kut did not have, and causing losses that were hard for the British and Indian governments to replace.
Orders of Battle
British and Indian Tigris Corps
Younghusband's Force, January 6, 1916
| 19th (Dehra Dun) Brigade | 28th Indian Brigade | 35th Indian Brigade | Artillery |
|---|---|---|---|
| 1st Battalion, Seaforth Highlanders | 2nd Battalion, Leicestershire Regiment | 1/5th Battalion, Buffs (East Kent Regiment) | 19th Battery, R.F.A. |
| 28th Punjabis | 51st Sikhs (Frontier Force) | 37th Dogras | 20th Battery, R.F.A. |
| 92nd Punjabis | 53rd Sikhs (Frontier Force) | 97th Deccan Infantry | 28th Battery, R.F.A. |
| 125th Napier's Rifles | 56th Punjabi Rifles (Frontier Force) | 102nd King Edward's Own Grenadiers | 1/1st Sussex Battery, R.F.A. |
| 62nd Punjabis (temporarily attached) | 72nd Heavy Battery, R.G.A. | ||
| 77th Heavy Battery, R.G.A. | |||
| 104th Heavy Battery (1 section), R.G.A. |
Reinforcements, January 7, 1916
| 21st (Bareilly) Brigade | 9th (Sirhind) Brigade | 6th Indian Cavalry Brigade | Corps Troops |
|---|---|---|---|
| 2nd Battalion, Black Watch | 1/4th Battalion, Hampshire Regiment | 14th King's Hussars | 1st Provisional Battery |
| 6th Jat Light Infantry | 107th Pioneers | 4th Cavalry | No. 18 Cavalry Field Ambulance |
| 41st Dogras | 67th Punjabis | 7th Hariana Lancers | No. 1 Field Ambulance (2 sections) |
| 9th Bhopal Infantry | 33rd Queen Victoria's Own Light Cavalry | No. 5 Field Ambulance (2 sections) | |
| S Battery, RHA | No. 6 Field Ambulance (2 sections) | ||
| 61st Howitzer Battery |
Ottoman Forces
XIII Corps (Colonel Nureddin)
- 35th Division (8 infantry battalions)
- 52nd Division (9 infantry battalions, arrived January 6)
- Ottoman Cavalry Brigade (arrived January 6)
- Camel Corps Regiment
- Arab Irregulars
- Artillery (20 guns)
Images for kids
-
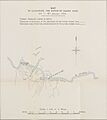
A 1924 British map showing action at the battle.
-

British field artillery supporting the attack on Ottoman positions during the Battle of Sheikh Sa'ad.
-
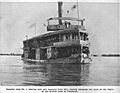
Hospital Ship No. 1 on the Tigris River in 1916, carrying wounded British and Indian soldiers.
