
British military vehicle markings of World War II facts for kids
British military vehicles used special markings during World War II to help identify them. These marks became very important as armies grew bigger and used more machines.
Sometimes, marks were hidden from the enemy. But other marks, like those for air recognition, were made very clear. This helped prevent "friendly fire," where your own side accidentally attacks you.
Most signs had practical uses. They helped identify allies, showed how much weight a bridge could hold, warned about gas, and showed which unit a vehicle belonged to. There were attempts to make these signs a standard size, color, and in the same place on every vehicle. This worked sometimes, but not always!

Contents
History of Vehicle Markings

Using marks on military vehicles to show their country or unit is actually older than cars and trucks! For example, the "broad arrow" symbol was used by the British government way back in the 1500s to mark their property.
Special marks for different army groups started with simple initials. For instance, "S. & M." meant Sappers and Miners, which later became "RE" for Royal Engineers.
During World War I, the need for identification grew. So, special "formation signs" were created. These were like badges for different army groups. But they were stopped after the war.
Big army groups like Armies, Corps, and Divisions often used symbols for their marks. Smaller groups, like Regiments and Battalions, usually used numbers with symbols.
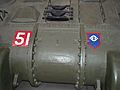
Vehicles also had registration numbers, just like regular cars. Armored vehicles (AFVs) sometimes even had personal names, like "ULSTER" on the tank in the picture. Other marks gave important information, such as the vehicle's weight or its top speed. Some marks identified friendly vehicles or showed what the vehicle was used for, like bomb disposal.
Most markings were put on using stencils. This means they weren't always as neat as hand-painted signs from before the war. Sometimes, marks done quickly in the field were even painted backward or in the wrong spot!
National Identification Marks

Before 1943, there wasn't a single official British identification mark. However, vehicles of the BEF often had a white rectangle on the front. This was used on armored vehicles and on the front of unarmored vehicles (called "softskins").
Between 1939 and 1945, some vehicles had a roundel (a circular symbol) painted on them. This was seen in Europe, the desert, and Italy. Later, in 1941, an 18-inch square patch with white, red, and white stripes was added to armored vehicles in the desert. In 1942, most UK armored vehicles got a similar striped rectangle. Some instead had the RAC "mailed fist" symbol.
From mid-1943, the "Allied star" became common. This was a white star used on the sides of both softskin and armored vehicles. You rarely saw a painted Union flag (the British flag) on vehicles later in the war.
Formation Signs: Team Badges


Every military vehicle had to show a "formation sign." This was like a special badge for the main army group it belonged to. Even if a vehicle was temporarily helping another unit, it usually kept its original sign.
The sign was placed on the front left side of the vehicle, usually near the bumper. It was also put in a clear spot on the back left side. These signs were about the same size as the "Arm of Service" signs (about 9 inches square). They weren't supposed to be on motorbikes, but sometimes they were painted on their fuel tanks.
Army and Corps Signs
Only vehicles that belonged to the headquarters of an Army or Corps would carry their special badges. This included vehicles from Army and Corps troops that were loaned out to smaller units when needed.
These vehicles also had normal "Arm of Service" markings, but with a white bar at the top.
Independent Brigade Signs
Independent Brigades were special groups not part of a larger division. They had their own unique formation signs. Soldiers in these brigades also wore the same sign on their sleeves. Sometimes, units would stencil their independent brigade sign on their vehicles, even if they also had their own divisional sign.
Division Signs
Each division had its own special badge. All vehicles in that division carried this sign. Soldiers in the division also wore the same sign on their sleeves.
These signs were usually painted using a stencil. But sometimes, they were hand-painted, which meant they could look a bit different. Occasionally, stencils were even used backward! Some vehicles, like those from RASC (Royal Army Service Corps) companies, carried both a Corps or Division sign and their own company sign.
-
Guards Armoured Division
-
1st Armoured Div
-
6th Armoured Division
-

7th Armoured Division
-

8th Armoured Division
-
11th Armoured Division
-
79th Armoured Division
-
2nd Infantry Division
-
3rd Infantry Division
-
British WWII 6th Infantry Division
-
43rd Infantry Division
-

50th Infantry Division
-
British Airborne Units


_Insignia.svg)


Other Important Signs
Arm of Service (AoS)
The "Arm of Service" (AoS) system was developed to identify different types of units. It was officially described in 1940 and updated several times during the war.
All vehicles had AoS markings. These were usually a 9-inch square with a white two or three-digit number. Sometimes, one or four-digit numbers were used. If the background color was light, the number might be a different color. The background color showed the type of service (like infantry or artillery). The number told you which specific headquarters, battalion, or company it was.
These signs were painted on the front right side of the vehicle, or nearby. They were also repeated on the back right side. Their size was adjusted to fit the vehicle.
|
|
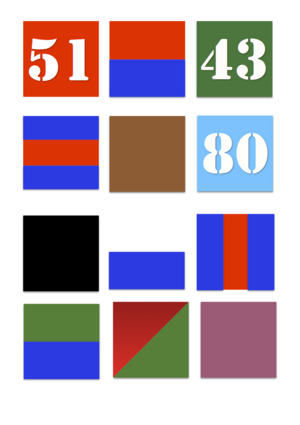
A white stripe at the top of the AoS sign meant the vehicle belonged to "Corps troops." These were units that served the Corps headquarters directly.
The first number in a series usually belonged to the brigade headquarters. Then, each battalion within that division would have a number that increased by one or more. Units like postal, medical, or training units didn't have an HQ unit number.
Vehicles that carried troops sometimes used removable plates for their AoS signs. This was because they often moved between different divisions. They might also have signs that were twice the normal size. These had a black square over the RASC sign, where the unit being transported could be written in chalk.
Headquarters, military police (provost), medical, training, and postal units in a division used a black panel with white numbers.
War Department Census Number
Every military vehicle had a "War Department census number." This was a letter followed by a number. The letter showed the type of vehicle. For example, 'T' was for tracked vehicles like tanks. These numbers were painted in white, about 3.5 inches high. They were usually on the sides of the engine cover (bonnet) and on the back of unarmored vehicles. If there was no bonnet, they were on the cab door. Armored vehicles had them on their sides, and sometimes on the front sloped armor (glacis) early in the war.
Light blue numbers were used on airborne vehicles, and black numbers on vehicles with desert camouflage. Motorcycles had smaller numbers on their fuel tanks or on plates.
These numbers were given out in sequence as vehicles were built. In the 1930s, the numbers started with the year, like "37..." or "38...". By 1942, the system changed to blocks of four to seven digits. Canadian army vehicles used the same numbers as British ones, but with a "C" in front.
| Letter | Vehicle type |
|---|---|
| A | Ambulance |
| C | Motorcycle |
| D | Dragons (tracked towing vehicles) |
| E | Engineer vehicles (bulldozers) |
| F | Armoured scout car or armoured car |
| H | Tractor (artillery tractor) |
| L | Lorry (truck weighing 30cwt or more) |
| M | Car (including Jeep) |
| P | Amphibious vehicle (can go on land and water) |
| R | Rota trailer |
| S | Self-propelled artillery (gun on a vehicle) |
| T | Tracked vehicles (tank and universal carriers) |
| V | Van |
| X | Trailers |
| Z | Truck (15cwt and smaller), White scout car, halftrack |
Letters like E, P, and S were added later in the war. Before 1941, in the Middle East, vehicles used "WD" instead of a letter prefix. They often had the numbers repeated in Arabic. Some military vehicles in the UK and the BEF still had their old civilian license plates in 1940.
Aerial Recognition Symbols
These symbols helped aircraft identify friendly vehicles from above. Before the war, there were experiments, like a white border around the top of tank turrets in 1941.
In January 1942, an RAF (Royal Air Force) style roundel was introduced. It was 31 inches wide and placed on the cab roof or engine cover of trucks, or on the turret or engine deck of armored vehicles. This roundel had a yellow outer ring, then blue, then white, and a red center. It was used in the UK, the Middle East, and Italy.
From mid-1943, a white five-pointed star inside a white circle became the main aerial recognition symbol for Allied forces. It was painted on flat surfaces, like the roof or engine deck. The size varied, from 15 to 60 inches in diameter, depending on the vehicle. The circle was sometimes broken at the points of the star. It was important not to place the star where it would be covered by equipment or fuel cans. On a flat surface, one point of the star faced the front of the vehicle. On a sloped front (glacis), a point faced upwards.
| Vehicle | Location | Size inches |
|---|---|---|
| Car | Roof | 36 |
| Jeep | Bonnet | 15 |
| Command Car | Bonnet | 20 |
| 30cwt | Bonnet | 20 or 25 |
| 2 ½ ton | Bonnet or cab roof | 32 |
| 4 ton | Bonnet or cab roof | 25 or 32 |
| Scout Car | Bonnet | 36 |
| Halftrack | Bonnet | 36 |
| M8 | Engine deck | 36 |
| Light tank | Turret top | 20 |
| Medium tank | Engine deck | 36 |
From mid-1944, a colored plastic panel was sometimes used along with the star. These panels were pink, yellow, or white, and a different color was chosen randomly each day.
Allied Star
A white five-pointed star was used from 1944 to identify Allied vehicles. British tanks usually had only one star on the back of their turret, rarely on the front or sides. Armored vehicles often had stars on their sides and rear. Unarmored vehicles (softskins) usually had stars on their sides. The star was typically 8-12 inches tall and was stenciled with one point facing upwards.
Bridge Rating
All vehicles had a "bridge rating." This number showed how heavy the vehicle was and what kind of bridges it could safely cross. It was displayed on a yellow circle with black writing. For most vehicles, this was a separate plate, about 7.5 to 9 inches wide. Tanks and many other armored vehicles had the rating painted directly on their body. It was usually on the front right side, sometimes attached to the radiator.
The number was a "bridge category," which was roughly based on the vehicle's weight. If a vehicle usually pulled a trailer, the sign showed two numbers: the top one for the loaded vehicle with a loaded trailer, and the bottom one for just the loaded vehicle.
| Class | Vehicle |
|---|---|
| 1 | 2–3 seat car, 10cwt GS trailer |
| 2 | 2–7 seat car, including Jeep, 8cwt truck , 15cwt and 1 ton trailer |
| 3 | heavy car, bren carrier, light recce car, light ambulance, Chevrolet 8cwt truck, 3-ton trailer |
| 4 | Daimler Dingo, Humber Scout Car, light ambulance, 15cwt GS truck, most Universal Carriers |
| 5 | most 15cwt trucks, 30cwt GS truck, White scout car, ambulance, Humber staff car, Windsor universal carrier, Lynx, 4 wheel trailer |
| 6 | most 30cwt trucks, some 3-ton trucks, Morris C8 "Quad" tractor, 6-pounder gun |
| 7 | 3-ton GS truck, Daimler Armoured Car, Humber Armoured Car, Tetrarch light tank |
| 8 | some 3-ton trucks including petrol, wireless and command, M14 Multiple Gun Motor Carriage half-track, White 15cwt half-track, 5 ton GS trailer |
| 9 | DUKW, 6 wheel 3-ton trucks such as machinery, most 6x4 vehicles, some 6x6 vehicles |
| 10 | 7 ton truck, 6 wheeled light recovery trailer, AEC 6-ton lorry, some 6x4 vehicles |
| 11 | Diamond T GS and pontoon 4 ton truck |
| 12 | AEC Matador, AEC Armoured Command Vehicle, 5–6 ton 4x2 lorries, Diamond T machinery trucks |
| 14 | AEC Armoured Car, A13 Cruiser tank, 6 ton 6x4 lorry |
| 15 | M3 Stuart tank, Staghound armoured car |
| 16 | Valentine tank |
| 17 | 6-ton 6x6 |
| 18 | Valentine bridgelayer, Diamond T transporter tractor |
| 24 | Matilda tank |
| 30 | Cromwell tank, Sexton self-propelled gun, Ram tank |
| 33 | M10, Sherman tank |
| 40 | Churchill tank |
For example, a Jeep with a trailer would show "3/2." This meant it was a Class 3 vehicle with a trailer, but just the Jeep alone was Class 2. A "Diamond T transporter tractor" with a Sherman tank on its trailer would show "70/18."
Motorbikes and motorbikes with sidecars didn't have bridge plates. They were always considered Class 1.
In battle areas, the bright yellow bridge sign was sometimes too easy for the enemy to see. So, soldiers would often paint it a duller color, make it a hollow circle, or even remove it.
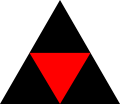
Tactical Signs
Tactical signs were used on armored vehicles to show which squadron (a small group of tanks) they belonged to within a regiment.
- Headquarters Squadron: Diamond shape
- A Squadron: Triangle
- B Squadron: Square
- C Squadron: Circle
- D Squadron: Solid vertical bar
Divisional troops and units not part of a brigade (like armored car regiments) used white tactical signs. Within an armored brigade, each regiment used a different color to show its seniority:
- Red: Senior regiment
- Yellow: Second regiment
- Blue: Junior regiment
- Green: Motorized infantry battalion
These signs were 8-12 inches tall, depending on the vehicle size. They were usually on the sides or back of the turret, or on the sides of the hull (body). Sometimes, they included a number to identify the individual vehicle.
Gas Detection
Special "gas detection panels" were painted on vehicles. These were 18-inch square patches. Until October 1943, they were on armored vehicles and on the back of headlights on unarmored vehicles. After that, they were only on the engine covers of unarmored vehicles, near the windshield. The paint used for these panels was a khaki-yellow color. It would change color if poison gas was present.
Other Markings
Convoy Marking
When vehicles traveled in a convoy (a group moving together), they sometimes had a number written in chalk on the front. This showed their position in the line. The first vehicle in the convoy flew a blue flag, and the last vehicle flew a green flag.
For night convoys, a small light shone on the rear axle. The center of the axle was painted white to help vehicles follow each other. Some vehicles used a white circular disc instead.
Left Hand Drive
Vehicles that were "left-hand drive" (meaning the steering wheel was on the left, like in the US) had "CAUTION LEFT HAND DRIVE" painted on the back. These words were in 2-inch white letters. If the vehicle didn't have turn signals, "NO SIGNALS" was added.
Civilian Vehicles
When civilian vehicles were taken over by the military, they sometimes displayed "WD" (for War Department) in 6-inch letters on the front and back. This was before they received their full military markings.
Speed Limit
The maximum allowed speed for a vehicle was painted in red on the back of unarmored vehicles. The speed number was 4 inches high, with "MPH" (miles per hour) in 2-inch letters below it. This mark was not put on bomb disposal vehicles or motorbikes.
Shipping and Rail Loading Marks
When vehicles were shipped overseas, they often had a temporary 5 or 6-digit number written in chalk or rough paint. They might also have the number of the landing craft they were on, like "LST 368." Sometimes, two or three colored horizontal stripes were painted next to the number. These stripes were specific to a vehicle's movement order. The vehicle's size and weight were also chalked on a black panel with a white edge.
Vehicles and trailers shipped by aircraft had a vertical yellow line, 6 inches long and 0.75 inches wide. This line showed the vehicle's "center of gravity," which is important for balancing it in the aircraft. On motorbikes, this line was 0.5 inches wide.
Personalised Markings

Armored vehicles, especially tanks, sometimes had names painted on them. This helped other tank crews identify them. For example, tanks in "Troop B" might have names that started with "B" or were themed around flowers, villages, or girls' names.
Sometimes, soldiers would add slogans or graffiti to their vehicles. These could be inspiring, like "Berlin or Bust," or hopeful, like "Home by Christmas." They might also be mottos, poetry, a person's name, or even funny slang. These unofficial markings were not encouraged, but they definitely existed!
Specialist Vehicle Markings

Bomb Disposal Vehicles
Bomb disposal vehicles had bright red painted wheel arches. The words "BOMB DISPOSAL" or "B.D.S." (Bomb Disposal Squad) were painted in 4-inch red letters on the front. The lights on the left side of the vehicle had a blue filter. These vehicles might also display a red flag.
Ambulance Markings
To be recognized internationally, ambulances had a large white square with a red cross on their roof and both sides. On the back doors, each door had an 18-inch white circle with a red cross.
RAF Vehicles
RAF (Royal Air Force) vehicles used an RAF roundel instead of a formation sign. This was placed on the front right and rear right bumper or mudguard. They also had a code with a letter (for the Command, like Bomber Command) and a number (for the Group). For example, "B/3" meant 3 Group, Bomber Command.
Vehicles in Europe after D-Day (the Normandy landings) would have "TAF" (Tactical Air Force) followed by a group number (like 2, 83, 84, 85). RAF vehicle numbers started with "RAF-" followed by up to six digits. From 1943, a 4-digit type number was painted on the door or side of the cab. After January 1945, mobile units showed their unit number and a three-letter code for the unit type in a hollow white rectangle, like "2679 MSU." The official air recognition symbol for RAF vehicles was the roundel, usually on the sides of the body.
Artillery and Anti-tank Guns
Guns themselves rarely had many markings on their gun shields. They didn't use tactical signs. The Royal Artillery had a system of red and blue flashes to show smaller units (sub-units). A red square that moved clockwise over a blue background indicated the 1st, 2nd, 3rd, or 4th battery.
Other Units
Vehicles and trailers belonging to the Military police, Royal Navy (RN), Royal Marines (RM), and NAAFI (a welfare organization) also had their own special signs painted on them.
Examples of Other Units and Markings
| Brigade | Unit | Vehicles | AoS | AoS colour | Tac colour |
|---|---|---|---|---|---|
| 8th Armoured Brigade | HQ | Sherman DD | 993 | Red with white stripe across bottom |
White |
| 4th/7th Royal Dragoon Guards | 994 | Red | |||
| 24th Lancers | 995 | Yellow | |||
| Nottingham Yeomanry | 996 | Blue | |||
| 12th Battalion KRRC | Half tracks | 475 | Bright Green | ||
| 31st Army tank Brigade | HQ | Churchill | 990 | Green with white diagonal | White |
| 7th RTR | 991 | Red | |||
| 9th RTR | 992 | Yellow | |||
| 141st RAC | 993 | Blue | |||
| 33rd Army tank Brigade |
HQ | Sherman | 172 | Red with white stripe across bottom |
White |
| 1st Northamptonshire Yeomanry | 173 | Red | |||
| 144th RAC | 174 | Yellow | |||
| 148th RAC | 175 | Blue |
See also
- British armoured fighting vehicles of World War II
- British Army during the Second World War
- U.S. military vehicle markings of World War II
