Capture of Wadi el Hesi facts for kids
Quick facts for kids Capture of the Wadi el Hesi |
|||||||
|---|---|---|---|---|---|---|---|
| Part of the Middle Eastern theatre of World War I | |||||||
|
|||||||
| Belligerents | |||||||
| Commanders and leaders | |||||||
| Units involved | |||||||
| XXI Corps | Eighth Army | ||||||
| Casualties and losses | |||||||
| 700 | |||||||
The Capture of Wadi el Hesi was an important battle during World War I. It happened between November 7 and 9, 1917. This fight was part of a bigger plan called the Southern Palestine Offensive. The battle took place in a valley called Wadi el Hesi and on a nearby hill known as Sausage Ridge, just north of Gaza in Palestine.
During this time, the British Empire's army, known as the Egyptian Expeditionary Force (EEF), was chasing the retreating Ottoman Empire and German forces. The Ottoman troops had set up a strong defense line at Wadi el Hesi. They wanted to slow down the British advance. The British managed to cross the valley on November 7. But taking Sausage Ridge was much harder. The Ottoman soldiers fought bravely, defending the ridge for a whole day and night. The British finally captured it on November 9. Even though the British won, the Ottoman rearguard (troops protecting the main army's retreat) successfully helped their main forces get away.
Contents
Background to the Battle
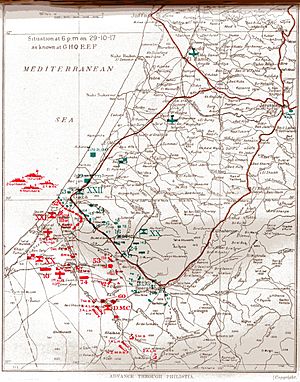
Before this battle, the British army, led by General Edmund Allenby, had won a big victory at the Battle of Beersheba on October 31. This win helped them break through the Ottoman defense line that stretched from Beersheba to Gaza.
After Beersheba, there were more tough battles at Tel el Khuweilfe, Hareira and Sheria, and Gaza. The Ottoman army fought hard to protect their retreat. They pulled back mostly at night, using special rearguard units to cover their movements.
The Ottoman 7th Division set up a strong defense line along the northern side of the Wadi el Hesi. This valley was a good place to defend because it had water and natural features. It was about 12 miles (19 km) north of another important valley, the Wadi Ghuzzee. Even though the Ottoman forces were retreating, they were still organized and skilled.
Getting Ready for the Fight
On November 7 and 8, the Ottoman Eighth Army's rearguard troops worked to slow down the British advance. The British forces included Lieutenant General Edward Bulfin's XXI Corps and Lieutenant General Harry Chauvel's Desert Mounted Corps.
Ottoman Troops Leave Gaza
The Ottoman XXII Corps had defended Gaza during the Third Battle of Gaza. This corps was not defeated. Instead, they cleverly pulled back from Gaza in an organized way. They showed good planning and movement skills.
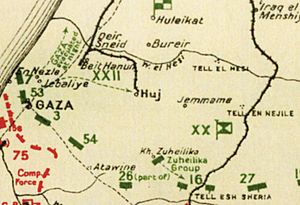
One group, the Ottoman 53rd Division, moved east towards Huj. They marched across the path of the advancing British cavalry. This helped them stop the British from breaking through and covered the main Ottoman army's retreat.
Defenses at Wadi el Hesi
Another group of Ottoman soldiers marched all night to set up new defenses. They chose a strong spot just north of the Wadi el Hesi, about seven miles (11 km) north of Gaza. They quickly dug short trenches in the sand dunes and nearby fields. These defenses were held by the 7th Division.
The Wadi el Hesi valley starts in the Judean Hills and flows west into the sea. It had water all year round, which was important for the soldiers. The Ottoman rearguard used the natural features of the area to make their trenches even stronger. Their goal was to delay the British until the winter rains came. They hoped the mud would stop the British until spring, when more Ottoman and German troops might arrive.
British Chase the Enemy
On November 7, the British 54th (East Anglian) Division took over guarding Gaza. However, they had problems with supplies. Most of their transport vehicles had been given to other British corps for the Battle of Beersheba. This meant they couldn't move far from Gaza.
So, the XXI Corps ordered the 52nd (Lowland) Division to lead the chase. The 157th Brigade of this division advanced along the coast. They reached Sheikh Hasan by 12:15 PM. By 4:00 PM, they were marching towards the mouth of the Wadi el Hesi, which was the next likely place the Ottomans would defend.
Fighting Near Beit Hanun
On the eastern side of Gaza, the British 75th Division, with the Imperial Service Cavalry Brigade helping, was ordered to push forward. The cavalry brigade arrived at Beit Hanun at 1:00 PM. Here, they met Ottoman troops defending a strong position.
The Hyderabad and Mysore Lancers (from the Imperial Service Cavalry Brigade) advanced to threaten the Ottoman side. Around noon, the Ottomans blew up their ammunition at the railway near Beit Hanun. Later, the cavalry brigade was ordered to attack the Ottoman rearguard near Tumra, north of Beit Hanun.
The Hyderabad Lancers captured a ridge west of Beit Hanun. They took 23 prisoners, a gun, and a lot of ammunition. They also captured water pumping equipment. However, they had to go back to Jebaliye for water because the pumps needed special fuel. By evening, the Lancers had chased the Ottoman forces as far as Tumrah and Deir Sineid.
The Battle Begins
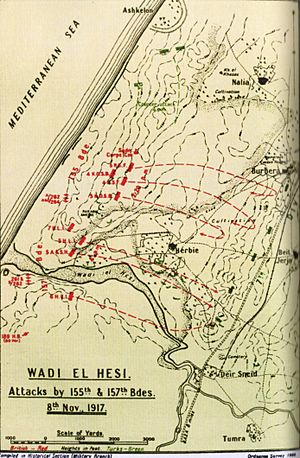
On the far left of the British advance, the 157th Brigade (52nd Division) reached the Wadi el Hesi on November 7. They crossed the valley near its mouth as dusk fell. The sand dunes helped hide their approach.
On November 8, the 155th Brigade (52nd Division) crossed the wadi behind the 157th Brigade. They spread out northwards into the sand dunes and towards Sausage Ridge. Sausage Ridge was a hill that protected the road and railway. The Ottoman 7th Division strongly defended this ridge. They held back the British advance for most of the day. This allowed most of the retreating Ottoman columns to get away safely along the road and railway.
At 5:30 AM, the 155th and 157th Brigades were ordered to capture Sausage Ridge. They were supported by artillery and even naval guns from ships off the coast.
Ras Abu Ameire Ridge
The 1/5th Highland Light Infantry and 1/7th (Blythswood) Bn, Highland Light Infantry (157th Brigade) attacked Ras Abu Ameire, a high dune, on the evening of November 7. They didn't face much resistance and captured their target.
On November 8, the 157th Brigade extended their line north along Ras Abu Ameire Ridge. They attacked the Ottoman rearguard holding the northern part of the ridge. The Ottoman troops fought hard, but the 7th Highland Light Infantry cleared most of the ridge. The 5th Kings Own Scottish Borderers finished the job by 10:30 AM.
Sausage Ridge Attack
When Brigadier General John Pollok-M'Call, leading the 155th Brigade, looked at Sausage Ridge, he saw it was very strong. It was over two hundred feet (61 m) high in places and had strong defenses. He also realized the ridge went further north than expected, which would leave his troops open to attack from Ashkelon. Despite these challenges, the attack had to go on. By 4:00 PM, all units were ready, but there was only one hour of daylight left to advance three miles (4.8 km).
157th Brigade's Fight
The 157th Brigade was ordered to attack with all its strength. They were to capture the southern edge of Sausage Ridge, which overlooked the Ottoman railway. The 5th Argyll and Sutherland Highlanders and the 5th Highland Light Infantry attacked from the front. The 6th Highland Light Infantry tried a turning movement by crossing the wadi southwest of the ridge.
The 157th Brigade advanced without trouble until they were three-quarters of the way to Sausage Ridge. Then, as darkness fell, they faced heavy rifle and machine gun fire. They suffered many casualties.
The brigade continued to attack the southern end of Sausage Ridge. As night fell, they managed to gain ground. By 6:00 PM, the leading troops reached the bottom of the hill and charged up. They faced very heavy machine gun fire and short-range mortars. Small groups of British soldiers fought hand-to-hand with bombs and bayonets. An Ottoman battalion counterattacked, pushing the British off the ridge. The British attacked again and again, but were driven back four times. Many British soldiers were killed.
After losing many officers and non-commissioned officers, the survivors regrouped. The 7th Highland Light Infantry, the reserve battalion, took over the attack. The turning movement by the 6th Highland Light Infantry also started to work. The Ottoman defenders were not ready for an attack from that side. At 8:50 PM, a general attack along the whole line captured the position with bayonets. The remaining Ottoman rearguards were cleared by 3:30 AM on November 9. The 157th Brigade lost over 400 soldiers.
155th Brigade's Fight
The 155th Brigade crossed the Wadi el Hesi and moved through the 157th Brigade's lines. They spread out northwards into the sand dunes near the coast. At 12:30 PM, the 155th Brigade formed up on the Ras Abu Ameire Ridge. Their attack started at 2:20 PM under heavy artillery fire from the Ottomans.
The 5th Royal Scots Fusiliers, on the northern side of the attack, moved too far to the left. This happened because Ottoman cavalry from Ashkelon threatened them. Machine gun fire from the dunes hit them from the side. An infantry company pushed the machine gunners back, but a gap opened in the British line. Before the gap could be closed, the Ottomans launched counterattacks with two battalions, supported by howitzers and machine guns. Ottoman cavalry also attacked from Ashkelon. One company of the 5th Royal Scots Fusiliers slowed the cavalry, but they were forced back. This made the whole brigade pull back to their starting point on Ras Abu Ameire Ridge. The British infantry suffered 285 casualties during this counterattack.
After the Battle
The Ottoman rearguard troops successfully covered the retreat of the Gaza garrison for two full days. The 1,000 strong rearguard also managed to escape capture. British soldiers saw them marching north in perfect formation, seemingly "under no pressure at all." The British infantry battalions captured about twelve prisoners but suffered seven hundred casualties.
By the evening of November 8, all the Ottoman positions that made up the Gaza to Beersheba line had been captured. The Ottoman Eighth Army was in full retreat.
The British Desert Mounted Corps began chasing the Ottomans across the Southern Palestine plain on the morning of November 8. This chase eventually ended about fifty miles (80 km) north.
General Allenby wrote on November 8: "The battle is in full swing. We have driven the Turks North and Northeast. My chasing troops are ten miles beyond Gaza, and travelling fast." He also mentioned that British planes were having a great time bombing and machine-gunning the retreating Ottoman columns.
British and Australian aircraft bombed Ottoman headquarters, airfields, railway junctions, and troops. They dropped bombs and used machine guns. They damaged many Ottoman aircraft on the ground. They also attacked railway stations, marching troops, and transport vehicles.
On November 9, the British GHQ EEF ordered the XXI Corps to send the 75th Division to join the 52nd (Lowland) Division in the chase. Their next goal was the Julis–Hamama line, about 20 miles (32 km) northeast of Gaza. However, transport problems slowed down the British advance. Many British divisions could not move forward because their transport vehicles had been given to other units.
On November 9, only the 156th (Scottish Rifles) Brigade of the 52nd (Lowland) Division was able to advance. They moved north along the coast. Their patrols found Ashkelon deserted by the Ottoman army. They continued to Al Majdel, a large village 16 miles (26 km) north of Gaza. Here, they found important supplies and water. Other towns like Beit Jerja, Burbera, and Huleikat were also reported clear of Ottoman troops.


