
Southern Palestine offensive facts for kids
Quick facts for kids Southern Palestine offensive |
|||||||||
|---|---|---|---|---|---|---|---|---|---|
| Part of the Middle Eastern theatre of World War I | |||||||||
|
|||||||||
| Belligerents | |||||||||
| Commanders and leaders | |||||||||
| Units involved | |||||||||
|
Egyptian Expeditionary Force
|
Yildirim Army Group
|
||||||||
| Casualties and losses | |||||||||
| 25,000 | |||||||||
The Southern Palestine offensive was a major military operation during World War I. It began on October 31, 1917, with the Battle of Beersheba. This battle was part of the larger Sinai and Palestine Campaign.
During this offensive, the Egyptian Expeditionary Force (EEF), which included soldiers from the British Empire, France, and Italy, fought against the Ottoman Turkish Empire and Germany. The EEF used a strategy called manoeuvre warfare, which means moving troops around quickly to surprise the enemy.
After capturing Beersheba, the EEF pushed the Ottoman armies back. They fought hard for about five and a half weeks. By December 9, 1917, the EEF had captured Jerusalem. This victory meant the EEF took over about 76 kilometers (47.5 miles) of Ottoman land.
Contents
- Why the Battle Happened
- Who Fought in the Battle
- The Battle Begins: October 31 to November 7
- Ottoman Retreat
- Rearguard Actions
- Air Attacks and Support
- November 9: Advancing North
- November 10: Wadi Sukereir and Summeil
- November 11: Ottoman Counterattack Plan
- November 12: Ottoman Counterattack
- November 13: Battle of Mughar Ridge
- November 14: Junction Station and Ayun Kara
- November 15: Jaffa and Latron
- November 16: Jaffa Captured
- Fighting in the Judean Hills: November 19-24
- Ottoman Counterattacks: November 27 to December 1
- Jerusalem Captured: December 2-9
- Casualties
- Aftermath
- Images for kids
Why the Battle Happened

After two earlier battles for Gaza, the British commanders knew they needed more soldiers. They needed to push into Palestine. By July 1917, General Edmund Allenby took charge of the EEF. He needed more troops and supplies.
At this time, Britain faced challenges in the war. The Western Front was difficult, and German submarines were sinking many British ships. Britain's Prime Minister, David Lloyd George, wanted a big victory to boost morale at home. He specifically wanted Jerusalem captured by Christmas. This victory would also put pressure on the Ottoman Empire and strengthen Britain's influence in the Middle East.
Another reason for the attack was the Russian Revolution. Russia left the war, freeing up many Ottoman soldiers. These soldiers could have been sent to fight the British in Mesopotamia. An attack in Palestine would force the Ottomans to send their troops there instead.
General Allenby's main goal was to defeat the Ottoman army in Southern Palestine. This would stop them from sending soldiers to other areas like Baghdad.
The Battlefield: Gaza to Beersheba Line
The area where the fighting happened was called the Gaza to Beersheba line. It stretched for about 35 kilometers (22 miles) from the Mediterranean coast at Gaza to a place near Beersheba.
The land was mostly flat but had many dry riverbeds called wadis. These wadis could become raging rivers in winter. The area was not very populated, and villages relied on wells for water.
The Ottoman forces had built strong defenses along this line. Gaza and Beersheba were surrounded by fortifications, trenches, and barbed wire. They expected an attack from the EEF.
Who Fought in the Battle
The Ottoman Army in Palestine had about 50,000 soldiers. General Allenby's EEF had about 76,000 soldiers.
Ottoman Army Defenses

The Ottoman forces were led by Erich von Falkenhayn. They had several army groups and divisions. They had also received German support, including special infantry units, artillery, machine guns, and aircraft.
The Ottoman Army had been fighting for a long time. Some reports said their infantry units were at half strength. They also faced problems with supplies and desertion. However, they were known to be tough fighters.
The Ottoman defenses were very strong. They had built trenches and wired positions from Gaza to Beersheba. They also had well-placed machine guns.
EEF Attacking Force
The EEF was made up of soldiers from many different places. It included British, Australian, New Zealand, Indian, and French troops. They had about 100,000 men, 46,000 horses, and many camels and donkeys.
The EEF had many infantry divisions and mounted divisions (cavalry). Many of these soldiers had fought in other tough campaigns, like the Gallipoli Campaign.
Air Power
The EEF also had many aircraft. They used planes for scouting, taking photos, and bombing enemy positions. New, faster planes arrived, giving the EEF an advantage in the sky.
Water and Supplies
Water was extremely important for the EEF's plan. The desert area was very dry. Engineers worked hard to find and develop water sources. They also extended railway lines to bring supplies closer to the front.
The EEF needed to move a lot of supplies. They used lorries, tractors, and camels. This was a huge challenge, especially in the desert.
The Battle Begins: October 31 to November 7
Capturing the Gaza-Beersheba Line

General Allenby planned to attack Beersheba and Gaza, then make a wide attack towards Hareira and Sheria. His goal was to break through the Ottoman defenses.
On October 31, the Battle of Beersheba began. The EEF's XX Corps and Desert Mounted Corps attacked Beersheba. They captured it by the end of the day. Allenby reported that they took prisoners and machine guns.
Even after Beersheba fell, the Ottomans fought hard. They had strong rearguards that slowed the EEF down for seven days.
Fighting in the Judean Hills
After Beersheba, some Ottoman forces moved north towards Tel el Khuweilfe. They wanted to defend their headquarters at Hebron and the road to Jerusalem. The EEF's Anzac Mounted Division attacked them in the Battle of Tel el Khuweilfe. The Ottomans resisted strongly.
Attacks on the Coast

At the same time, the XXI Corps launched attacks on the Mediterranean coast in the Third Battle of Gaza. These attacks were meant to keep the Ottoman soldiers in Gaza busy. They used new tactics, tanks, and a lot of artillery.
Breaking Through the Center
The main attack on the Ottoman line happened on November 6 at Hareira and Sheria. The EEF broke through, creating a gap for the Desert Mounted Corps to advance. By November 7, the Ottoman Seventh and Eighth Armies were retreating.
Ottoman Retreat
The Ottoman forces skillfully pulled back from Gaza. They did not try a big counterattack. Instead, they were ordered to retreat while fighting. This allowed them to escape being surrounded.
Rearguard Actions

The retreating Ottomans used rearguards. These were small groups of soldiers who would stop and fight fiercely from strong positions. This slowed down the EEF's advance and allowed the main Ottoman army to get away.
The EEF's pursuit was slowed by these rearguards and by a lack of water. The hot, dusty wind also made things difficult.
Air Attacks and Support

The EEF's Royal Flying Corps played a big role. They bombed Ottoman aerodromes, transport, and troops. They took photos and scouted enemy positions. This constant air attack caused a lot of damage to the retreating Ottomans.
On November 8, a large bombing raid by 30 aircraft hit Ottoman aerodromes, destroying many planes and hangars. This helped the EEF gain control of the sky.
November 9: Advancing North
On November 9, the EEF continued to push north. The Anzac Mounted Division moved towards the coast. They captured prisoners and supplies. The Australian Mounted Division also advanced, searching for water.
The Ottoman Eighth Army retreated about 32 kilometers (20 miles). The Seventh Army had not lost much ground and was preparing for a counterattack.
November 10: Wadi Sukereir and Summeil

On November 10, the EEF encountered more Ottoman forces. The 52nd (Lowland) Division advanced and established a bridgehead across the Nahr Sukereir river.
The Australian Mounted Division faced strong Ottoman rearguards near Summil. They fought hard, but the Ottomans resisted fiercely.
November 11: Ottoman Counterattack Plan
The Ottoman commanders decided to make a stand in front of Junction Station. This station was important because it was on the railway line to Jerusalem. They planned a counterattack against the British right flank, hoping to cut off their supplies.
November 12: Ottoman Counterattack

The Ottomans launched their counterattack on November 12. About 5,000 Ottoman soldiers attacked the Australian Mounted Division. The fighting was intense, with heavy artillery fire.
The Australian Mounted Division fought bravely and slowly pulled back to a stronger position. The EEF's artillery helped stop the Ottoman advance. The Ottoman counterattack failed to break the British lines.
November 13: Battle of Mughar Ridge

The EEF continued their advance. Allenby planned to attack the Ottoman right flank on the coast. The Anzac and Yeomanry Mounted Divisions moved north.
In the center, the 52nd (Lowland) and 75th Divisions attacked towards Junction Station. They faced very strong Ottoman defenses. The villages of Qatra and El Mughar were heavily fortified.
The 6th Mounted Brigade (Yeomanry Mounted Division) launched a famous cavalry charge at El Mughar. They galloped up the ridge, surprising the Ottoman defenders. This charge, along with infantry attacks, led to the capture of Qatra and El Mughar.
November 14: Junction Station and Ayun Kara
.jpg)
On November 14, units of the 75th Division captured Junction Station. This cut the important railway line from Jaffa to Jerusalem.
The Anzac Mounted Division pushed north. The New Zealand Mounted Rifles Brigade fought a fierce battle at Ayun Kara. They faced a determined Ottoman rearguard but eventually won. This battle showed how effective mounted rifle units could be.
November 15: Jaffa and Latron

On November 15, the Ottoman Seventh Army retreated into the Judean Hills towards Jerusalem. The Eighth Army moved north of Jaffa. The Ottomans had lost a lot of territory, about 64 to 96 kilometers (40 to 60 miles). They also lost 10,000 prisoners and 100 guns.
The EEF continued to advance. The Yeomanry Mounted Division made another difficult cavalry charge at Abu Shusheh, overcoming an Ottoman rearguard.
November 16: Jaffa Captured

On November 16, Latron was captured. The New Zealand Mounted Rifle Brigade entered Jaffa without a fight.
Fighting in the Judean Hills: November 19-24
After capturing Jaffa, Allenby decided to push into the Judean Hills. He wanted to keep pressure on the Ottoman Seventh Army and capture Jerusalem.
The 52nd (Lowland) and 75th Infantry Divisions, along with the Yeomanry and Australian Mounted Divisions, began advancing into the hills. They faced Ottoman rearguards on high ridges. Indian and Gurkha troops used clever tactics to outmaneuver the Ottomans.
Nebi Samwil
The 75th Division advanced towards Nebi Samwil, a very important and fortified hill. After fierce fighting, the 234th Brigade captured it late on November 19. The Ottomans fought hard to defend this area.
Ottoman Counterattacks: November 27 to December 1

The Ottoman Army tried to take advantage of the tired British divisions. They launched a series of counterattacks. They hoped to break the British lines.
These attacks happened in the Judean Hills and on the coastal plain. The Ottomans used shock tactics, trying to surprise the British. However, the British troops, reinforced with fresh soldiers, managed to hold their ground.
Jerusalem Captured: December 2-9
By December 2, fresh EEF troops had taken over the front lines. This made their position much stronger.
Mott's Detachment
A special group called Mott's Detachment, including the 53rd (Welsh) Division, advanced north along the Beersheba to Jerusalem road. They moved quickly, hoping to cut off the road from Jerusalem to Jericho.
Surrender of Jerusalem

On December 8, Jerusalem was no longer protected by the Ottoman Empire. The Ottoman Seventh Army retreated during the evening. The city surrendered the next day, December 9, 1917.
Casualties
From October 31 to the capture of Jerusalem, the Ottoman armies suffered about 25,000 casualties. The EEF also had many casualties, with over 14,000 soldiers evacuated to Egypt for treatment.
Aftermath
Capture of Arsuf: December 20-21

Allenby wanted to create a strong defensive line from the Mediterranean Sea to the Dead Sea. To do this, they needed to push the Ottoman forces back from the Nahr el Auja river, north of Jaffa.
On the night of December 20-21, the 52nd (Lowland) Division crossed the Nahr el Auja. They surprised the Ottoman defenders, who surrendered. This allowed the EEF to advance further north, capturing key Ottoman positions.
Defense of Jerusalem: December 26-30

The Ottomans launched a counterattack on December 27 to try and retake Jerusalem. They attacked the 60th (London) Division. The fighting lasted for two days, but the Ottoman attack was unsuccessful.
The EEF then pushed their front line further north, securing the area around Jerusalem.
The Offensive's Impact

The Southern Palestine offensive was a huge success for the EEF. It showed how different parts of the army, like infantry, cavalry, and air forces, could work together effectively.
Unlike battles on the Western Front, this campaign resulted in significant territorial gains. It helped secure Baghdad and oilfields in Mesopotamia. It also encouraged the Arab Revolt against the Ottomans. The Ottoman Army suffered heavy losses that they could not easily replace. This campaign was a major defeat for the Central Powers in World War I.
Images for kids
-
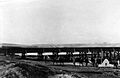
A military railway bridge over the Wadi Ghazzeh, with water storage beyond. EEF horses watered in this vicinity during September and October 1917
-
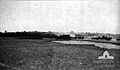
Transport wagons. Gaza in the background
-
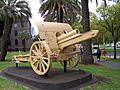
Ottoman Army howitzer captured near Huj now on display outside Victoria Barracks, Melbourne.
-

Horses queue for water at Jemmameh 8 November 1917. Ambulance horses and the end of the queue at 08:30 were watered at 17:30
-
'Iraq el Menshiye aerodrome and railway station after EEF air raid on 8 November 1917
-

Hong Kong (Indian) mountain gun battery
-
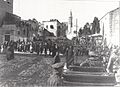
The 4th Battalion, Sussex Regiment march through Bethlehem. Their infantry division, the 53rd (Welsh) Division, occupied Bethlehem on the night of 9 December
-
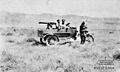
A Model T Ford Utility with a Vickers .303 machine gun mounted on a tripod
-
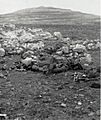
Dead Ottoman soldiers at Tel el Ful in 1917


.jpg)

.jpg)
.jpeg)


