
Battle of Tel el Khuweilfe facts for kids
Quick facts for kids Battle of Tel el Khuweilfe |
|||||||
|---|---|---|---|---|---|---|---|
| Part of the Middle Eastern theatre of World War I | |||||||
 Guns of the Inverness Royal Horse Artillery in action against Tel el Khuweilfe on 2 November |
|||||||
|
|||||||
| Belligerents | |||||||
|
|
||||||
| Commanders and leaders | |||||||
| Units involved | |||||||
| 53rd (Welsh) Division Anzac Mounted Division 5th Mounted Brigade (Australian Mounted Division) Yeomanry Mounted Division |
III Corps headquarters 6th and 8th Regiments (3rd Cavalry Division) 19th Division 27th Division (also known as the Beersheba Group) 2nd Regiment 125th Regiment (16th Division) 143rd Infantry Regiment (24th Division) 24th Division headquarters 12th Depot Regiment |
||||||
The Battle of Tel el Khuweilfe was a tough fight during World War I. It started on November 1, 1917, right after the Egyptian Expeditionary Force (EEF) won the Battle of Beersheba. This battle was part of a bigger plan by the British Empire to break through the defenses of the Ottoman Empire and their German allies.
The main goal was to capture Tel el Khuweilfe, a key position north of Beersheba in the Judean Hills. This area was important because it controlled the main road from Beersheba to Jerusalem. The Ottoman forces, led by German General Erich von Falkenhayn, strongly defended this road and their army headquarters.
Over the next week, British, Australian, and New Zealand troops, including infantry and mounted soldiers, tried to take Tel el Khuweilfe. They faced strong Ottoman resistance. Even though the British forces didn't fully capture the position, their constant attacks forced the Ottomans to send many reserve troops to defend it. This helped the British in other battles happening at the same time, like the Third Battle of Gaza and the Battle of Hareira and Sheria. On November 6, the Ottomans finally started to pull back from Tel el Khuweilfe. This happened because their other defensive lines were breaking, and they were in danger of being surrounded.
Contents
Background to the Battle

Before this battle, the British EEF had tried twice to capture Gaza but failed. After these defeats, both sides built strong trenches and defenses. The British also reorganized their army, creating new groups of soldiers. General Edmund Allenby took command in July 1917 and made the EEF stronger.
The Ottoman forces also reorganized their army, bringing in more soldiers from other areas. Their Yildirim Army Group, led by German General Erich von Falkenhayn, was in charge of defending the front line from Gaza to Beersheba.
The desert conditions were very hard for the soldiers. They faced food shortages, illnesses like sandfly fever, and hot desert winds called khamsin. Getting water and supplies to the front lines was a constant challenge.
Preparing for the Fight

When the British captured Beersheba on October 31, it surprised the Ottoman commanders. The Ottoman soldiers in Beersheba retreated north to Tel el Khuweilfe. This area was about 10 miles (16 km) north of Beersheba. It was important because it had the only paved road leading north to Hebron and Jerusalem.
The Ottomans quickly set up new defenses at Tel el Khuweilfe. They sent many reserve units, including the 19th Division, to strengthen their positions there. They wanted to protect the road and prevent the British from advancing further into the Judean Hills.

The area around Tel el Khuweilfe was a "stone desert" with rocky hills and dry valleys. Water was very scarce, found mostly in small gullies. Tel el Khuweilfe itself was strategically important because it was high ground and had the best water supply in the area. However, the British had found some water sources near Beersheba, which helped them.
Ottoman Defenders

Several Ottoman divisions were sent to defend the Tel el Khuweilfe area. These included the 19th, 24th, and 27th Divisions, and the 3rd Cavalry Division. Their goal was to stop the British advance and force them to commit more troops to this area. This would reduce the pressure on other Ottoman defenses at Gaza and Sheria.
British Attackers

Lieutenant General Harry Chauvel led the British Desert Mounted Corps. His forces, including the 53rd (Welsh) Division and mounted units, pushed the Ottoman forces back into the Judean Hills. This created space for other British units to prepare a flank attack on the Ottoman center at Hareira and Sheria. The British also wanted to cut off the Ottoman armies in the hills from those on the coast.
Newcombe's Detachment

To disrupt Ottoman reinforcements, a small British detachment led by Lieutenant Colonel S. F. Newcombe was sent to cut the road and telegraph lines north of Beersheba. This group, made up of British camel soldiers and Arab scouts, successfully cut communications between Hebron and Jerusalem for 40 hours.
However, they were attacked by Ottoman and German soldiers and suffered heavy losses. The detachment was eventually forced to surrender. Despite this, their actions caused problems for Ottoman communications and troop movements.
The Battle Unfolds

Even though the fighting around Tel el Khuweilfe was fierce and undecided, General Chauvel continued the attacks. He wanted to keep the Ottoman forces busy so they couldn't reinforce other parts of their line. The Ottomans fought very hard to hold Tel el Khuweilfe and the road to Jerusalem.
The British forces faced many challenges, including heavy casualties and supply problems. Their horses had little food and water was scarce. Despite these difficulties, the British held their ground and prevented the Ottomans from pushing them back to Beersheba.
November 1: The First Push

On November 1, the 53rd (Welsh) Division marched through Beersheba to take up positions west of the town. They faced little opposition at first. Meanwhile, the Anzac Mounted Division advanced to the east and met strong Ottoman resistance.
New Zealand and Australian mounted soldiers fought hard, capturing some prisoners and machine guns. They pushed forward along the road to Jerusalem, facing Ottoman forces with mountain guns and machine guns.
November 2: Desert Mounted Corps Attacks

General Chauvel ordered the Anzac Mounted Division to capture Tel el Khuweilfe and other key points northeast of Beersheba. As they advanced, they met stronger resistance. British mounted brigades pushed forward, but the Ottomans were well-entrenched.
The 8th Light Horse Regiment attacked Tel el Khuweilfe but faced fierce opposition. The South Notts Hussars pushed back some Ottoman defenders, but strong resistance prevented them from capturing their main targets. The fighting continued through the night.

The Ottomans reinforced Tel el Khuweilfe, making it a very strong position. They moved their corps headquarters to Edh Dhahriye to protect the road to Hebron and Jerusalem. They also sent more cavalry to guard against any British attempts to cut their lines again.
The British 53rd (Welsh) Division spent the day digging trenches. A hot desert wind, called a khamsin, began to blow, making water supplies even scarcer. Soldiers and animals suffered from thirst and heat.
November 3: Ottoman Counterattack

The Ottoman commander, Falkenhayn, ordered a counterattack to push the British off the Beersheba to Jerusalem road. However, delays in troop movements and the British advance prevented this attack from happening as planned.
Fighting for Tel el Khuweilfe
British air patrols spotted Ottoman troop movements. The 53rd (Welsh) Division and Anzac Mounted Division continued their attacks. The 7th Mounted Brigade and 1st Light Horse Brigade fought to capture Ras en Naqb and advance towards Tel el Khuweilfe.

The fighting was intense. The 53rd (Welsh) Division faced strong resistance at Tel el Khuweilfe, suffering many casualties. They managed to gain a small foothold on the hill but could not advance further. The 1st Light Horse Brigade also suffered losses.
Water and Evacuation Problems
Water was a huge problem for the British. There was no water in the Ras en Naqb area, so soldiers and horses had to return to Beersheba to drink. New pumps were brought in to increase the water supply in Beersheba. However, many horses went without water for long periods, sometimes for over 30 hours.
Wounded soldiers had to be carried back from the front lines by camels and carts. The journey was difficult and dangerous, with many more casualties occurring during evacuation.
November 4: Continued Attacks

The Ottomans continued to hold their defensive line. Falkenhayn ordered a recapture of Ras en Naqb. British patrols faced heavy fire. In the afternoon, the Ottomans launched a strong counterattack with 1,500 soldiers, supported by intense machine gun and rifle fire.
The British 5th Mounted Brigade, who had been without water for 30 hours, were heavily attacked. They were reinforced by other units, which helped stabilize the situation. The New Zealand Mounted Rifles Brigade eventually relieved them.

The fighting continued through the night. Many wounded soldiers were evacuated under difficult conditions, often under enemy fire. The British forces suffered more casualties during this time.
Over the next two days, the New Zealand Mounted Rifles Brigade and other units faced many Ottoman counterattacks. The fighting for Tel el Khuweilfe continued day and night, with both sides suffering heavy losses. The British 53rd (Welsh) Division renewed their attacks but made little progress.
Beersheba Conference
On November 4, British commanders met in Beersheba. They decided to postpone a planned general attack until November 6 due to severe water shortages and the exhaustion of the troops. General Allenby agreed to this delay.
November 5: More Intense Fighting
The New Zealand Mounted Rifle Brigade, holding a key position, faced a strong Ottoman attack. Ottoman artillery shelled their lines, and about 400 Ottoman soldiers attacked with bayonets. The New Zealanders, reinforced by other units, stopped the attack but suffered many casualties.
The New Zealanders' horses had been without water for 48 hours, so they were sent back to Beersheba. The Imperial Camel Brigade was supposed to relieve them but got lost, forcing the New Zealanders to stay in the firing line longer.
Meanwhile, British convoys bringing food and water to the 53rd (Welsh) Division also got lost. Soldiers and animals were on very short supplies. An attack planned for later in the day was postponed until November 6.
November 6: General Attack

On November 6, General Falkenhayn arrived at his headquarters. Despite the delays, the British were ready for a major attack on the center of the Ottoman line. The fighting at Tel el Khuweilfe had drawn in many Ottoman regiments, weakening their other defenses.
The British 53rd (Welsh) Division, supported by artillery and machine guns, attacked Tel el Khuweilfe and nearby ridges. The attack started in darkness and mist, causing some confusion. Some units captured their objectives but were then heavily counterattacked and forced to retreat.
.jpg)
The fighting was very confused and bloody. The 53rd (Welsh) Division suffered many casualties. However, their attacks prevented the Ottoman 19th Division from moving to reinforce other areas. The constant threat to the road to Jerusalem kept the Ottoman Seventh Army busy.
By the end of the day, the Ottomans had held Tel el Khuweilfe, but they had begun to evacuate Gaza. General Chauvel ordered his mounted divisions to advance northwards, while other forces remained at Tel el Khuweilfe.
Aftermath of the Battle
After the Ottoman 19th Division finally retreated from Tel el Khuweilfe, the 53rd (Welsh) Division moved back to Beersheba.
General Barrow took command of the remaining British forces in the area. He was ordered to hold the captured positions and continue to threaten the Ottoman forces. Barrow planned another attack on Khuweilfe, but it was cancelled. The Ottoman forces eventually withdrew completely from the area as part of a larger retreat.
The British mounted divisions rejoined the main force and continued their advance. The New Zealand Mounted Rifles Brigade and the Imperial Camel Brigade also returned to their main commands.
Later, in early December, during the Battle of Jerusalem, the 53rd (Welsh) Division and other units advanced towards Jerusalem. They moved cautiously, but their slow progress meant they couldn't fully support other British divisions at a crucial moment in the battle.
Images for kids
-
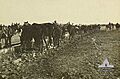
12th Light Horse Regiment watering horses at Beersheba
-
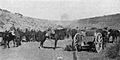
New Zealand Mounted Rifle Brigade first line transport and led horses in Shrapnel Gully during the fighting
-
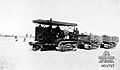
Caterpillar tractor towing two trailers across the desert

