Battle of Bir el Abd facts for kids
Quick facts for kids Battle of Bir el Abd (the Abd well) |
|||||||
|---|---|---|---|---|---|---|---|
| Part of the Middle Eastern theatre of the First World War | |||||||
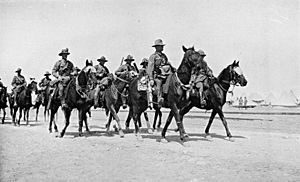
 Australian light horse patrol in Egypt |
|||||||
|
|||||||
| Belligerents | |||||||
| Commanders and leaders | |||||||
| Units involved | |||||||
| ANZAC Mounted Division 5th Mounted Brigade |
39th Infantry Regiment 603rd Machine-Gun Company 606th Machine-Gun Company Mountain Artillery Battery Engineer Company |
||||||
The Battle of Bir el Abd, also known as the Abd well, happened on 9 August 1916. It was a fight between the British Empire and the Ottoman Empire during the First World War. This battle was part of the Sinai and Palestine Campaign.
The battle took place in the Sinai Desert. It happened after the British won the Battle of Romani (3–5 August). The British Empire's ANZAC Mounted Division, along with the 5th Mounted Brigade, was ordered to chase the retreating Ottoman Army. British scouts found the Ottoman forces on 8 August. The rest of the ANZAC Mounted Division then moved into position to attack the next day. The attack started early on 9 August and involved many attacks and counter-attacks throughout the day. In the early evening, General Chauvel, who led the ANZAC Mounted Division, told his troops to pull back. This left the Ottoman forces in control of the battlefield.
Contents
The Battle of Bir el Abd: A Desert Clash
Chasing the Enemy: The Advance to Bir el Abd
The ANZAC Mounted Division was tired after their win at the Battle of Romani. The two units that fought the hardest, the 1st and 2nd Light Horse Brigades, went to rest. The rest of the division, with the 5th Mounted Brigade, was told to follow the Ottoman forces as they pulled back. As the Ottoman army had moved across the Sinai Desert, they had built strong defenses. They now used these defenses as they retreated east towards their border.
On 7 August, the New Zealand Mounted Rifles Brigade was leading the chase. They found the Ottoman army's rearguard (the troops protecting the main force) at Oghratina. They tried to go around the Ottoman left side but found the enemy too strong. So, they pulled back. Early the next day, patrols found that the rearguard had left during the night. The patrols kept going and found the Ottoman forces again. They were set up on high ground east of Bir el Abd. This spot was about 22 miles (35 km) east of Romani on the road to El Arish.
That night, the division's headquarters, the 5th Mounted, and New Zealand Brigades camped at Oghratina. They waited for the 1st and 2nd Brigades to join them. However, both brigades had fewer soldiers than needed. They had to form a combined unit called a "composite brigade." On 9 August, the division moved forward again. The New Zealand Brigade was in the middle. The Composite Brigade was on their left, and the 3rd Light Horse Brigade was on the right.
They met the Ottoman rearguard again. The Ottoman troops were holding a 10-mile (16 km) front, falling back towards Bir el Abd. The Composite Brigade was to aim for a spot 2 miles (3.2 km) northeast of the Ottoman defenses. The New Zealand Brigade was to attack the position directly. The 3rd Light Horse Brigade would stay close to the New Zealanders. Then, they would move behind the Turkish position, about 5 miles (8 km) to the east. This would make it hard for the Ottomans to retreat and cut off their supply lines. The 5th Mounted Brigade would be the reserve.
The Fight at Bir el Abd
The Ottoman position at Bir al-Abed had strong trenches and redoubts (small forts). These defenses looked down on the paths the British would use to approach. The Ottomans had used their time well since arriving. They had recovered from their earlier defeat, restocked their supplies, and received more soldiers. The Turkish force now had about 6,000 men. This was twice the number of soldiers that General Chauvel had. They also had good support from mountain artillery and howitzers (types of cannons). German soldiers operated the machine guns, and Austrian soldiers fired the artillery.
The New Zealand advance started at 4:00 AM. At the same time, the 3rd Brigade moved towards a redoubt more than 2 miles (3.2 km) to the south. It took another hour for the Composite Brigade to set out. But they found a system of trenches from the well to Lake Bardawil. The ANZAC Mounted Division moved forward through Turkish artillery and machine gun fire. The fire became so heavy that it put their horses in danger. So, they got off their horses and continued on foot.
However, they were not moving in a straight line. There was a gap of about 800 yards (730 m) between the New Zealanders and the smaller Composite Brigade. There was also a gap of about 1 mile (1.6 km) between the 3rd Brigade and the New Zealanders. By 5:00 AM, the New Zealand Brigade had reached a high point. From there, they could see the well and the Turkish position. An hour later, the Turkish troops left their trenches with bayonets (knives attached to rifles) and counter-attacked the New Zealand Brigade in two groups. This first attack failed because of the New Zealanders' machine guns and artillery fire from the Somerset Battery.
The break lasted for thirty minutes. Then, the Turkish troops attacked the New Zealanders again. The Composite Brigade, which was still moving forward, came under fire from artillery, anti-aircraft guns, and machine guns. They were stopped about 800 yards (730 m) from the Turkish lines. By 7:00 AM, the Turkish forces had found the gap in the ANZAC Mounted Division's line. This gap was between the New Zealanders and the Composite Brigades. The Turks tried to use this gap to their advantage. An hour later, on the southern side, the 3rd Brigade's advance was stopped. They were ordered to change their direction towards Ard instead of trying to go around it. At the same time, they were told to close the gap between them and the New Zealanders.
The New Zealand Brigade advanced again. At one point, it looked like two of their regiments might break into the Turkish position. But elsewhere, in the north and south, the brigades had been stopped. Turkish artillery fire became stronger. At 10:30 AM, Chauvel asked for air support to help find the Turkish cannons. One problem was that the Turkish guns were larger than the British ones and could shoot farther. At the same time, he sent one of his reserve regiments, the Warwickshire Yeomanry, to help the Composite Brigade.
By 11:30 AM, the ANZAC Mounted Division was spread out in a crescent shape. They were about 3 miles (4.8 km) from the Turkish position. They could see Turkish camel transports leaving to the east. But thirty minutes later, the Turkish troops counter-attacked along their entire line. One of their artillery shells hit a limber (a two-wheeled cart for cannons) from the Ayrshire Battery. This killed four men, wounded several others, and killed thirty-seven horses. The Turkish soldiers were now moving in waves towards the New Zealand Brigade. But with their artillery support, the New Zealanders managed to push them back.
The Composite Brigade was the next target for the Turks. The Warwickshire Yeomanry, who were helping them, had to fight off three battalions (large groups of soldiers) by themselves. The 3rd Brigade was also attacked. They told Chauvel that there was little chance of them breaking through the Turkish lines. Back in the north, by 2:00 PM, the Composite Brigade was being forced back. The Ayrshire Battery supporting them was in danger of being captured. Chauvel sent his last reserve troops here to strengthen the position. They managed to pull back the cannons. All along the ANZAC front, they were now pulling back.
The ANZAC Mounted Division held on for the next two hours, slowly moving to the rear. Realizing their chance, the Turkish artillery fired even faster. To fight back, the ANZAC Division's squadrons (groups of cavalry) rode forward. But the heavy fire forced them to get off their horses. They then tried attacking on foot. At 3:00 PM, Chauvel ordered the division to attack, but they made little progress. At 4:30 PM, in the north, between 2,000 and 3,000 men attacked the Composite Brigade. They got within a "few hundred yards" of the ANZAC Division's lines. To the right, the New Zealand Brigade was now exposed. The two brigades on their sides had moved further back. Their position was being attacked from both sides (called enfiladed fire).
Then, at 5:00 PM, the Turkish force launched a strong counter-attack. The ANZAC Mounted Division was forced to retreat. One squadron of the 9th Light Horse Regiment tried to get their wounded soldiers. They waited until they were within 50 yards (46 m) before leaving. They were forced to leave three of their wounded behind. At 5:30 PM, with the danger of hand-to-hand combat (fighting up close) coming, Chauvel had to order a "general withdrawal." When the Turkish forces realized what was happening, they tried even harder to break through the division's front. The ANZAC Mounted Division retreated by "bounds," meaning squadrons moved back one after another. First, they went to where their horses were, and then they rode back to safety.
Aftermath: What Happened Next
The Turkish regiment showed the ANZAC Mounted Division that they were still a strong force. They turned the ANZAC attack into a defense and then pushed them away. The ANZACs had 73 soldiers dead, 243 wounded, and six missing. The number of Turkish casualties for this battle is not known. However, in total, they had lost more than half of their 18,000-man force during their advance into the Sinai.
The ANZAC Mounted Division was supposed to camp nearby that night. The plan was to follow the Turkish force the next day if they retreated. However, Chauvel pulled the division back all the way to Oghratina, except for some observation posts. Reconnaissance patrols on 10 August reported that the Turkish forces still held the area around the well. Then, early the next day, a New Zealand patrol reported that the Turkish forces had left the position and were at Salama. The rest of the ANZAC Mounted Division moved to meet the Turkish force. But both sides only fired artillery and rifles from a long distance. That night, the Turkish force stopped fighting and retreated to El Arish.


