
Battle of Romani facts for kids
Quick facts for kids Battle of Romani |
|||||||
|---|---|---|---|---|---|---|---|
| Part of the Middle Eastern theatre of World War I | |||||||
 8th Light Horse Regiment at Romani |
|||||||
|
|||||||
| Belligerents | |||||||
|
|||||||
| Commanders and leaders | |||||||
| Units involved | |||||||
| Anzac Mounted Division's 1st Light Horse Brigade 2nd Light Horse Brigade 52nd (Lowland) Division |
3rd Division Pasha I Ottoman camel Machine gun battalion |
||||||
| Strength | |||||||
| 14,000 | 16,000 | ||||||
| Casualties and losses | |||||||
| 1,130 | 9,200 including 4,000 prisoners | ||||||
The Battle of Romani was a major battle during World War I. It took place from August 3 to 5, 1916, in the Sinai Peninsula of Egypt. This battle was the last time the Central Powers (Ottoman Empire, Germany, and Austria-Hungary) tried to attack the important Suez Canal by land.
The battle was a big win for the British Empire forces. These included soldiers from the United Kingdom, Australia, New Zealand, India, and Southern Rhodesia. Their victory kept the Suez Canal safe. It also stopped the Central Powers' plans to control this vital waterway. After Romani, the British Empire forces went on the attack. They chased the enemy across the Sinai Desert. This marked a turning point in the Sinai and Palestine campaign.
Contents
Setting the Stage for Battle
Protecting the Suez Canal
At the start of World War I, the Sinai Peninsula was mostly unguarded. In February 1915, Ottoman and German forces tried to attack the Suez Canal. They were not successful. Small groups continued to threaten the canal.
By early 1916, the British started building a railway and water pipeline. These went from Kantara towards Romani. This helped them move more troops and supplies. British planes also flew over the Sinai. They looked for enemy troop movements.
Enemy Attacks and British Response
In April 1916, a German-led Ottoman force attacked British troops. This happened at Katia and Oghratina, east of Romani. The British soldiers, called yeomanry (cavalry volunteers), were surprised. They were guarding the new railway and pipeline.
After this attack, the British Empire sent more troops to the area. The New Zealand Mounted Rifles Brigade and the 2nd Light Horse Brigade (from Australia) quickly moved in. They took back the Katia area. Major General Harry Chauvel took command of these advanced troops.
Building Defenses at Romani
The British continued building the railway and pipeline. By May, trains were running regularly to Romani. A second railway line was built to the Mediterranean coast. But conditions in the Sinai Desert were very tough. Temperatures could reach 123°F (50°C) in the shade. Dust storms, called Khamsin, also made things difficult.
Even with the heat, soldiers constantly patrolled the area. They went as far as 60 miles (100 km) east of Romani. These patrols helped them know where the enemy was. They also destroyed water sources on other routes. This forced the Ottoman army to use the northern coastal route.
The British built strong defenses at Romani. They made a line of 18 redoubts (small forts). These were built on high sand hills. Each redoubt had rifles, Lewis guns, and Vickers machine guns. This defensive line was also supported by artillery.
German and Ottoman Forces Prepare
By July, the Ottoman forces were gathering. They had about 28,000 troops in southern Palestine. Before the battle, thousands more were at bases closer to Romani. The main attacking force was led by German General Friedrich Freiherr Kress von Kressenstein. His army had about 16,000 men. This included Ottoman infantry and a special German unit called Pasha I. They had many rifles, machine guns, and heavy artillery. They also had nearly 5,000 camels and 1,750 horses.
German planes were also active. They were faster and better than the British planes. They helped the Ottoman forces by watching the British. The goal of the German and Ottoman attack was to capture Romani. Then, they wanted to set up heavy artillery to bombard the Suez Canal.
British Forces Get Ready
General Sir Archibald Murray was the commander of the British Empire forces in Egypt. He brought together different units to form the Egyptian Expeditionary Force (EEF). His main job was to defend Egypt. He also sent troops to the Western Front in Europe.
Murray believed the main attack would be in the northern sector, around Romani. He sent more machine gun companies to Romani. He also gathered a mobile column of light horse and camel troops. British warships in the Mediterranean were ready to shell the enemy. An armored train was also ready to help.
Major General Herbert Lawrence commanded the defenses in the Romani area. He had infantry from the 52nd (Lowland) Division. He also had the Anzac Mounted Division, led by General Chauvel. This division included the 1st and 2nd Australian Light Horse Brigades. Other units, like the New Zealand Mounted Rifles Brigade, were also positioned to stop the enemy.
Scouting Before the Battle
Mounted troops kept patrolling the area. By mid-July, British planes saw a large Ottoman force. It was moving across the northern Sinai. The Australian 1st and 2nd Light Horse Brigades took turns patrolling. They rode out every day to find the enemy. They would fight small battles and then slowly pull back. This way, the British knew exactly where the enemy was.
By August 3, the German and Ottoman force had reached Katia. They were very close to Romani. Their line stretched from the Bardawil Lagoon to east of Katia.
The Battle Begins: August 4
Just before midnight on August 3, about 8,000 German and Ottoman soldiers attacked. They targeted the outpost line held by the Australian 1st Light Horse Brigade. The Australians were outnumbered. They fought bravely in the dark. They were forced to slowly retreat.
As dawn approached on August 4, the 2nd Light Horse Brigade joined the fight. Later, the 5th Mounted Brigade and the New Zealand Mounted Rifles Brigade also arrived. These four brigades of the Anzac Mounted Division worked together. They managed to push the German and Ottoman forces into deep sand. This made it very hard for the enemy to move.
Here, the attackers came under fire from the 52nd (Lowland) Division. These infantry soldiers were strongly dug in at Romani. The deep sand, intense heat, and lack of water wore down the attacking forces. Their advance was stopped.
The German and Ottoman forces tried to outflank the British. They moved around to the west, towards Mount Royston. But the light horse brigades continued to fight. They slowly pulled back, still holding their ground. The 52nd (Lowland) Division's machine guns and artillery also fired on the attackers.
Reinforcements Arrive
As the battle continued, more British Empire troops arrived. The 5th Mounted Yeomanry Brigade moved towards Mount Royston. The New Zealand Mounted Rifles Brigade also marched towards the battle. Their goal was to cut off the enemy.
At 2:00 PM, the five mounted brigades began a counterattack. They moved from the west towards Mount Royston. The New Zealand riflemen quickly gained ground. They were helped by accurate artillery fire. By 4:00 PM, British cavalry charged the southern part of Mount Royston. The enemy soldiers quickly surrendered.
By 6:00 PM, 500 prisoners were captured. Two machine guns and an artillery battery were also taken. The outer part of the attacking force was completely defeated. When darkness fell, the fighting stopped. The 1st and 2nd Light Horse Brigades stayed on the battlefield. The other brigades went back for water and food. About 1,200 unwounded prisoners were captured that day.
The Battle Continues: August 5
By August 5, the British had a large advantage in numbers. They had about 50,000 men in the Romani area. This included two infantry divisions and four mounted brigades. The German and Ottoman forces were spread out. They were also tired and low on water.
British Capture Wellington Ridge
At daybreak, British infantry and mounted troops attacked Wellington Ridge. This was a key position held by the enemy. They charged up the sandy slope. They quickly broke through the German and Ottoman lines. The enemy soldiers, who had fought stubbornly, began to surrender.
By 5:00 AM, 1,500 German and Ottoman soldiers were captured near Wellington Ridge. By 5:30 AM, the main enemy force was in a disorganized retreat towards Katia. The 1st and 2nd Light Horse Brigades followed closely.
Chasing the Enemy to Katia
The British 42nd and 52nd infantry divisions moved out to support the mounted troops. But the infantry found it very hard to march in the deep sand and scorching heat. Many soldiers suffered from thirst and heat exhaustion. This slowed down their advance. Because of this, General Kress von Kressenstein was able to get most of his troops and heavy guns away.
The mounted brigades continued the chase. They attacked the German and Ottoman rearguard at Katia. The enemy fought back strongly. They had well-placed artillery and machine guns. The British Empire mounted brigades charged forward. They rode through shell fire and bullets. But the enemy's strong defense eventually stopped their advance.
As darkness fell, the battle ended. The Germans and Ottomans retreated to Oghratina. The British infantry and mounted troops had won the two-day battle. They captured about 4,000 enemy soldiers and killed over 1,200. However, most of the enemy's main force and their artillery escaped.
The Pursuit Continues
General von Kressenstein had prepared defensive lines as he advanced. Even though he lost many soldiers, he fought strong rearguard actions. This slowed down the British chase. It allowed his forces to retreat towards El Arish.
The British infantry found it too difficult to keep up the chase in the desert. They suffered from heat and thirst. So, the mounted troops continued the pursuit.
Towards Oghratina and Bir el Abd
On August 6, the Anzac Mounted Division continued to attack. They tried to capture Oghratina. But the enemy's rearguard was too strong. The mounted forces were not big enough to capture the position without infantry or heavy artillery. However, the threat from the mounted troops forced the enemy to leave Oghratina.
By August 7, the German and Ottoman forces had retreated to Bir el Abd. This was a base they had used before.
Action at Bir el Abd: August 9
General Chauvel planned to capture the enemy rearguard at Bir el Abd. This position was strongly held. The enemy had many soldiers and well-placed artillery. But they were seen burning supplies and leaving camps.
The Anzac Mounted Division attacked Bir el Abd on August 9. The New Zealand Mounted Rifles Brigade attacked in the center. The 3rd Light Horse Brigade tried to go around the enemy's left side. Royston's Column (made of the 1st and 2nd Light Horse Brigades) tried to go around the enemy's right side.
The New Zealanders pushed back enemy outposts. But the German and Ottoman rearguard quickly counterattacked. They realized the British line was thin. The fighting was fierce. The enemy had more soldiers and more guns, including heavy howitzers. The British mounted troops were held up.
Fresh German and Ottoman troops arrived from El Arish. They launched a strong counterattack. The New Zealanders fought hard. Their machine guns stopped the enemy when they were very close. But by midday, the British advance was completely stopped.
By 5:30 PM, General Chauvel ordered a general retreat. It was hard to pull back, but the New Zealanders' toughness and nightfall saved them. After this tough day, the Anzac Mounted Division had to return to Oghratina for water. They had lost over 300 soldiers.
End of the Pursuit
On August 10 and 11, British patrols kept an eye on the enemy at Bir el Abd. On August 12, the Anzac Mounted Division advanced again. But the enemy had already left Bir el Abd. They retreated further to Salmana. The British chased them, but the enemy continued to pull back to El Arish.
The British supply lines were now stretched very far. It was too difficult to supply the mounted troops from Romani. So, the British stopped their advance. They secured the areas they had won, from Katia to Bir el Abd.
General von Kressenstein had managed to pull his forces back. This was a remarkable achievement for him.
Casualties
The Battle of Romani was a costly fight for both sides.
| Killed | Died of wounds | Wounded | Total | |
|---|---|---|---|---|
| British | 79 | 27 | 259 | 365 |
| Australian | 104 | 32 | 487 | 623 |
| New Zealand | 39 | 12 | 163 | 214 |
| Total | 222 | 71 | 909 | 1202 |
The Ottoman Army had many more casualties. It's estimated they had about 9,000 losses. About 1,250 enemy soldiers were buried after the battle. Around 4,000 were taken prisoner.
Medical teams worked very hard to help the wounded. They used camels and sand-carts to move injured soldiers. This was because the deep sand made it impossible to use regular ambulances.
Aftermath of the Battle
The Battle of Romani was the first major victory for the British Empire in World War I. At this time, the Allied nations had faced many defeats. This win was a big turning point. It secured Egypt's safety and ended the land campaign against the Suez Canal.
General Chauvel said that Romani changed the whole campaign. The enemy never again gained the upper hand.
The British Empire forces completely defeated the German, Austrian, and Ottoman force. About half of them were killed or wounded. Nearly 4,000 were taken prisoner. The British also captured many enemy weapons and supplies. These included artillery, machine guns, rifles, and medical equipment.
The tactics used by the Anzac Mounted Division proved very effective. They would quickly move to key positions. Then, they would fight as infantry once they dismounted from their horses. Their artillery and machine guns were very good at stopping enemy attacks.
The battle was fought in extreme desert heat. This caused much suffering for both soldiers and animals. It showed the great toughness and endurance of everyone involved.
Romani marked the end of the German and Ottoman campaign against the Suez Canal. The British Empire forces, led by the Anzac Mounted Division, then went on the offensive. They pushed von Kressenstein's forces back across the Sinai Peninsula. They won battles at Magdhaba in December 1916 and Rafa in January 1917. These victories secured the Egyptian Sinai Peninsula. This successful campaign ended with the First Battle of Gaza in March 1917.
Important Lessons Learned
Some people criticized the British commanders for letting von Kressenstein's force escape. They felt that a chance was missed to capture the entire enemy army. One reason for this was the infantry's difficulty with water supply and moving in the desert. They were not trained for desert warfare.
Despite these criticisms, the Battle of Romani was a very important victory. It showed the strength and skill of the British Empire forces. General Chauvel pointed out that these criticisms should not hide how important the victory was.
Recognition for Soldiers
General Murray praised the Anzac Mounted Division highly. He said they were an "indispensable part" of his forces. He spoke of their "gallantry, steadfastness and untiring energy." He called them the "keystone of the defense of Egypt."
However, many soldiers felt they did not receive enough recognition for their bravery. General Chauvel himself was not initially given a high award for his role. It was only later, after more victories, that he received a higher honor. He felt it was important that the bravery of his front-line troops was recognized.
Images for kids
-
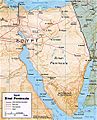
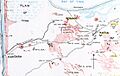
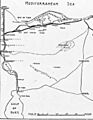
Map of the Egyptian Sinai Peninsula (Bi'r ar Rummanah is Romani and Al Qantjarah is Kantara).
-
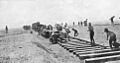
Laying the railway track across the Sinai Desert.
-

Members of the Australian Flying Corps in 1916
-
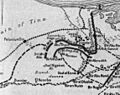
Romani and surrounds, 1916 (Serbonian Lake also known as Bardawil Lagoon)
-
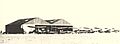
Ismailia Aerodrome with BE 2C two seater aircraft outside the hangars
-
Romani area when the railway reached Canterbury Hill
-
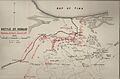
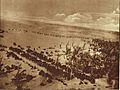
Romani defences at nightfall 3 August 1916
-
Detail of Romani map showing defences
-
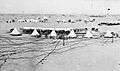
Camp at Hill 70 between Dueidar and Kantara with shaded horse lines and barbed wire entanglements
-
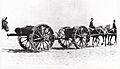
Light 18-pounder with sand wheels (ped-rails). Suez Canal Defences 1916
-
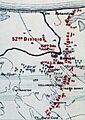
Romani defences at nightfall 3 August 1916: details of redoubts numbered 1 to 11 and 21 to 23
-
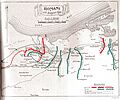
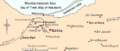
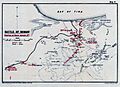
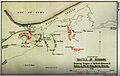
Positions from 19 July to 9 August. British lines in red and Ottoman advance and attacks on 3 and 4 August in green
-
Australian signaller with heliograph in Egypt in 1916
-
Position at 16:00 on 4 August 1916
-
Kantara to El Arish showing Ballah railhead between Kantara and Ferdan
-
British Empire forces camped at the Oghratina oasis
-
Falls' Sketch Map 10 Stages of Battle of Romani to Bir el Abd


