
Battle of Callantsoog facts for kids
Quick facts for kids Battle of Callantsoog |
|||||||
|---|---|---|---|---|---|---|---|
| Part of the Anglo-Russian invasion of Holland during the War of the Second Coalition | |||||||
 Landing at Callantsoog by Dirk Langendijk |
|||||||
|
|||||||
| Belligerents | |||||||
| Commanders and leaders | |||||||
| Herman Willem Daendels | Ralph Abercromby | ||||||
| Strength | |||||||
| 10,000 | 12,000 | ||||||
| Casualties and losses | |||||||
| 137 dead 950 wounded |
74 dead 376 wounded |
||||||
The Battle of Callantsoog took place on 27 August 1799. It was a key part of the Anglo-Russian invasion of Holland. British forces, led by Lieutenant-General Sir Ralph Abercromby, landed near Callantsoog in the Netherlands. They faced strong resistance from troops of the Batavian Republic, commanded by Lieutenant-General Herman Willem Daendels. Despite the fierce fighting, the British managed to secure their landing spot. The Dutch forces were then forced to retreat.
Contents
Why the Battle Happened
The British government had been planning an invasion of the Netherlands for a while. They wanted to find the best place to land their troops. They considered a few spots, but finally chose the northern part of the North Holland area.
Choosing the Landing Spot
This area was picked for several reasons:
- The coastline was easier to access than other parts of the Dutch coast. Other areas had dangerous sandbanks.
- It was not heavily defended. There were only a few small forts at Den Helder.
- The British hoped to capture a large part of the Dutch navy, which was anchored nearby. This was a very important goal.
- They also believed that the big city of Amsterdam could be easily reached from this direction.
Dutch and French Preparations
The Dutch and French governments knew an invasion was coming. However, they didn't know exactly where the British would land. This meant they had to spread their soldiers out across a wide area.
One of the Dutch army divisions, led by General Daendels, was in North Holland. He had about 7,000 soldiers near Alkmaar. Another Dutch force was further south. A second Dutch division was guarding the northern provinces, but they were too far away to help Daendels quickly. The French forces, led by General Guillaume Marie Anne Brune, were also spread out.
The British Fleet Sets Sail
The British decided not to wait for their Russian allies. On 13 August, General Abercromby's division, with about 12,000 soldiers, set sail. The fleet had about 200 ships and was commanded by Vice-Admiral Mitchell.
Soon after they left, a storm hit, forcing the fleet to stay away from the Dutch coast. The weather finally calmed down, allowing them to approach Den Helder on 22 August. The British admiral demanded that the Dutch navy and forts surrender, but the Dutch refused. The weather turned bad again for a few days, but by the evening of 26 August, it was calm enough to plan the landing for the next day.
The Battlefield at Callantsoog
To understand the battle, it helps to know what the area looked like in 1799. Den Helder was a small village with two small forts. It was at the very northern tip of a sandy strip of land. This strip had three rows of sand dunes along the North Sea beach. Behind the dunes was a road and a canal. Behind the canal was a marshy area called the Koegras, which would flood at high tide.
General Daendels knew this narrow strip of land made it hard to spread out his soldiers. So, he planned to have only light forces in the dunes. His main idea was to attack the British from both the north and the south once they landed.
He placed about 5,000 men in Den Helder, including two demi-brigades, skirmishers, cavalry, and artillery. Daendels himself was near Callantsoog with about 5,200 men. This plan meant dividing his forces, but he thought it was the best way to fight in that area.
The Battle Begins
At 3 AM on 27 August, the first British soldiers, about 2,500 men, got into boats from their fleet. There weren't enough boats for everyone, so the landing had to happen in stages. These soldiers landed without any major problems. The British fleet fired cannons at the beach, which moved a lot of sand but didn't harm the Dutch defenders hiding behind the dunes.
The British landed at a spot called Kleine Keeten. There was a signal station on top of a dune nearby, which the British immediately attacked.
Dutch Resistance
Dutch skirmishers tried to stop the British but were pushed back. An inexperienced Dutch battalion panicked and was routed. Their commander was killed. Another Dutch battalion counter-attacked but was also pushed back by the larger British force.
General Guericke, a Dutch commander, tried to help by moving his troops south. However, he deployed them in the swampy Koegras area, behind a canal. This cut him off from communicating with his other troops. As a result, his attack was not effective, and other Dutch units did not move forward because they didn't receive orders.

Most of the Dutch fighting happened on the British right side. General Daendels arranged his forces in three lines, as the area was too narrow for more than two battalions at a time. He sent his first attack with two battalions, supported by cavalry and artillery. They faced the British 3rd Brigade.
The Dutch soldiers struggled with the terrain. Their horses sometimes sank deep into the loose dune sand, and their cannons often got stuck. Also, British gunboats came very close to the beach. They fired powerful shots at the Dutch whenever they could see them through gaps in the dunes. This naval gunfire caused a lot of damage to the Dutch troops.
British Victory
As the Dutch troops were slowly pushed back, Daendels sent in more soldiers, but it didn't help much. Meanwhile, more British soldiers continued to land safely. Only one boat overturned, and 20 men drowned. The British numbers on their right side kept growing. They even managed to bring up field cannons, with British sailors helping to pull them through the sand.
Around 6 PM, Daendels realized that continuing the fight was pointless. He ordered his troops to retreat to their starting positions. The British did not chase them.
This left only a few Dutch troops near the forts at Den Helder. Daendels decided to pull these troops back too, as they were too few to fight the much larger British forces. The forts' cannons were pointed towards the sea, so they couldn't defend against an attack from the land. The Dutch soldiers spiked the 86 cannons (making them unusable) and left Den Helder safely.
As a result, the important port of Nieuwe Diep fell into British hands without a fight. This gave the British and Russian forces a much better place to land more troops later. Several inactive Dutch warships and the contents of the naval supply depot in Den Helder were also captured. The Dutch navy squadron, led by Admiral Story, had to move further east.
The British lost 74 soldiers killed (including the 20 who drowned), 376 wounded, and 20 missing. The Dutch lost 137 killed and 950 wounded.
What Happened Next
After the battle, Daendels retreated to a nearby defensive line. Over the next few days, he moved even further south. He was worried about another British landing behind him, which would trap his forces. This would also make it easy for the British to advance towards Alkmaar and other southern areas.
Some historians have criticized Daendels for abandoning Den Helder. However, others argue that it was probably unavoidable. The strong fortress of Kijkduin, which was built later by Napoleon, did not exist yet. Daendels's decision to leave his defensive line seems more debatable, but the British did not make the expected landing that would have trapped him. Another important reason for the retreat was that the Dutch had used up almost all their ammunition during the battle. They couldn't fight another battle right away.
While Daendels was moving to his new position, something dramatic happened with the Dutch fleet. On 30 August, during the famous Vlieter Incident, the crews and some officers mutinied. Admiral Story's squadron then surrendered to Admiral Mitchell without firing a single shot.
Images for kids
-
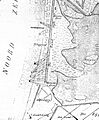
Map of the Landing at Callantsoog

