
Anglo-Russian invasion of Holland facts for kids
Quick facts for kids Anglo-Russian invasion of Holland |
|||||||
|---|---|---|---|---|---|---|---|
| Part of the War of the Second Coalition | |||||||
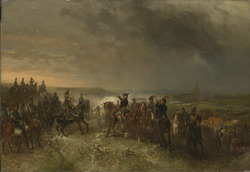
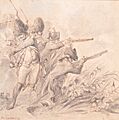
 A painting of the Battle of Callantsoog |
|||||||
|
|||||||
| Belligerents | |||||||
| Commanders and leaders | |||||||
| Strength | |||||||
| 25,000 | 40,000 | ||||||
| Casualties and losses | |||||||
| 7,000 killed, wounded or captured 25 ships lost |
18,000 killed, wounded or captured | ||||||
The Anglo-Russian invasion of Holland was a military campaign that took place from August to November 1799. It was part of a larger conflict called the War of the Second Coalition. During this invasion, soldiers from Great Britain and Russia attacked the North Holland area in the Batavian Republic (which is now the Netherlands).
The main goals of the invasion were to capture the Dutch navy and to encourage the Dutch people to rise up against their government. This government was allied with France. A combined army of French and Dutch soldiers fought against the invaders. The British and Russian forces had some early successes, winning battles at Callantsoog and Krabbendam. However, later battles did not go their way. After a defeat at Castricum, the British commander, the Duke of York, decided to pull his troops back. Eventually, an agreement was made with the French commander, General Guillaume Marie Anne Brune, allowing the British and Russian forces to leave safely. Even though the invasion failed overall, the British did manage to capture a large part of the Dutch fleet.
Contents
Why Did the Anglo-Russian Invasion Happen?
In the 1780s, a group called the Patriots tried to create a democratic Dutch republic. They wanted to remove the House of Orange family from power. This attempt failed when Prussia invaded in 1787 and restored the Orange family's rule.
The Dutch Republic then joined a group of countries called the First Coalition. This group was against the revolutionary French Republic. In 1795, the French army, with help from Dutch revolutionaries, defeated the Dutch and their allies. The Dutch Republic was overthrown, and the Batavian Republic was created. The former ruler, William V, fled to London.
After 1795, the Netherlands became an ally of France. France needed naval resources, which the Dutch could provide. The Dutch began building new warships. However, many experienced Dutch naval officers were loyal to the old Orange family and refused to serve the new government. This meant the new Dutch navy had less experienced leaders. This led to defeats, like the Battle of Camperdown in 1797, where the Dutch lost many ships.
Britain became worried about the growing Dutch navy. They feared it could help France invade England or Ireland.
Forming the Second Coalition
The First Coalition against France ended in 1797. But Britain soon found a new ally in Emperor Paul I of Russia. This new alliance was called the Second Coalition. They had some successes against France in other parts of Europe.
The British Prime Minister, William Pitt the Younger, wanted to keep up this momentum. He saw the Batavian Republic as a good target for an attack. The exiled Prince of Orange was also pushing for an invasion to get his power back. He made the British believe that the Dutch people would rise up against the French.
Also, attacking the Dutch was a condition of the agreement with Russia. Russia promised to send 17,593 soldiers for the expedition. In return, Britain would pay Russia a large sum of money and provide 13,000 of its own troops, along with transport ships.
The Invasion Begins: Campaign in North Holland
The invasion was not just a military plan. British leaders believed the Dutch people would welcome the invaders and join them against the French. However, these hopes were not met.
Preparing for the Landing
British forces gathered near Canterbury. While Russian troops were being picked up, the British decided not to wait. A first group of British soldiers, led by Lieutenant-General Sir Ralph Abercromby, sailed ahead to secure a landing spot.
They considered several places on the Dutch coast. The northern part of the North Holland peninsula was chosen. This area had fewer defenses, and a large part of the Dutch fleet was nearby. It also seemed to offer an easy path to Amsterdam, an important city.
The French and Dutch knew an invasion was coming, but they didn't know exactly where. This forced them to spread their forces. The Dutch army had two divisions. One, led by General Herman Willem Daendels, was in northern North Holland. The French troops were spread out elsewhere. The entire Franco-Batavian army was commanded by the French General Guillaume Marie Anne Brune.
Landing at Callantsoog and the Dutch Fleet's Surrender


The invasion started well for the British. On August 27, 1799, British troops landed near Callantsoog without opposition from the Dutch fleet. General Daendels tried to stop them but was defeated in the Battle of Callantsoog. His forces were divided, and British gunboats provided strong support from the sea.
Daendels then decided to abandon the Helder fortresses, giving the invaders a fortified base. This decision badly hurt Dutch morale. The sight of the old ruler's flag (the Prince of Orange soon joined the expedition) made the Dutch fleet in the Zuyder Zee even less loyal.
When Dutch Admiral Samuel Story finally decided to fight the British fleet, his sailors mutinied. This event, known as the Vlieter Incident, led to the surrender of the entire Dutch fleet on August 30 without a single shot being fired. The Prince of Orange himself went aboard Story's ship to receive the cheers of the mutineers.
Battles at Arnhem and Krabbendam
The Dutch land forces and the people of North Holland were not easily convinced to support the Prince of Orange. The invasion actually united many Dutch people against the invaders. The Prince's arrogant message ordering the Dutch to rally to him did not help. An attempt by Orange supporters to start an uprising near Arnhem failed easily.
Meanwhile, the French and Dutch forces in North Holland were getting stronger. General Brune brought in a French division and ordered a Dutch division to join him. By September 9, the Franco-Batavian army had about 25,000 men, while the British had about 20,000. Brune decided to attack the British position.
The British won the Battle of Krabbendam near Alkmaar on September 10. The Dutch and French were defeated. This was partly because of poor planning, which caused confusion among the Dutch forces. The British had set up a strong camp in a polder (a low-lying area of land) that was naturally protected by dikes and canals. The French and Dutch could not break through these defenses.
With British naval control, more British and Russian troops arrived easily at Den Helder. The combined Anglo-Russian forces now had about 40,000 men, compared to 23,000 for the Franco-Batavian army.
The Battle of Bergen

The Duke of York, now in supreme command, decided to use his larger army to attack. The terrain in North Holland was difficult. It had a beach, sand dunes, and then low-lying areas with many ditches and canals. The Dutch engineers also started flooding more areas to make it harder for the invaders to move.
_forces_near_Bergen,_by_Dirk_Langendijk_(1748_-_1805).jpg)
The Duke of York planned a bold attack on September 19, dividing his forces into four columns. The Russian right wing started too early in the dark, causing confusion and friendly fire. They captured Bergen but were pushed back by French counter-attacks. The Russian general, Hermann, was captured. This part of the attack failed.
The other columns also faced difficulties with the terrain and Dutch defenses. While some British forces made progress, the retreat of the Russian troops forced them to pull back as well. The fourth column, under General Abercromby, reached Hoorn without a fight. However, the planned advance from Hoorn to outflank the French was impossible due to prepared obstacles. After the other columns retreated, Abercromby also had to return to his starting position.

In the end, neither side gained territory in this battle. Both sides suffered significant losses.
The Battle of Alkmaar
After the Dutch fleet surrendered, the British navy controlled the Zuider Zee. Surprisingly, the British did not use this advantage to land troops near Amsterdam, which was poorly defended at the time. This missed opportunity could have ended the campaign much earlier.
On land, the Anglo-Russian forces received more Russian reinforcements. The Duke of York delayed his next attack for two weeks due to bad weather. This gave the French and Dutch time to complete their flooding and defenses. The Langedijk (a long dike) became a narrow "island" in a shallow lake, making it very difficult to attack.

When the weather improved in early October, the Duke of York planned a new attack, known as the Battle of Alkmaar (or "Second Bergen") on October 2, 1799. The British and Russian forces advanced slowly, facing tough resistance in the dunes and plains. The French and Dutch fought a steady retreat, falling back to Bergen and Koedijk.
In the afternoon, a British brigade advanced too far and was counter-attacked by the French. Later, General Abercromby's column on the beach made very slow progress because the tide was coming in, making the beach narrow and difficult to cross. French sharpshooters and cavalry attacked them.
By nightfall, Abercromby had passed Bergen, threatening to outflank the French. General Brune, feeling threatened, ordered a general retreat from Bergen and other positions. The French and Dutch fell back to a new defensive line, where they waited for the next move.
The Battle of Castricum
Most of North Holland was now in Anglo-Russian hands, but much of it was flooded. This meant the British couldn't get supplies from the land. Supplies had to be brought by sea to Den Helder, which was difficult due to constant rain. The Duke of York's forces were also shrinking due to sickness. By the Battle of Castricum on October 6, his effective force was only about 27,000 men.
Brune had reinforced his army with six French battalions. On the morning of October 6, the Anglo-Russian forces attacked French outposts. The Russians pushed forward and attacked Castricum, a village that was fiercely defended. The village changed hands several times throughout the day.
Brune ordered a bayonet attack, which pushed the British and Russians back. A French cavalry charge nearly caused a full retreat, but British cavalry intervened and pushed the French back. However, a counter-attack by Dutch cavalry under Colonel Quaita turned the tide of the battle. The Anglo-Russian troops broke and retreated in disorder. Darkness ended the fighting.
On the Dutch right wing, nothing happened because the area was completely flooded. During the battle, a strange incident occurred when British General Don tried to cross the Dutch lines under a flag of truce. He had papers that seemed to be for stirring up rebellion. The Dutch general, Daendels, arrested Don as a spy.
Anglo-Russian Retreat and Agreement
Even though the Anglo-Russian losses at Castricum were not devastating, the Duke of York decided to retreat completely. He pulled his army back to their original fortified area, the Zijpe polder, giving up all the land they had gained since September 19. They also evacuated cities like Hoorn, Enkhuizen, and Medemblik. The retreat was so quick that two field hospitals full of wounded British soldiers, along with 400 women and children, were left behind in Alkmaar.
By mid-October, the situation was back to how it was before September 19. The Anglo-Russians were trapped in their defenses, and the French and Dutch were besieging them. Bad weather made it hard to get supplies by sea. Facing the possibility of starvation, the Duke of York decided to ask General Brune for an honorable surrender.
Negotiations were quick. Brune initially demanded the return of the captured Dutch fleet. The Duke of York threatened to flood the countryside by breaching a dike. Although the Dutch general Krayenhoff knew this threat wasn't very serious, Brune agreed to a very favorable agreement for the Anglo-Russians.
The Convention of Alkmaar was signed on October 18. It did not mention the return of the ships. The Anglo-Russian troops and the Dutch who had joined them were allowed to leave safely by December 1. There would also be an exchange of 8,000 prisoners of war, including Dutch sailors captured earlier. The British promised to return the fortresses at Den Helder in good condition. The Dutch felt they got the worse end of the deal, but they couldn't get a better agreement.
An armistice (a temporary stop to fighting) began immediately. The evacuation was completed on November 19.
What Happened Next?
The surrender was good for the British and Russians. Their troops were able to leave unharmed and fight in other wars.
The British public and Parliament were initially happy with their troops' performance. Admiral Mitchell and General Abercromby received honors. However, when the failure of the expedition and its high cost became clear, public opinion changed.
For the Batavian Republic, the losses were severe. The Dutch navy lost 16 ships-of-the-line and many other vessels. The British claimed these ships for the old Stadtholder, but later some were "bought" by the Royal Navy.
In France, the failure of this expedition may have helped lead to the fall of the Directoire government. Napoleon Bonaparte then took power in a coup d'état.
See Also
- Battle of Callantsoog
- Battle of Krabbendam
- Battle of Bergen (1799)
- Battle of Alkmaar (1799)
- Battle of Castricum
- Convention of Alkmaar
- Vlieter Incident
Images for kids
-

A painting of the Battle of Callantsoog
-
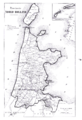
19th century map of North Holland
-
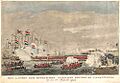
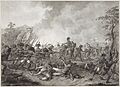
The landing of British forces at Callantsoog
-
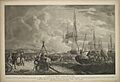
Abercromby, Duncan and Admiral Mitchell make their landing, 27 August 1799
-
Batavian Grenadiers and Fuselier, by Dirk Langendijk
-
Capture of Lieutenant-General Hermann at Bergen
-
Detail of the Arc de Triomphe with on the top right the name "Alkmaer"
-

Battle of Castricum, by Charles Rochussen
