
Battle of Camperdown facts for kids
Quick facts for kids Battle of Camperdown |
|||||||
|---|---|---|---|---|---|---|---|
| Part of the naval operations during the War of the First Coalition | |||||||
 The Battle of Camperdown, 11 October 1797, Thomas Whitcombe |
|||||||
|
|||||||
| Belligerents | |||||||
| Commanders and leaders | |||||||
| Strength | |||||||
| 16 ships of the line 2 frigates 1 sloop 4 cutters 1 lugger (OOB) |
15 ships of the line 6 frigates 4 brigs 1 aviso (OOB) |
||||||
| Casualties and losses | |||||||
| 203 killed 622 wounded |
540 killed 620 wounded 3,775 captured 9 ships of the line captured 2 frigates captured |
||||||
The Battle of Camperdown was a huge naval battle fought on October 11, 1797. It took place between the British North Sea Fleet, led by Admiral Adam Duncan, and the Batavian Navy (Dutch fleet), led by Vice-Admiral Jan de Winter. This battle was the most important fight between British and Dutch forces during the French Revolutionary Wars. The British won completely, capturing eleven Dutch ships without losing any of their own.
In 1795, the Dutch Republic was taken over by the French Republic. It was then renamed the Batavian Republic, which was a state controlled by France. In early 1797, the Dutch fleet was ordered to join the French fleet in Brest. However, this meeting never happened. The French and Dutch allies failed to use the chance given by the Spithead and Nore mutinies. These mutinies had made the British Channel and North Sea fleets unable to fight in the spring of 1797.
By September, the Dutch fleet under De Winter was blocked inside their harbor in the Texel by Admiral Duncan's British North Sea fleet. In early October, Duncan had to go back to Yarmouth for supplies. De Winter used this chance to make a quick trip into the North Sea. When the Dutch fleet returned to the Dutch coast on October 11, Duncan was waiting. He stopped De Winter near the village of Camperduin.
Duncan's ships attacked the Dutch line of battle in two loose groups. They broke through the Dutch line at the back and front. The battle then split into two messy fights. The British won in the south, where they had more ships. In the north, the fight was more even, focusing on the main flagships. As the Dutch fleet tried to escape to shallower waters, the British ships from the south joined the fight in the north. This eventually forced the Dutch flagship, Vrijheid, and ten other ships to surrender.
After their flagship was lost, the remaining Dutch ships scattered and retreated. Duncan called his British ships back with their captured prizes to return to Yarmouth. On the way, a series of strong storms hit the fleet. Two captured ships were wrecked, and another had to be taken again before the rest reached Britain. Both sides had many casualties. The Dutch aimed their cannons at the hulls (bodies) of enemy ships, like the British did. This caused more losses among British crews than they usually had against other European navies. The Dutch fleet was badly damaged and could no longer fight as a strong independent force. They lost ten ships and over 1,100 men.
Contents
Why Did the Battle of Camperdown Happen?
In the winter of 1794–1795, French forces took over the nearby Dutch Republic during the French Revolutionary Wars. The French then changed the country into a client state called the Batavian Republic. This new state joined France against its enemies in the War of the First Coalition.
One of the most important things the French gained was the Dutch Navy. The Dutch fleet greatly helped the French forces in northern Europe. These forces were mainly based in Brest on the Atlantic Ocean. Their main enemy was the Royal Navy's Channel Fleet. Because the main Dutch fleet was anchored near the Texel, the British changed how they spread out their warships in Northern Europe. They started focusing more on the North Sea.
The British Navy had a shortage of men and equipment. Other war areas were seen as more important. So, small, old, and poorly kept ships were brought out of storage. They were based in ports in East Anglia, mainly Yarmouth. Admiral Adam Duncan was put in charge. Duncan, who was 65, had fought in many wars before, like the War of the Austrian Succession and the American Revolutionary War. He was known for his strength and size, standing at 6 feet 4 inches (1.93 meters).
The French Navy had lost many battles in the first years of the war. In late 1796, the French Atlantic Fleet tried to invade Ireland. This plan, called the Expédition d'Irlande, also failed badly. Twelve ships were lost, and thousands of men drowned in severe winter storms.
Irish leaders, like Wolfe Tone, then asked the new Batavian state for help. They were promised support from a combined French and Dutch fleet in 1797. A plan was made to join the French and Dutch fleets and attack Ireland together. Tone joined Vice-Admiral Jan de Winter on his flagship, Vrijheid, in the Texel. About 13,500 Dutch troops were ready for the operation. The fleet waited for the right easterly winds to sail past the British blockade and down the English Channel.
What Were the Mutinies of 1797?
The early years of the war were successful for the Royal Navy. But fighting a global conflict put a lot of stress on its equipment, men, and money. The navy grew from 134 ships in 1793 to 633 by 1797. The number of sailors increased from 45,000 to 120,000. This was only possible because of the impressment service. This service forced people, including criminals and beggars, to join the navy.
Sailors' wages had not increased since 1653 and were often paid months late. Food was terrible, shore leave was not allowed, and discipline was very strict. Tensions had been growing in the fleet. In February 1797, sailors from the Channel Fleet at Spithead sent letters asking for better conditions. These requests were ignored.
On April 16, the sailors started the Spithead Mutiny. This was mostly a peaceful strike action. Sailors from each ship formed a group to talk with the authorities and keep order. The fleet remained stuck for a month. Finally, Lord Howe negotiated improvements. These included higher pay, removing unpopular officers, and better conditions for all sailors.
While the Spithead mutiny was happening, Admiral Duncan kept order in the North Sea Fleet at Yarmouth. He did this through his strong personality. On May 1, men on his flagship, HMS Venerable, tried to start a revolt. Duncan threatened the leader. He then gathered his officers and Royal Marines and confronted the men. His strong words made them stop. He later pardoned them.
A week later, a similar mutiny happened on HMS Adamant. Duncan again acted quickly. He boarded Adamant and asked if anyone questioned his authority. When a sailor stepped forward, Duncan grabbed him and held him over the side of the ship. He shouted, "My lads – look at this fellow – he who dares to deprive me of command of the fleet." The mutiny ended almost immediately.
The Nore Mutiny

Despite his early success, Duncan could not control a larger revolt that started on May 15 among ships based at the Nore. This became known as the Nore Mutiny. Led by a sailor named Richard Parker, these mutineers quickly became a threat to ship traffic in the Thames Estuary.
Duncan was told his fleet might have to attack the mutineers. He was not keen but said he would do it if there was no other way. When his crew heard this, they did not like the idea. But they promised to stay loyal to their admiral.
Then, news arrived that the Dutch fleet under De Winter was getting ready to sail. Duncan's fleet was ordered to block the Dutch coast. Duncan gave orders to sail, but his men disobeyed. Ship after ship removed their officers and joined the mutineers at the Nore. Eventually, Duncan was left with only his own Venerable and Hotham's Adamant to stop the entire Dutch fleet. Duncan later wrote that being deserted by his own fleet in front of the enemy was a disgrace he never thought possible.
Duncan knew that if the Dutch fleet escaped into the North Sea at this weak moment, it could be terrible for Britain. He stayed in position off the Texel for three days. The wind was perfect for the Dutch to sail out. He made his two ships look like different vessels each day. He also ordered the frigate HMS Circe to send many confusing signals to a fake British fleet beyond the horizon.
He was later joined by two more ships, HMS Russell and Sans Pareil. On the fourth day, with conditions still perfect for the Dutch, he anchored his small group of ships in the Marsdiep Channel. He ordered them to fight until their ships sank, blocking the channel. He told his men, "The soundings are such that my flag will continue to fly above the water after the ship and her company have disappeared."
The expected attack never came. The Dutch army that was supposed to join the fleet was not ready. Duncan's misleading signals had convinced De Winter that a large British fleet was waiting. The winds then changed direction. On June 10, six more ships joined Duncan's group from the Channel Fleet. On June 13, a Russian squadron arrived.
While Duncan was at sea, the Nore Mutiny fell apart. Government forces had blocked the mutineers, cutting off their food. Public support was against the mutiny. Parker threatened to hand his ships over to the French. Fighting broke out between the radical leaders and the moderate sailors. Ships gradually left Parker and returned to their anchorages. By June 12, only two ships still flew the red flag of the mutineers. Finally, Parker's own HMS Sandwich surrendered on June 14.
How Did the Fleets Meet?
By mid-August 1797, De Winter decided that trying to join the French at Brest to invade Ireland was not practical. This was partly because Duncan's fleet was strong again, with 17 ships of the line. Duncan's men were also better trained and more experienced. They had spent much longer at sea and could fire three shots a minute compared to the Dutch two.
De Winter was also worried about his men's loyalty. French control over the Batavian Republic and being forced to fight in distant wars were unpopular. Many Dutch people still supported the House of Orange.
When the British Admiralty heard this, they called Duncan's blockade fleet back to Yarmouth for repairs on October 1. Duncan insisted on sending some of his ships back to the Dutch coast two days later. Captain Henry Trollope in HMS Russell, along with HMS Adamant and smaller ships, arrived off Texel on October 6.
Their arrival matched De Winter's delayed expedition. De Winter was worried his men were unhappy and lacked experience from being in port so long. He had reluctantly agreed to orders to sweep the Southern North Sea. He hoped to find weak British forces or draw them into shallow Dutch waters. He might also have hoped to join the French at Brest if he could pass undetected.
His fleet had 16 ships of the line and smaller support ships. His orders from The Hague told him to remember how Dutch admirals had often honored their flag, even against stronger enemies. Preparing the ships took time. The Dutch did not leave the Texel until 10:00 on October 8. De Winter sailed southwest, hoping to meet another Dutch ship near the River Maas. Within hours, Trollope had found and followed De Winter.
Duncan's observation ships constantly watched the Dutch fleet. When the Dutch prepared to sail, a message was sent to Duncan. The message arrived in Yarmouth early on October 9. By then, the British fleet was already getting ready to sail. Duncan sent a final message to the Admiralty: "The wind is now in the NE and [I] shall make good course over to them, and if it please God, hope to get at them. The squadron under my command are unmoored and I shall put to sea immediately."
Before midday, Duncan sailed with 11 ready ships towards the Texel, planning to stop De Winter on his return. By evening, his fleet was at full strength. On the afternoon of October 10, his ships were anchored off the Dutch port. Scouts reported 22 merchant ships but no sign of De Winter's warships.
Since leaving the Texel, De Winter could not escape Trollope's ships. On the evening of October 10, some Dutch ships tried to drive Trollope's group away but could not catch the faster British vessels. After failing to meet off the Maas, De Winter turned northwest. He sailed off Lowestoft in Suffolk and again tried to drive away Trollope's ships without success.
There, reports from Dutch fishing boats told De Winter that Duncan was off the Texel. He immediately called his ships back and ordered the fleet to turn towards the Dutch coast, heading for Scheveningen. Meanwhile, more messages from Trollope reached Duncan. Duncan turned his fleet west, following the Dutch coastline.
At 07:00 on October 11, Trollope's ships saw sails to the northeast. After confirming it was Duncan's fleet, they signaled that the Dutch fleet was about 3 nautical miles (5.6 km) further southwest. The Dutch fleet became visible to Duncan's fleet by 08:30. Captain Peter Halkett of Circe first clearly saw them from the mainmast. At this point, the Dutch were sailing towards land, about 9 nautical miles (17 km) off the coast of North Holland, near Camperduin. The weather was bad, with rough seas and strong winds, but hundreds of Dutch civilians gathered on the dunes to watch the coming battle.
How Did Duncan Plan His Attack?

At 09:00, Duncan signaled to prepare for battle. De Winter arranged his ships into a line of battle to meet the British attack. They sailed northeast, close to the shore. Duncan wanted to break through the Dutch line, like Lord Howe did three years earlier. But the Dutch formation and their closeness to shore made this hard.
Duncan then ordered his ships to form a line and sail southeast with the wind behind them. Soon after, worried the Dutch might reach shore before he could fight them, Duncan ordered his fleet to turn south and attack directly. He fired signal guns and told his captains to "engage the enemy as arriving up" and for his front ships to attack the Dutch rear.
At 11:00, Duncan tried to close gaps between his ships. He told faster ships to slow down. He then tried to form a line again. But he saw the Dutch fleet was still in order and getting closer to the dangerous coast. Duncan then changed his orders. He told the whole fleet to turn towards the Dutch and attack directly, with each ship attacking its opponent.
Many of these signals were not done well or were wrong. Visibility was low, and Trollope's ships used old signal codes. So, many ships did not understand Duncan's plan. The advancing line became a messy group of scattered ships, split into two loose parts. The orders came so fast that at least one captain, John Inglis of HMS Belliqueux, threw his signal book down in frustration and shouted, "Up wi' the hel'lem and gang into the middle o't."
Duncan's orders split his fleet into two groups. Each group sailed loosely towards the Dutch line. The northern group had six third rate ships of the line, two fourth rate ships, and the frigate Circe. This group was led by Venerable, with HMS Triumph and Ardent close behind. They aimed for the Dutch flagship, Vrijheid, which was fifth in the Dutch line.
The southern group had eight third rate ships of the line and the frigate HMS Beaulieu. Vice-Admiral Richard Onslow on HMS Monarch led this group. Onslow's force aimed for the back of the Dutch line, to hit the fourth ship from the end. Behind the two groups were smaller ships that repeated Duncan's signals. At 11:53, Duncan signaled for each ship to pass through the Dutch line and attack from the other side. But bad weather stopped distant ships from seeing the signal.
De Winter had planned to make his line strong and retreat to shallower waters while Duncan formed his line. But the sudden, messy British attack confused his plans. Gaps opened in his line, leaving the last four ships greatly outnumbered. De Winter urgently ordered his front and middle ships to fall back and help the rear. But there was little time.
The British ships were almost all larger and stronger than the Dutch ones. Their crews were experienced in rough weather. The Dutch crews, stuck in port for a year, knew little about fighting at sea. The Dutch line of battle had a second line of ten frigates, brigs, and smaller ships to the east. These ships were well-armed. They were placed to cover the gaps in the Dutch line, ready to fire at any British ships trying to break through.
The Battle of Camperdown Begins
What Happened to the Dutch Rear Guard?
At 12:05, Duncan signaled his ships to engage the enemy closely. At the same time, the Dutch ship Jupiter, under Rear-Admiral Hermanus Reijntjes, opened fire on the fast-approaching Monarch. The Dutch ships waited until the British were very close to make their shots most effective. Soon, Onslow's flagship was under fire from the entire Dutch rear guard. Monarch was damaged trying to break through the Dutch line between Jupiter and Haarlem at 12:30.
On Monarch, Captain Edward O'Bryen said he could not see where his ship could pass between the Dutch ships. Admiral Onslow replied, "the Monarch will make a passage." Onslow fired raking broadsides into both ships. He then turned to place his ship alongside Reyntjes' flagship. The Dutch frigate Monnikkendam and the brig Daphné tried to fill the gap Monarch had made. They fired at the British ship. Onslow fired back at the smaller ships, damaging the frigate's wheel and rigging. The frigate fell back, followed by the damaged brig.
HMS Powerful followed Monarch. It passed through the same gap, fired at Haarlem again, and heavily damaged Monnikkendam. At the same time, HMS Montagu attacked Alkmaar. HMS Russell attacked the last Dutch ship, the 56-gun Delft. HMS Monmouth passed between Alkmaar and Delft, firing at both. HMS Director (under William Bligh of Bounty fame) engaged the damaged Haarlem at close range.
The straggling HMS Veteran joined the northern part of the fight. It cut across Jupiter and then chased the Dutch center. Adamant arrived late, joining the attack on the already damaged Haarlem. Only HMS Agincourt stayed out of the battle, passing the Dutch line from far away. Its captain, John Williamson, was later removed from his command.
The end of the Dutch line became a chaotic mess. Eight British ships fought four Dutch ships and the frigate Monnikkendam. The fighting was so close that British ships risked firing at each other in the rough seas, heavy rain, and poor visibility. The Dutch center, led by Rear-Admiral Johan Bloys van Treslong, pulled away.
The isolated Dutch rear guard was quickly overwhelmed. Jupiter, Haarlem, Alkmaar, and Delft all surrendered to Onslow's attack before 13:45. The damaged Monnikkendam was taken by the frigate Beaulieu.
The Fight at the Front of the Lines
_-_The_Battle_of_Camperdown_-_N01659_-_National_Gallery.jpg)
While the Dutch rear was being defeated, a more even fight was happening in the north. This fight focused on the two flagships. Duncan's Venerable attacked De Winter's Vrijheid 18 minutes after Monarch broke the line in the south. Duncan had wanted to break the line between Vrijheid and the next ship, Staaten Generaal. But Staaten Generaal stayed too close to the flagship. Their combined fire was so dangerous that Duncan instead cut through behind Staaten Generaal. He fired at Story's ship twice, causing it to drift away as Duncan engaged Vrijheid.
While Venerable had moved south, Vrijheid had been attacked by Ardent under Captain Richard Rundle Burges. The smaller British ship soon had over a hundred casualties, including Burges who was killed. This was due to fire from De Winter's flagship and the ship ahead, Admiraal Tjerk Hiddes De Vries. Only when Venerable arrived next to Vrijheid did Ardent get a short break. During the fight, Burges's men "fought like maniacs."
Soon, both Venerable and Ardent were surrounded. At least one frigate from the second line joined the attack. At the height of the battle, the flags on Venerable were shot down. To show the flagship had not surrendered, a sailor named Jack Crawford climbed the mainmast and put them back up.
To help Duncan, Captain William Essington of HMS Triumph and Captain Sir Thomas Byard of HMS Bedford joined the battle. Triumph came close to the Dutch Wassenaar and fired heavily. Bedford attacked Admiraal Tjerk Hiddes De Vries and Hercules. At the front of the line, Beschermer was attacked by Belliqueux. Ahead of this, HMS Isis and Gelijkheid fought side by side.
The Dutch central division joined the battle at the front of the line. They caused much damage to all British ships, especially Venerable. The British flagship was soon alone among the Dutch front ships. It fought Vrijheid, Staaten General, Admiral Tjerk Hiddes De Vries, and Wassenaar at the same time.
Despite the odds, Duncan fought hard. The British disabled two opponents. Captain Dooitze Eelkes Hinxt of Beschermer was wounded, and his ship drifted away. Shots from Bedford or Triumph set a powder barrel on Hercules on fire. The fire on Hercules caused a pause in the battle. Its crew tried to put out the blaze, and other Dutch ships moved away from the burning vessel. Soon after, the damaged Wassenaar surrendered to Triumph. Triumph then moved towards the fight between Vrijheid and Venerable. The crew of Wassenaar raised their flags again after being fired on by a Dutch brig.
British Reinforcements Arrive

After Onslow's victory over the Dutch rear guard, he ordered his least damaged ships to help the outnumbered British ships at the Dutch front. Powerful and Director were the quickest to respond, joining the attack on Vrijheid at 14:00. Russell, moving north, found the now extinguished Hercules. Its crew had thrown all their ammunition overboard during the fire. The ship was defenseless, and Commander Ruijsoort surrendered immediately.
The rest of the British fleet now arrived. Captain John Wells of HMS Lancaster fired on the Beschermer near the front of the Dutch line. Knowing their ship could not resist, Beschermer's officers turned towards the shore. The unengaged parts of the Dutch line quickly followed. With British reinforcements and parts of the Dutch fleet retreating, the battle was almost over. The damaged Wassenaar surrendered a second time to Russell. Admiraal Tjerk Hiddes De Vries and Gelijkheid, both too damaged to escape, also lowered their flags.
Only the Dutch flagship remained in combat. For an hour, De Winter kept fighting. Director stayed at the stern of Vrijheid and fired at it repeatedly. By 15:00, all three masts were down, blocking the cannons on the right side of the ship. De Winter was the only officer not hurt. He stood on his damaged deck, still refusing to lower his flag.
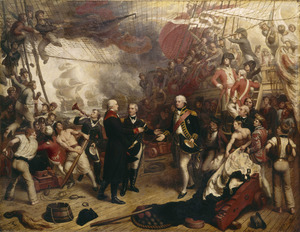
To end the fight, Captain William Bligh of Director came within 20 yards (18 m) of the Dutch flagship. He asked if De Winter surrendered. The Dutch admiral replied, "What do you think about it?" He then tried to raise signals for help from his fleet, but the ropes had been shot away. De Winter then called the ship's carpenter and told him to fix his small boat. The admiral wanted to move to another ship and keep fighting. When British sailors from Director boarded the drifting flagship, De Winter was found helping the carpenter. When told he was a prisoner of war, he said, "This is my destiny not foreseen." After checking on a badly wounded officer, he followed the boarding party to their boat to go to Venerable.
What Happened After the Battle?

De Winter was immediately taken to see Duncan. The Dutch officer offered his sword as a sign of surrender. Duncan refused the weapon. Instead, he shook De Winter's hand, saying, "I would much rather take a brave man's hand than his sword."
Besides the ships lost in the rear, five ships from the Dutch front had been captured. The frigate Ambuscade was also captured. The remaining Dutch ships had fled towards the shallow coastal waters. Duncan did not chase them. The Dutch coast was only 5 nautical miles (9.3 km) away. His ship was in only 9 fathoms (18 yards (16 m)) of water. The weather was too bad, and his ships too damaged to risk fighting in shallow waters. Instead, he ordered his ships to secure their captured prizes and return to Britain.
Casualties were very high on both sides. Historians like William James noted that British losses were much higher than in battles against French or Spanish fleets. This was because the Dutch, like the British, aimed at the hulls of enemy ships. Other navies often aimed at masts and rigging to disable ships.
The British ships hit hardest were those in the first wave. Ardent had 148 casualties, Monarch had 136, and Belliqueux had 103. Both Adamant and Agincourt had no men killed or wounded. Captain Burges of Ardent was killed. Captain Essington of Triumph was wounded. In total, British losses were 203 killed and 622 wounded. Later, higher figures of 228 killed and 812 wounded were reported. Many British ships were badly damaged and took on a lot of water. Venerable had to be completely taken apart and rebuilt before it could be used again.
Dutch casualty reports were unclear and incomplete. Captain Hinxt of Beschermer and Captain Holland of Wassenaar were killed early in the battle. Captain Van Rossum of Vrijheid died from a cannonball wound. Admiral Reijntjes died as a prisoner in England from his wounds. His remains were later returned to the Netherlands with full military honors. Many Dutch sailors were wounded, including Rear-Admirals Bloys van Treslong and Story. De Winter was one of the few Dutch officers not hurt or killed. He later said it was a marvel that two such large men as Duncan and himself survived the battle. In total, Dutch losses were 540 killed and 620 wounded. Vrijheid was hit the worst, losing almost half its crew.
The Journey Home
On Venerable, Duncan gathered all fit men for a church service. They gave thanks to God for their victory. For the next 24 hours, Duncan, who was 66, stayed on duty without a break. He organized the scattered fleet for the journey home. Duncan did find time to play a game of whist with De Winter after dinner. When the Dutch admiral lost, he joked that it was hard to be beaten twice in one day by the same man.
On October 13, Duncan finished his official report. He sent it ahead with Captain William George Fairfax on the cutter Rose. He praised all his men, especially Trollope and the late Burges, calling him a "good and gallant Officer...a sincere Friend". De Winter was allowed to send reports to the Batavian government. He blamed Story and his center for not fighting longer. He also said the British had too many ships and that he might have captured some if he had been better supported. When this letter was published, it caused much criticism in Britain.
On the afternoon of October 12, a strong storm hit. It caused more damage to the battered ships. Water poured through the many shot holes in the hulls. On the Dutch ships, the situation was very dangerous. Casualties were much higher, especially on Vrijheid. The small number of British sailors put on board as prize crews could not manage alone. In the high winds, many masts fell, and huge amounts of water leaked into the hulls.
Delft, captured early in the battle, was under the command of Dutch Lieutenant Heilberg and British Lieutenant Charles Bullen. It had a small British prize crew of 69 men. Ninety-three Dutch prisoners had been removed, but 76 wounded Dutch men remained. As the storm grew, it became clear the ship would not reach Britain. A large board was raised with the message "The ship is sinking."
Boats from nearby ships quickly began evacuating the Dutch prisoners. Bullen offered Heilberg a place in the first rescue boat. But the Dutch officer refused, pointing to the wounded men who had been brought onto the main deck as the lower decks flooded. He said, "But how can I leave these men?" Bullen replied, "God bless you, my brave fellow! Here is my hand; I give you my word I will stay here with you!" The prize crew left on the second boat. Bullen and Heilberg waited for a third trip for themselves and 30 wounded men. But before more help arrived, Delft suddenly sank. Bullen and Heilberg jumped clear. Both were seen in the water, but only Bullen reached safety.
Two other captured ships were lost. Monnikkendam had a prize crew of 35 men. It got separated in the storms and lost its masts. The crew tried to fix temporary masts, but they also fell. The hull flooded to 14 feet (4.3 m) deep. On October 12, the prize master ordered the ship to be run onto the Dutch coast at West Cappel. Local boats rescued everyone. The 35 British prisoners were taken to a prison hulk at Flushing. The ship was too damaged to repair. The captured frigate, Ambuscade, also ran aground and sank. Its prize crew was taken prisoner. But that ship was later saved and returned to Dutch service.
The surviving Dutch ships had few problems returning to the Texel, except for Brutus. Admiral Bloys van Treslong had sailed for the coast off Hinder with two brigs. There, on October 13, the 40-gun British frigate HMS Endymion found him. Endymion closed with the larger, but damaged, Dutch ship and opened fire. Brutus fired back. Endymion hit its opponent twice. But the strong tides pulled the British ship out of range. The British frigates then returned to Duncan's struggling fleet.
What Was the Impact of the Battle?
On October 17, 1797, Duncan's convoy began to arrive at Yarmouth. They were met with huge celebrations. News of the victory had already spread across Britain. On October 20, Duncan was made Viscount Duncan of Camperdown and Baron Duncan of Lundie. Admiral Onslow was made a baronet. Captains Henry Trollope and William George Fairfax were knighted.
King George III wanted to meet Duncan. On October 30, he set out for Sheerness in the royal yacht HMY Royal Charlotte. But strong winds forced him back. Unable to reach Duncan's flagship, the King instead rewarded the fleet by pardoning 180 men who had been punished for their part in the Nore Mutiny. Gold medals were given to the captains. Both Houses of Parliament thanked them for their victory. All first lieutenants were promoted. Duncan and Onslow received valuable swords. Duncan was also given a pension of £2,000 a year.
When Duncan traveled to a reception in The Guildhall on November 10, a crowd surrounded his carriage. They unhitched the horses and pulled it themselves up Ludgate Hill to show their respect. On December 23, the King led a thanksgiving ceremony in St Paul's Cathedral in London. Duncan carried De Winter's flag from Vrijheid, and Onslow carried Reijntjes' flag from Jupiter.
Not all reactions were positive. Some of Duncan's captains were criticized for not engaging the enemy quickly. The most criticism fell on Captain John Williamson of Agincourt. Agincourt had barely fought and had no casualties. Williamson was accused of not doing his duty. He was removed from his command.
All the captured Dutch ships were bought into the Royal Navy. None of these ships were ever in good enough condition for service in open waters. The damage from Camperdown was too severe. Also, Dutch ships had lighter hulls and flatter bottoms. They were built for shallow Dutch waters, not the open ocean. All the captured ships were used only for harbor duty.
The battle was considered the greatest victory for a British fleet against an equal enemy force up to that time. The losses suffered by the Dutch Navy gave the Royal Navy control of the North Sea. This also hurt French plans to invade Ireland. It might have even influenced Napoleon Bonaparte's decision to give up attacking Britain directly in early 1798.
In 1799, a large British and Russian force landed in the Netherlands. The rest of the Dutch Navy, under Admiral Story, surrendered without a fight. This event, known as the Vlieter Incident, happened because of disagreements among the Dutch officers and sailors. The Dutch sailors threw their ammunition overboard.
In Britain, people were very relieved that the Navy's authority was back after the mutinies. This helped the British government continue the war by restoring confidence in British naval power in home waters. Christopher Lloyd notes that 1797 led to "a new and blatant patriotism." A popular rhyme at the time showed how people felt: "They say they are going to make a Lord of our Admiral. They can't make too much of him. He is a heart of oak; he is a seaman every inch of him, and as to a bit of a broadside, it only makes the old cock young again."
Duncan's tactics at Camperdown were similar to Nelson's tactics at the Battle of Trafalgar in 1805. Duncan himself felt he could have done more, saying, "We were obliged ... to be rather rash in our attack. Had we been ten leagues at sea none would have escaped." But his opponent, De Winter, praised him. De Winter wrote, "Your not waiting to form line ruined me: if I had got nearer the shore and you had attacked, I should probably have drawn both fleets on it, and it would have been a victory for me, being on my own coast." Duncan's health got worse after the battle, forcing him to retire in 1799. He died in 1804.
De Winter's actions during the battle were praised. Edward Pelham Brenton wrote that the Dutch admiral showed "the most undaunted valour." William James noted that "Batavian prowess" still earned respect. De Winter was released in 1798. He became the Dutch ambassador to France. He then commanded the Dutch fleet again at the start of the Napoleonic Wars. He died in Paris in 1812.
The battle became a popular subject for artists. Many paintings are in national collections in the UK. These include works by Thomas Whitcombe and Philip de Loutherbourg in the Tate Gallery. The battle also inspired composers like Daniel Steibelt and Jan Ladislav Dussek.
The Royal Navy has honored the battle with four ships named HMS Camperdown and seven named HMS Duncan. These ships have kept ties with Duncan's hometown of Dundee. In Dundee, the Battle of Camperdown is remembered at Camperdown House. This was once the home of the Viscounts Camperdown. It was finished in 1828 and is now a public park. The 200th anniversary of the battle was celebrated in Dundee in 1997. A memorial service was held, and a new statue of Admiral Duncan was unveiled.
Images for kids
-
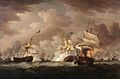
The Battle of Camperdown, Thomas Whitcombe, 1798, Tate
-
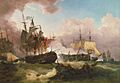
The Battle of Camperdown, painted by Philip de Loutherbourg in 1799.
-

Admiral Duncan Receiving the Sword of the Dutch Admiral de Winter at the Battle of Camperdown, 11 October 1797, painted by Samuel Drummond.
