Battle of Ctesiphon (1915) facts for kids
Quick facts for kids Battle of Ctesiphon |
|||||||
|---|---|---|---|---|---|---|---|
| Part of the Mesopotamian Campaign of World War I | |||||||
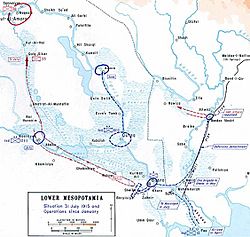
 British advance towards Baghdad, 1915. |
|||||||
|
|||||||
| Belligerents | |||||||
| Commanders and leaders | |||||||
| Strength | |||||||
|
|
||||||
| Casualties and losses | |||||||
| 4,600 | 6,200 to 9,500 | ||||||
The Battle of Ctesiphon was a major fight during World War I. It happened in November 1915 between the British Empire and the Ottoman Empire. This battle was part of a larger conflict called the Mesopotamian Campaign.
The British forces, which included many soldiers from British India, had been quite successful in Mesopotamia. They had landed in the area in November 1914. One main reason for the British being there was to protect an important oil refinery in Abadan, Iran.
The British army, led by General Townshend, had won several smaller battles. However, after about a year of fighting, the Ottoman forces managed to stop the British advance. This happened during two days of very tough fighting at Ctesiphon.
Contents
Where did the Battle of Ctesiphon happen?
Ctesiphon is located on the west side of the Tigris River in the desert of modern-day Iraq. It's about 610 kilometers (380 miles) upstream from Basra. The town is also about 26 kilometers (16 miles) southeast of Baghdad.
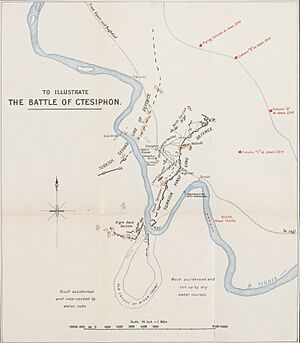
This area was a good place for defense. It was located in a 10-kilometer (6-mile) long bend of the Tigris River. There were also old ruins from ancient empires, which could be used for observation.
The Ottoman army had built strong, hidden trenches across the river. They had two lines of trenches. There was also a 6-meter (20-foot) high ancient wall about 5 kilometers (3 miles) south of their main line. This wall was used by the Ottoman soldiers to watch for the British.
Who fought in the Battle of Ctesiphon?
The Ottoman forces had about 18,000 to 20,000 soldiers and 52 guns. Their main commander in Mesopotamia was Khalil Pasha. However, the commander leading the troops in the field during this battle was Lieutenant General Nureddin. The British thought Nureddin was not a very good general, which might have affected their battle plans.
Nureddin's army had four divisions. Two of these divisions were mostly Arab soldiers. The other two were newer divisions, mainly made up of Turkish soldiers. They were a mix of active and reserve troops.
The British force was called the 6th (Poona) Division. They had about 11,000 soldiers. Some British troops had been left behind to guard the town of Kut, which they had recently captured.
The British advance towards Ctesiphon was slow. This was partly because of bad weather and wet ground. General Townshend also didn't really want to go further. But the main British commander, General Nixon, ordered Townshend to capture Baghdad. So, Townshend began his march up the Tigris River.
How did the British plan their attack?
General Townshend planned to divide his army into four groups, called columns.
- Three columns (A, B, and C) were infantry groups. They were supposed to attack the Ottoman lines from the front.
- The fourth column, called the "flying column," was a mix of cavalry (soldiers on horseback) and infantry. This group was meant to go around the left side of the Ottoman lines.
Two river boats, including a gunboat and HMS Firefly, were also supposed to help with the attack.
How did the Ottomans plan their defense?
Lieutenant General Nureddin had more than 55 days to get his defenses ready, and his soldiers did a great job. He arranged his troops in an L-shape formation.
- The 38th Division held the long part of the L.
- The newer 45th Division defended the most exposed part of the line, the short leg of the L on the left.
- There were 12 strong points along the first trench line. There was also a complete second line of trenches for them to fall back to if needed.
- The experienced 51st Division was kept in reserve.
- The 35th Division was across the river.
The Ottoman artillery (big guns) were placed in the middle. From there, they could support either the left side of the line or the center. The artillery was told to shoot at the British gunboats first, then help the Ottoman reserve troops.
The Battle Begins
General Townshend wanted to surprise the Ottomans, just like he had done in an earlier battle. So, he ordered his troops to march at night on November 21, 1915. The plan was to attack at dawn on November 22.
The attack started on time. However, because of the difficult ground on the west side of the river, the British ended up attacking the stronger Ottoman positions on the east side.
The British river gunboats were supposed to help, but they couldn't. First, Ottoman guns on the west bank fired heavily on them. Second, the Tigris River had many mines and obstacles, making it hard for the boats to move.
At the start of the battle, the British C-Column, which was closest to the river, faced heavy gunfire. They couldn't reach the first trench line. The A-Column, in the middle, also got stopped before reaching the trenches.
On the right side, the B-Column (made up mostly of Punjabi and Gurkha soldiers) managed to reach the first line of trenches. They forced the Ottoman soldiers to retreat and chased them towards the second line. Lieutenant General Nureddin quickly sent in his reserve troops from the 45th Division. He also brought the 35th Division from the other side of the river to help. This stopped the British-Indian forces.
Townshend then told the C-Column to fall back and try to use the breakthrough made by B-Column. This was a difficult move, especially with Ottoman soldiers firing at their side. Meanwhile, the "flying column" got stuck in a fight against Turkish and Arab cavalry. Again, Nureddin used his reserves, the 51st Division, very effectively. This stopped Townshend's plan to attack from the side.
By the end of the first day, the British 6th (Poona) Division had captured the first line of trenches. But the British had suffered many casualties (soldiers killed or wounded). The Ottoman forces also had many casualties but still held their main position.
Second Day of Fighting
On the second day, General Townshend tried again to break through the Ottoman lines. He also tried another attack from the side. But the Ottoman forces stopped both attempts. Then, the Ottomans launched a counter-attack with all their available soldiers. The fighting was very tough, but the British line held firm.
Both armies had lost many soldiers and were very tired after two days of intense combat. The Ottoman forces had lost 6,188 soldiers killed or wounded. Some of their divisions, like the 45th Division, lost a very large number of their soldiers.
Third Day: Retreat
On November 24, both generals decided to pull their armies back. General Townshend felt he had to retreat because his army had lost too many soldiers to continue fighting for Baghdad. Lieutenant General Nureddin also thought he had to retreat because of his heavy losses.
However, when Nureddin realized the British were retreating, he quickly turned his army around. He then sent them to chase the British-Indian forces.
What happened after the battle?
The British 6th (Poona) Division had lost about 4,600 soldiers, which was 40% of their force. They were exhausted. Townshend decided they needed to retreat back to Kut to rebuild their strength.
The Ottoman Army had lost 6,188 soldiers. But they had shorter supply lines and could get new soldiers from Baghdad and other areas. Lieutenant General Nureddin chased the British all the way to Kut.
The Battle of Ctesiphon showed a big problem for the British in this campaign: their supply lines were not good enough. The British troops didn't have enough supplies, and their medical teams were too small. This was a problem for both battle injuries and diseases. In a later campaign, when General Maude captured Baghdad, the supplies were much better organized.
The battle also proved that the Ottoman Army could fight very well on its own. Lieutenant General Nureddin took an army that had been defeated several times. He put them in a well-prepared defensive position and successfully held off the British and Indian forces. He did this without any German advisors helping him.
Images for kids


