
Battle of Dogger Bank (1915) facts for kids
Quick facts for kids Battle of Dogger Bank |
|||||||
|---|---|---|---|---|---|---|---|
| Part of the First World War | |||||||
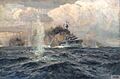
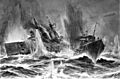
 Battle of Dogger Bank, Arthur James Wetherall Burgess |
|||||||
|
|||||||
| Belligerents | |||||||
| Commanders and leaders | |||||||
| Strength | |||||||
| 5 battlecruisers 7 light cruisers 35 destroyers |
3 battlecruisers 1 armoured cruiser 4 light cruisers 18 torpedo boats 1 Zeppelin |
||||||
| Casualties and losses | |||||||
| 47 killed and wounded 1 battlecruiser disabled 1 destroyer disabled |
1,034 killed and wounded 189 captured 1 armoured cruiser sunk 1 battlecruiser damaged |
||||||
The Battle of Dogger Bank was an important naval battle during the First World War. It happened on January 24, 1915, near the Dogger Bank in the North Sea. This fight was between ships from the British Grand Fleet and the German High Seas Fleet.
The British had a secret advantage: they had intercepted and decoded German radio messages. This meant they knew in advance that a German raiding group was heading for Dogger Bank. So, British ships sailed out to meet them.
The British ships surprised the smaller and slower German group. The German ships quickly turned around to escape. During a long chase, the British caught up and started firing their powerful guns from far away. The British managed to disable the German ship Blücher, which was at the back of their line. However, the British flagship, HMS Lion, was also badly damaged.
Because of some confusing signals, the other British ships stopped chasing the main German group. They focused on sinking the Blücher. By the time Blücher was sunk, the rest of the German ships had gotten away.
The German ships returned to their ports, needing many repairs. Lion also made it back but was out of action for several months. The British didn't lose any ships and had few casualties. The Germans lost Blücher and most of its crew. After this British victory, both navies made changes to their leaders, equipment, and procedures based on what they learned from the battle.
Contents
Why Did the Battle of Dogger Bank Happen?
How Did the British Know?
Before 1914, most international messages traveled through undersea cables. Many of these cables were controlled by Britain. When the war started, Britain cut Germany's cables. This meant Germany had to send messages using wireless radio. They used secret codes to hide their plans.
The British had a secret group called Room 40. This group was made up of experts who broke codes. They got their hands on German codebooks in different ways. For example, they found one from a German ship that ran aground. Another was found in a chest that a British trawler pulled up from the sea.
Room 40 could read many German messages. This meant the British knew where German ships were. They didn't have to waste fuel patrolling the North Sea all the time. Instead, they could save fuel and use the time for training. This secret information gave them a big advantage.
German Attacks on British Coasts
In 1914, the German High Seas Fleet mostly stayed in port. But Admiral Friedrich von Ingenohl, the German commander, planned a raid on the east coast of England. This attack targeted towns like Scarborough, Hartlepool, and Whitby.
On December 16, 1914, German ships, led by Admiral Franz von Hipper, shelled these towns. This attack killed 108 people and wounded 525 civilians. British people were very angry that German warships could attack their coast so easily. The British navy had failed to stop the attacks or catch the German ships.
The German ships escaped in bad weather and poor visibility. They also got away because of British communication problems. This was the first successful attack on Britain since the 1600s. Even though the Germans had no losses, Admiral Ingenohl was blamed for missing a chance to defeat the Royal Navy.
British Response to the Raids
The British public felt that their navy had been caught off guard. They were also upset that the German ships got away. In reality, the British had been warned by the decoded messages from Room 40.
There were problems with how the British used this secret information. Sometimes, decoded messages took too long to reach the commanders at sea. By then, the information was old or wrong. For example, news that the German fleet was sailing arrived so late that British commanders thought the Germans were still coming when they were already going home.
Admiral John Jellicoe, the commander of the British Home Fleet, tried to fix these issues. He ordered that commanders at sea should treat orders from those who didn't know the local situation as suggestions only. This was to encourage officers to use their own judgment in battle.
Planning the Battle
German Battle Plan
Admiral Hipper thought the British knew about German ship movements. He suspected British spy ships were hiding among fishing boats near the Dogger Bank. He believed that a signal from a fishing boat could warn the British in time to intercept German ships.
Hipper decided to attack the British fishing fleet on the Dogger Bank. He wanted to clear the area of British fishing boats and any suspicious neutral ships. His battlecruisers would attack any small British warships. The main German fleet would cover their retreat.
On January 19, 1915, British ships had been seen near the German coast. This made Admiral Ingenohl order Hipper to check the Dogger Bank area. He wanted Hipper to surprise and destroy any small British forces there. Hipper's group included three battlecruisers (Seydlitz, Moltke, Derfflinger), one armored cruiser (Blücher), four light cruisers, and eighteen destroyers.
British Battle Plan
On January 23, 1915, Room 40 intercepted German radio messages. These messages showed that a large German force was sailing towards the Dogger Bank. British leaders quickly made a plan to meet the Germans with a stronger force.
They set a meeting point for January 24, 1915, at 7:00 AM. This spot was north of Dogger Bank. The British battlecruisers, including Lion, Tiger, Princess Royal, New Zealand, and Indomitable, sailed out.
The Harwich Force, with three light cruisers and 35 destroyers, also sailed to meet the battlecruisers. Other British squadrons sailed to cover the East Coast and act as distant support. The main Grand Fleet also left port, but it would arrive later in the day.
At 7:05 AM on January 24, the British ships met German scouting vessels. The day was clear, with good visibility.
Who Fought in the Battle?
Here are the main ships and groups involved:
- 1st Battlecruiser Squadron: HMS Lion, HMS Tiger, and HMS Princess Royal
- 2nd Battlecruiser Squadron: HMS New Zealand and HMS Indomitable
- 1st Light Cruiser Squadron: HMS Southampton, HMS Birmingham, HMS Lowestoft, and HMS Nottingham
- Harwich Force: Three light cruisers (HMS Aurora, HMS Arethusa, HMS Undaunted) and 35 destroyers
- 1st Scouting Group: SMS Seydlitz, SMS Moltke, SMS Derfflinger, and SMS Blücher
- 2nd Scouting Group: SMS Kolberg, SMS Stralsund, SMS Rostock, and SMS Graudenz
- Two groups of 18 torpedo boats
The Battle Unfolds
The Chase Begins
_Map.png)
When Admiral Hipper saw smoke from the approaching British ships, he turned his squadron southeast to escape. But the British battlecruisers were faster than the German ships. The German group was slowed down by the armored cruiser Blücher and their coal-fueled torpedo boats.
By 8:00 AM, the British on Lion could see the German battlecruisers. The older British ships in the 2nd Battlecruiser Squadron were falling behind the 1st Squadron. The British chased the Germans from behind and to their right side. They slowly caught up, with some ships reaching speeds of 27 knots (about 31 mph or 50 km/h).
The British approached from this direction so their smoke would blow away, giving them a clear view. The German gunners, however, had their view partly blocked by their own smoke. Lion opened fire at 8:52 AM from about 20,000 yards (11 miles or 18 km) away. The other British ships started firing as they got closer. The Germans couldn't fire back until 9:11 AM because their guns had a shorter range. No warships had ever fought at such long distances or high speeds before.
Hits and Damage
The British ships focused their fire on Seydlitz at the front of the German line and Blücher at the back. With five British ships against four German, Admiral Beatty wanted his two rear ships, New Zealand and Indomitable, to attack Blücher. His three leading ships would attack the other German battlecruisers.
However, Captain Henry Pelly of the British ship Tiger thought two ships should focus on the leading German ship. So, he also attacked Seydlitz, leaving the German ship Moltke free to fire at Lion. Tiger's shots were not very effective.
At 9:43 AM, Seydlitz was hit by a 13.5-inch shell from Lion. The shell went through her back turret and caused a fire in the ammunition area. This fire quickly spread, igniting propellant charges all the way to the magazines (where ammunition is stored). Both rear turrets were knocked out, and 165 men were lost. A quick-thinking officer, Wilhelm Heidkamp, saved Seydlitz by flooding the magazines. This prevented a huge explosion that would have destroyed the ship.

The British ships were mostly unharmed until 10:18 AM. Then, Derfflinger hit Lion with several 12-inch shells. This damaged Lion's engines and caused flooding. Lion lost speed and started to fall behind. At 10:41 AM, Lion almost had a disaster like Seydlitz. A German shell hit her front turret and started a small fire. But it was put out before it could cause a magazine explosion.
A few minutes later, Lion was taking on water and leaning to one side. She had to stop one engine and slow down to 15 knots (about 17 mph or 28 km/h). Soon, she was out of action, having been hit 14 times. At 10:30 AM, Blücher was hit by a shell from Princess Royal. This caused an ammunition fire and damaged her boiler room. Blücher had to slow down to 17 knots (about 20 mph or 31 km/h) and fell behind the other German ships. Beatty ordered Indomitable, his slowest ship, to attack Blücher.
Confusing Orders and Retreat

With his ships running low on ammunition, Admiral Hipper decided to head home. He left the damaged Blücher behind to save his other ships. It looked like the British were about to destroy the rest of the German squadron.
But at 10:54 AM, Admiral Beatty, on Lion, thought he saw a submarine periscope. He ordered a sharp 90-degree turn to the left to avoid a submarine attack. (The "periscope" might have been a torpedo that had run out of fuel and was surfacing). At 11:02 AM, Beatty realized such a sharp turn would make his ships too far from the Germans. He then ordered "Course NE" to limit the turn to 45 degrees. He also added "Engage the enemy's rear" to make it clear that his other ships should continue chasing the main German force.
Since Lion's electric generators were out, Beatty could only use flag signals. Both signals were flown at the same time. This caused a big misunderstanding. Rear-Admiral Moore, on New Zealand, was Beatty's second-in-command. He thought the order "Course NE" (which was the direction of Blücher) combined with "Engage the enemy's rear" meant all battlecruisers should finish off Blücher.
The British battlecruisers stopped chasing the main German squadron and attacked Blücher. Most of the British light cruisers and destroyers joined in. Beatty tried to correct the mistake. He tried to use a famous order from Admiral Nelson at the Battle of Trafalgar: "Engage the enemy more closely." But this order wasn't in the signal book. So, Beatty chose "Keep nearer to the enemy" as the closest option. By the time this signal was raised, Moore's ships were too far away to read Beatty's flags. The correction was not received.

Despite being greatly outnumbered, Blücher managed to disable the British destroyer HMS Meteor. She also hit two British battlecruisers with her 8.3-inch guns. But Blücher was hit by about 70 shells and then by two torpedoes. She capsized and sank at 1:13 PM, with the loss of 792 crew members.
British ships started rescuing survivors. But then a German Zeppelin (a type of airship) and a German seaplane arrived. They attacked the British ships with small bombs. No damage was done, but the British ships sped up and left to avoid more air attacks. They had to leave some survivors behind. By this time, the rest of the German ships were too far away for the British to catch.
Lion could only go 10 knots (about 11.5 mph or 18.5 km/h) for the 300-mile (480 km) journey home. She was escorted by Indomitable. Lion had more engine problems from saltwater getting into her system. Her speed dropped to 8 knots (about 9 mph or 15 km/h). Indomitable had to tow Lion, which took two hours. During this time, the battlecruisers were very open to submarine attacks.
The Day After
On January 25, Lion and Indomitable slowed to 7 knots (about 8 mph or 13 km/h) overnight because Lion had more engine trouble. At dawn, they were still 100 miles (160 km) from the Firth of Forth. The destroyers formed an anti-submarine screen. The ships finally reached the firth at midnight. The destroyer Meteor had to be towed into the Humber Estuary.
Lion was out of action for four months. She was repaired at Armstrong's on the Tyne, which was a very difficult and long job because she couldn't go into dry dock. The surviving German ships reached port. Derfflinger was repaired by February 17, but Seydlitz needed a drydock and wasn't ready until April 1.
What Happened After the Battle?
Who Was Lost?

The German ship Blücher lost 792 men killed and 45 wounded out of 1,026 crew members. The British rescued 189 of the men. Seydlitz lost 159 men killed and 33 wounded. Most of these casualties were from the fire in her two back turrets. Kolberg lost three men killed and two wounded.
Overall, over 1,000 German sailors were killed or captured. The British had far fewer casualties: 15 men killed and 80 wounded. On Lion, two men were killed and eleven wounded. Ten men were killed on Tiger with nine wounded. On Meteor, four men were killed and two wounded.
How Accurate Was the Firing?
Here's a look at how well the ships fired their guns:
| Ship | Shells fired | Target hits | Hits received | Casualties |
|---|---|---|---|---|
| Lion | 243 × 13.5-inch | Blücher 1 Derfflinger 1 Seydlitz 2 |
16 × 11- and 12-inch 1 × 8.3-inch |
1 killed 20 wounded |
| Tiger | 355 × 13.5-inch | Blücher – Derfflinger 1 Seydlitz 2 |
6 × 11- and 12-inch 1 × 8.3-inch |
10 killed 11 wounded |
| Princess Royal | 271 × 13.5-inch | Blücher – Derfflinger 1 |
0 | 0 |
| New Zealand | 147 × 12-inch | Blücher — | 0 | 0 |
| Indomitable | 134 × 12-inch | Blücher 8 | 1 × 8.3-inch | 0 |
| Seydlitz | 390 × 11-inch | Lion and Tiger 8 | 3 × 13.5-inch (1 Tiger, 2 Lion) |
159 killed 33 wounded |
| Moltke | 276 × 11-inch | Lion and Tiger 8 | 0 | 0 |
| Derfflinger | 310 × 12-inch | Lion, Tiger, and Princess Royal 5 or 6 |
3 × 13.5-inch (1 each Lion Tiger and Princess Royal) |
0 |
| Blücher | 12 × 8.2-inch | Lion 1 Tiger 1 Indomitable 1 |
about 70 7 torpedoes |
792 killed 234 prisoners 45 wounded |
Images for kids
-
Battle of Dogger Bank, Arthur James Wetherall Burgess
-
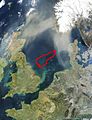
Area of the Dogger Bank
-
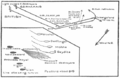
Positions in the battle
-
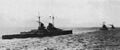
German battlecruisers (L–R) Derfflinger, Moltke and Seydlitz en route to Dogger Bank.
-
Painting of SMS V5 engaging HMS Lion, by Willy Stöwer
-
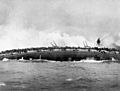
SMS Blücher rolls over onto her side
-
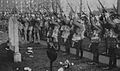
Royal Scots Territorials firing a salute over the grave of Captain Erdmann, Commander of SMS Blücher

