Battle of Mission Ridge–Brigade Hill facts for kids
Quick facts for kids Battle of Mission Ridge–Brigade Hill |
|||||||
|---|---|---|---|---|---|---|---|
| Part of the Second World War, Pacific War | |||||||
 Mission Hill and Efogi |
|||||||
|
|||||||
| Belligerents | |||||||
| Commanders and leaders | |||||||
| Units involved | |||||||
|
Maroubra Force
|
South Seas Detachment
|
||||||
| Strength | |||||||
| 1,400 | 1,570 | ||||||
| Casualties and losses | |||||||
| 87 killed 77 wounded |
60 killed 165 wounded |
||||||
The Battle of Mission Ridge–Brigade Hill was a big fight during World War II. It happened between September 6 and 9, 1942, on the Kokoda Track in Papua New Guinea. Soldiers from Australia, the United States, and Japan fought over a high area called Mission Ridge and Brigade Hill, near the village of Efogi.
This battle was part of a larger series of fights along the Kokoda Track. The Japanese South Seas Detachment, led by Major General Tomitaro Horii, was trying to advance south towards Port Moresby. Before this battle, the Australians had fought a successful delaying action at Isurava in late August 1942. During the Battle of Mission Ridge–Brigade Hill, Japanese soldiers attacked Australian positions. One Japanese group managed to go around the Australian lines, cutting off three Australian battalions from their main headquarters. This forced the Australians to retreat further south after trying several counter-attacks that did not work. About a week later, another battle happened near Ioribaiwa. There, the Japanese were finally stopped. This allowed the Australians to make a strong defensive line before starting their own attack.
Why This Battle Happened
In early 1942, Japan wanted to capture Port Moresby. This port was important because it would help Japan cut off Australia from its allies, especially the United States. At first, Japan planned to attack by sea. But after losing the Battle of the Coral Sea, they changed their plan. They decided to land troops on the northern coast of Papua New Guinea and march over the Owen Stanley Ranges to Port Moresby.
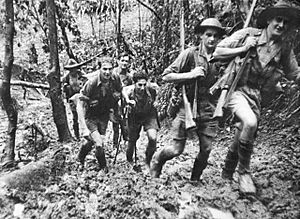
This march meant going through the Kokoda Track. This jungle path was about 96 kilometers (60 miles) long. It went through thick forests and steep mountains, some as high as 2,100 meters (7,000 feet). The area was also full of malaria, heat, and humidity. These conditions were as tough as fighting the enemy soldiers.
On July 21 and 22, 1942, Major General Tomitaro Horii's Japanese South Seas Detachment landed at Buna–Gona on the northern coast. They began their march south towards Port Moresby. To stop them, the Allies created a special group called "Maroubra Force." At first, only a small group of soldiers from the Papuan Infantry Battalion (PIB) and the Australian 39th Infantry Battalion were there to stop them. They fought a delaying action on July 23 near Awala, then fell back to Kokoda village.
The Australians and Japanese fought again on July 28 and 29. The Japanese took control of Kokoda. An Australian counter-attack on August 8 caused heavy losses for both sides, but the Japanese kept Kokoda. The PIB and 39th Infantry Battalion, low on supplies, pulled back further south along the Kokoda Track.
There was a short break in the fighting. During this time, more Australian soldiers arrived. The 21st Brigade, a group of experienced soldiers, moved to Isurava. Lieutenant General Sydney Rowell, who was now in charge of the Australian forces, decided to pull back the 39th Infantry Battalion. This would make their supply lines shorter.
The Japanese attack started again on August 26. Battles were fought at Isurava (August 26–31) and Eora Creek–Templeton's Crossing (August 31–September 5). Australian soldiers successfully slowed down the Japanese advance in these battles.
The Battle of Mission Ridge–Brigade Hill
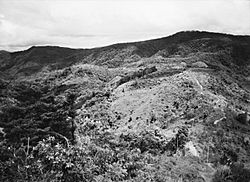
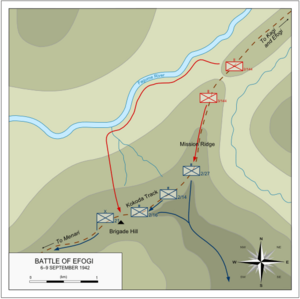
In early September, the Australian commander, Brigadier Arnold Potts, decided to make a strong stand. He chose Mission Ridge and Brigade Hill. This area was important because it overlooked the track and offered good views of the Japanese approach. Mission Ridge was a long bump that stretched north from Brigade Hill. It formed a "boomerang shape" along the track. This position was good for defense because it had clear areas for air attacks. It was also protected by tough high ground to the east. However, to the west, the land dropped towards the Fagume River. This gave the Japanese a chance to go around the Australian position.
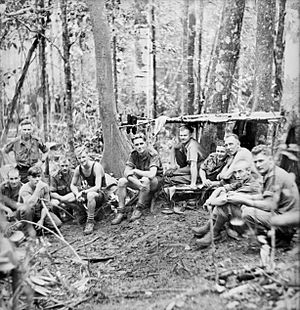
The Australian Maroubra Force had three battalions of experienced soldiers: the 2/14th, 2/16th, and 2/27th Infantry Battalions. They also had some Papuan police and medical teams. In total, the Australians had about 1,400 men. Potts thought they were greatly outnumbered, but it turned out the two sides were about equal in strength. The Japanese had 1,570 soldiers, mostly from the 144th Infantry Regiment, and six artillery guns. The Australians had air support from the US, but they lacked artillery. However, they did have three large mortars that were dropped by parachute. These mortars helped them fire back at the Japanese artillery for the first time in the campaign.
Since the 2/14th and 2/16th Battalions were tired from earlier fighting, Potts sent the 2/27th Battalion forward. They set up a blocking position on Mission Ridge. The 2/14th and 2/16th were kept behind them on Brigade Hill as a reserve. Maroubra Force's headquarters was even further south. There were gaps between these positions, which was a big weakness. The Japanese commander, Colonel Masao Kusunose, planned to use a "pin and flank" tactic. One Japanese battalion would attack the main Australian position on Mission Ridge. Another would try to go around the Australian left side.
On September 6 and 7, Allied planes attacked Japanese positions. On September 7, the Japanese began their main attack with heavy artillery fire on the 2/27th's positions. The III Battalion, 144th Infantry Regiment, attacked straight up the track. The Australians held their ground, but the Japanese managed to partly surround the forward Australian battalion. While the Australians were busy fighting, the II Battalion, 144th Infantry Regiment, made a flanking move. They went west towards the Fagume River, guided by a Papuan. They got behind the Australian 2/16th Battalion, cutting off the Australian soldiers from their headquarters. At this time, the Japanese artillery switched its fire to the 2/16th's positions.
The Australian commander tried to make their defensive area smaller. The 2/27th was ordered to move one company back up Mission Ridge. The 2/14th moved to help the 2/16th. But communication was difficult, and in the confusion, the entire 2/27th fell back, giving up Mission Ridge to the Japanese. Meanwhile, about 300 men from the 2/14th and 2/16th Battalions attacked the Japanese from the north in heavy rain. They caused many Japanese casualties, but the attack failed as Japanese reinforcements arrived. Only a few Australians managed to reach their headquarters. An attempt to break through from the south also failed, with heavy losses. The Australians could not fix the situation. Potts had to order a retreat south towards Ioribaiwa. A small group from the 2/27th launched a quick counter-attack, which helped the Australians get away cleanly. The headquarters troops went back down the track. But the isolated soldiers from the 2/14th, 2/16th, and 2/27th Battalions had to leave the track. They withdrew east across Brigade Hill to escape through the mountains. The Japanese did not know they had left their positions.
What Happened Next
After the fighting at Mission Ridge and Brigade Hill, the Australians had 87 killed and 77 wounded. The Japanese lost 60 killed and 165 wounded. This battle was very difficult for the Australians. The Australian commander, Potts, was later removed from his command. Brigadier Selwyn Porter took over for the next stage of the fighting. Right after the battle, the Australian forces were scattered and disorganized as they retreated. If the Japanese commander had known how bad the Australian situation was, he might have been able to advance all the way to Port Moresby.
However, there was a brief pause, which allowed the Australians to quickly reorganize before the Japanese continued their pursuit. The remaining soldiers from the 2/14th and 2/16th Battalions met up with Potts at Menari. But the 2/27th Battalion could not reach Menari before the rest of the brigade had to retreat again. As they fell back, the Australian rearguard fought with the Japanese in the Maguli Range. The 2/27th, along with wounded soldiers from other battalions, had to follow paths next to the main track. They finally rejoined the main Australian force on September 22. Their journey was very hard, with heavy rain, many wounded soldiers, and little food. It took over three weeks for the 2/27th to rejoin Maroubra Force. This meant the Australians were missing a relatively fresh battalion for the final defensive battle at Ioribaiwa.
For the Japanese, their supply lines became even more stretched as they continued to advance. The Australian resistance was getting stronger, even though they were missing the 2/27th. The Australian supply situation, however, was getting better. They received supplies by air and from local carriers who stored supplies along the track.
A week after the fighting at Mission Ridge and Brigade Hill, the Australians made another stand at Ioribaiwa. This was after they retreated through Menari and Nauro. Ioribaiwa was only about 40 miles (64 km) north of Port Moresby. The position was held by the remaining soldiers of the 2/14th and 2/16th Battalions. They were reinforced by Brigadier Kenneth Eather's 25th Brigade. This brigade had fresh soldiers. The 25th Brigade then took over from the 21st Brigade, which had suffered heavy losses and was down to only 300 men.
From September 14 to 16, the Japanese tried to go around the Australian positions at Ioribaiwa. But they were pushed back and stopped. The Australian commander, Eather, did not know how successful his men had been. He ordered a retreat back to Imita Ridge.
Imita Ridge was the closest the Japanese got to Port Moresby. Their supply line was too long, and resources were being sent to fighting on Guadalcanal. Horii was told to stop his attack on September 8. He canceled the offensive a few days later. The Japanese positions on the north coast around Buna and Gona were strengthened. Then, the Japanese began to withdraw.
From Imita Ridge, the Australians began their own attack. Elsewhere, at Milne Bay, they successfully stopped a Japanese landing in late August and early September. Throughout early October, the Australians chased the retreating Japanese back towards Eora and Templeton's Crossing. Kokoda was taken back on November 2. A week later, the Japanese suffered a big defeat at Oivi–Gorari. Soon after, the Australians crossed the Kumusi River. This finally ended Japanese plans to capture Port Moresby. It was followed by an Australian advance towards the Japanese beachheads and heavy fighting around Buna–Gona.
After the war, Australian units involved in the fighting around Mission Ridge and the retreat to Menari were given a special honor. This honor was called "Efogi – Menari." The 2/14th, 2/16th, and 2/27th Infantry Battalions received this honor.


