
Battle of Ioribaiwa facts for kids
Quick facts for kids Battle of Ioribaiwa |
|||||||
|---|---|---|---|---|---|---|---|
| Part of the Second World War, Pacific War | |||||||
.jpg) View towards Imita Ridge and Ioribaiwa |
|||||||
|
|||||||
| Belligerents | |||||||
| Commanders and leaders | |||||||
| Units involved | |||||||
|
Maroubra Force
|
South Seas Detachment
|
||||||
| Strength | |||||||
| 2,957 | 1,650 | ||||||
| Casualties and losses | |||||||
| 49 killed 121 wounded |
40 killed 120 wounded |
||||||
The Battle of Ioribaiwa was a key battle during the Second World War. It happened between September 14 and 16, 1942. This fight was part of the Kokoda Track campaign in Papua. Soldiers from Australia, the United States, and Japan were involved. The main fighting took place on a high area called Ioribaiwa Ridge. This ridge was south of Ofi Creek, along the famous Kokoda Track. It was the last major battle where Australian forces tried to stop the Japanese advance. The Japanese were pushing from the north coast of Papua towards Port Moresby.
Even though the Japanese pushed the Australians back in the middle of their lines, heavy fighting on the sides stopped their attack. After the battle, the Australian commander, Brigadier Kenneth Eather, decided to pull his troops back. He felt they couldn't hold Ioribaiwa Ridge any longer. He also thought it wasn't a good place to launch a counter-attack. So, his forces moved back to Imita Ridge. However, the Japanese had reached the very end of their supply lines. Also, other events in the war made the Japanese commander, Major General Tomitaro Horii, change his plans. He decided to focus on defending in Papua and New Guinea. Because of this, in October, the Japanese began to retreat. They headed back towards their landing areas at Buna–Gona, with the Australians following them.
Why the Battle of Ioribaiwa Happened
On July 21, 1942, Japanese forces landed on the northern coast of Papua. They came ashore near Buna and Gona. Their goal was to capture Port Moresby, an important town. They planned to do this by marching overland along the Kokoda Track. An earlier attempt to reach Port Moresby by sea had failed during the Battle of the Coral Sea in May 1942.
Just two days after landing, the first clash of the campaign occurred. A small group of Australian and Papuan soldiers fought the advancing Japanese near Awala. The Japanese quickly pushed them aside. Throughout late July, August, and September, many battles took place along the Kokoda Track. The Japanese kept moving south. At first, the Japanese landing forces were small. But in mid-August, more troops arrived. These were part of the South Seas Detachment. They included the 144th and 41st Infantry Regiments. Major General Tomitaro Horii led these forces.

The Australian forces, called Maroubra Force, had limited numbers at first. To slow the Japanese advance, they used delaying tactics. This gave time for more Australian soldiers to arrive from Port Moresby. Kokoda village fell to the Japanese in early August. Then, there was heavy fighting at Isurava later that month. Veteran soldiers from the 21st Brigade joined the less experienced Militia troops. After Isurava, the Australians fought more battles as they retreated. These included fights at Eora Creek and Templeton's Crossing, and near Efogi. The Australians then fell back towards Menari. There, their rearguard fought the Japanese in the Maguli Range. The retreat continued until they reached Ioribaiwa in mid-September.
At Ioribaiwa, the remaining soldiers of the Australian 21st Brigade were joined by the 25th Brigade. They faced Japanese forces from the 144th Infantry Regiment. Colonel Masao Kusunose led these Japanese troops. Before the battle, Brigadier Arnold Potts, who commanded Maroubra Force, was replaced. Brigadier Selwyn Porter took over on September 10. Porter was told to "stabilise the situation" and try to gain ground. He received reinforcements, including the 2/1st Pioneer Battalion and the 3rd Infantry Battalion. However, some historians believe that gaining ground was impossible given the situation.
The Battle Unfolds
The Australians decided to launch a counter-attack to stop the Japanese from reaching Port Moresby. They set up their defenses on Ioribaiwa Ridge. This ridge was south of Ofi Creek. It was one of the last major ridges before the capital city. Brigadier Porter chose Ioribaiwa because he felt the land further north wasn't good for a counter-attack. The ridge ran across the Kokoda Track and had two high peaks. As the Australians retreated to Ioribaiwa, they tried to slow the Japanese. They set up an ambush in the Maguli Range. This ambush caused many casualties for the Japanese, but the Australians were eventually pushed back.
By September 11, the 2/14th and 2/16th Infantry Battalions were very low on soldiers. They had done most of the fighting at Isurava, Eora Creek, and Templeton's Crossing. They formed a combined unit of just two companies. They held a position along the track on the northern slopes of the ridge. The 21st Brigade's third battalion, the 2/27th, had been cut off earlier. It was still trying to rejoin Maroubra Force. The Australian right side was held by the 3rd Infantry Battalion. This unit extended the defensive line east along Ioribaiwa Ridge. On September 12 and 13, parts of the 2/6th Independent Company helped protect the flanks.
Japanese artillery and mortars began shelling the Australian positions. They fired from the northern slope overlooking Ofi Creek. There were several small fights around the position on September 12–13. The Australians had no artillery to fire back. But they managed to turn back several Japanese scouting patrols. Soldiers from the Australian 2/16th and 3rd Infantry Battalions set a successful ambush near Ofi Creek. They killed 20 to 30 Japanese soldiers who were drawn into an abandoned food dump. Meanwhile, the fresh 25th Brigade, led by Brigadier Kenneth Eather, arrived from Port Moresby. They marched from Imita Ridge to Ioribaiwa. Their orders were to launch a counter-attack, moving past Porter's position to Nauro.
With these new troops, Maroubra Force grew to 2,957 soldiers. This gave the Australians more troops than the 1,650 Japanese soldiers in the battle. The 2/25th Infantry Battalion was placed south of the ridge. They were in the low ground near Ua-Ule Creek. This was a reserve force in case of an emergency. The 25th Brigade's other two battalions, the 2/31st and 2/33rd, prepared to attack. They planned to move around the Australian defensive line to outflank the Japanese. Their goal was to cut the track at Nauro.
.jpg)
Two Japanese battalions from the 144th Infantry Regiment had been chasing the Australians from Efogi. The main Japanese force had stayed behind, waiting for orders to continue. The Japanese pursuit group attacked Ioribaiwa Ridge. This happened just as the two Australian battalions were moving into their attacking positions. The 2/31st was to the left (west) of the 2/14th and 2/16th. The 2/33rd was to the right (east) of the 3rd Infantry Battalion. The Japanese attack stopped the forward movement of the 2/31st and 2/33rd Battalions. This accidentally made the Australian line longer on both sides of the ridge.
On September 14, the first day of the battle, half of the Japanese III Battalion, 144th Infantry, attacked. They focused on the combined 2/14th – 2/16th Battalion in the center. Japanese artillery supported their attack. The Japanese suffered casualties from booby traps and trip wires set by the Australians. They also faced heavy small arms fire. Still, they managed to push the Australians back slightly to the south. Meanwhile, the Japanese II Battalion tried to flank the Australians from the west. They ran into the 2/31st Infantry Battalion. This Australian unit was in a position the Japanese thought was empty. Japanese artillery caused many casualties in the center of the Australian line. But the depleted Australian unit managed to stop the Japanese advance in their area all day.
On September 15, the other half of the Japanese III Battalion tried to find the eastern side of the Australian position. They found the line was much longer than they expected. This was due to the 2/33rd's earlier movements. However, the Japanese found a gap in the Australian line. It was between the 3rd Infantry Battalion and the 2/33rd. They quickly moved into this gap. They seized a key position that allowed them to fire down on the Australians from the east. This was a significant advantage. But they couldn't use it further. The 2/25th Battalion counter-attacked from its reserve position. This counter-attack failed to remove the Japanese from the right side of the Australian line. The Japanese then dug in there. The III Battalion was stuck between the two Australian infantry battalions. A stalemate developed on the left side. Both sides tried to break it by launching flanking attacks, but each was stopped. The 2/33rd also tried a counter-attack on the right. They wanted to attack the Japanese from behind. But they couldn't find the Japanese in the thick jungle.
By September 16, the fighting at Ioribaiwa had reached a standstill. Neither side could gain an advantage. The Japanese commander, Kusunose, was unsure what to do next. The 2/14th and 2/16th battalions in the Australian center had suffered many casualties from Japanese artillery. But the Australians had fought a successful defensive battle. They had stopped the Japanese for the first time in the campaign. Despite this, the Australian commander, Eather, decided to retreat. He didn't know that Kusunose was also facing problems. Kusunose realized he was outnumbered and had no reserve troops. Eather thought the Japanese attack couldn't be held any longer. He felt defeated.
After talking with Porter, Eather asked for permission to continue the retreat south to Imita Ridge. Major General Arthur Allen, the 7th Division commander, agreed. But he made it clear that Imita Ridge had to be held at all costs. Eather agreed to this. The Australians then withdrew across the Ua-Ule Creek to Imita Ridge. The first troops arrived late on September 16. The rest arrived the next morning. At Imita Ridge, the Australians finally came within range of their own artillery. Two 25-pounder guns had been moved into position on a peak near Uberi. Reinforcements from the 2/1st Pioneer Battalion also arrived. They had been held back doing labor and defense tasks.
What Happened Next
The number of casualties at Ioribaiwa was similar for both sides. The Australians lost 49 killed and 121 wounded. Many of these were caused by Japanese artillery hitting the 2/14th – 2/16th's position. The Japanese lost 40 killed and 120 wounded. Even though the fighting at Ioribaiwa ended with another Australian retreat, it was their last defensive action of the campaign. The Australian withdrawal was orderly. Their rearguard fought to keep the Japanese away. This gave the Australians enough time to set up firmly on Imita Ridge. There, Maroubra Force could regroup and regain its strength.
In the days that followed, there were only small skirmishes. The Australians sent out patrols to Ioribaiwa to see what the Japanese were doing. The Japanese worked to strengthen their hold on Ioribaiwa. They dug in and sent out groups to find food.
Imita Ridge was very close to Port Moresby. It turned out to be the furthest south the Japanese advanced. Their supply lines were stretched thin. US and Australian aircraft were constantly attacking these supply lines. Also, events elsewhere, especially the Guadalcanal Campaign and the earlier defeat at Milne Bay, were going well for the Allies. This forced the Japanese to focus more on defense in New Guinea. Instead of a final big battle, the fighting around Imita Ridge slowly turned into small patrol actions. Then, the Japanese began to retreat north on September 26. The remaining soldiers of the Australian 21st Brigade were led south by Porter. The Australians, now stronger with fresh troops from the 25th Brigade, launched a counter-attack. Brigadier Eather officially took command of Maroubra Force on September 17.
The Australian counter-attack eventually pushed them all the way to the Japanese landing areas on the northern coast. This happened during October and November. After carefully sending patrols north from Imita Ridge to Ioribaiwa, they found the Japanese had left. The full pursuit began on October 2. They pressed on to Efogi with little resistance. In late October, the Australians reached Eora Creek and Templeton's Crossing. These places had seen heavy fighting during the Japanese advance. A second battle was fought there. The Australians gained the important ridge overlooking the creek. They paid a heavy price, but the Japanese fought hard to buy time for their comrades to escape.
As pressure grew from Australian and US commanders to speed up the advance, the 16th Brigade arrived. This helped to boost the advance, which had been slow due to the difficult land and supply problems. However, the Australian pursuit was held up long enough for most of the Japanese force to fall back to their northern landing areas.
In the fighting that followed, Kokoda village was recaptured on November 2. This gave the Australians a forward airfield where supplies could be flown in. This helped solve many of their supply problems. As the Australian advance sped up, heavy fighting took place in mid-November. This was around Oivi and Gorari. Here, the Australians and Japanese fought the final battle of the campaign before crossing the Kumusi River. In December 1942, the Battle of Buna–Gona saw the Australians join up with US ground forces. They then fought the Japanese around the northern landing area. This heavy fighting lasted until late January 1943. The remaining Japanese soldiers were then moved to Salamaua–Lae.
After the war, Australian units involved in the fighting at Ioribaiwa received a special honor. This honor was given to the 3rd, 2/14th, 2/16th, 2/25th, 2/31st, and 2/33rd Infantry Battalions.
Images for kids
-
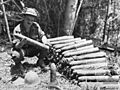
Japanese shells found abandoned on Ioribaiwa following their withdrawal
.jpg)
