
Battle of Muar facts for kids
Quick facts for kids Battle of Muar |
|||||||
|---|---|---|---|---|---|---|---|
| Part of the Malayan Campaign of the Pacific War | |||||||
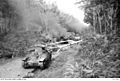
 Australian 2 pounder gun of 13th Battery, 2/4th Anti-Tank Regiment, firing on Japanese Type 95 Ha-Go light tanks of the 14th Tank Regiment on the Muar-Parit Sulong road on 18 January 1942. Sergeant Charles Parsons and his crew were credited with destroying six of the nine tanks in this engagement. |
|||||||
|
|||||||
| Belligerents | |||||||
| Commanders and leaders | |||||||
| Takuma Nishimura Masakazu Ogaki Shiegeo Gotanda † |
|||||||
| Units involved | |||||||
| Westforce: |
Twenty-Fifth Army: Imperial Guards 5th Division 3rd Air Division |
||||||
| Strength | |||||||
| 4,000 infantry 60 aircraft |
8,000 infantry 400 aircraft |
||||||
| Casualties and losses | |||||||
| 3,100 killed and wounded(including 145 prisoners of war) |
700+ killed and 800+ wounded Total casualties: 1500+ killed and wounded15+ tanks destroyed |
||||||
The Battle of Muar was a major battle during the Malayan Campaign in World War II. It happened from January 14 to 22, 1942, near the Gemensah Bridge and on the Muar River in Malaya. After a tough defeat at Slim River, the Allied commander, General Archibald Wavell, decided that the Indian Corps should move south to rest. The 8th Australian Division was tasked with stopping the Japanese advance.
Allied soldiers, led by Major General Gordon Bennett, caused heavy losses for the Japanese. This happened during an ambush at the Gemensah Bridge and in another fight near Gemas. Australian soldiers killed about 600 Japanese troops at the bridge. Australian anti-tank guns also destroyed several Japanese tanks. This battle caused the most Japanese losses of any battle in the Malayan campaign. One of their commanders, Shiegeo Gotanda, was killed. This temporarily lowered the spirits of many Japanese soldiers.
Even though the ambush was successful, the defense of Muar and Bakri on the west coast failed badly. This led to almost all of the 45th Indian Infantry Brigade being wiped out. Two Australian battalions also suffered many casualties. This battle was also the first time the British 18th Division fought the Japanese in Malaya.
Contents
Planning the Battle
The ambush was ordered by Lieutenant General Arthur Percival, who believed ambushes were key to fighting the Japanese. A group of Allied forces, called Westforce, was put in charge of defending the Muar area. Westforce set up defenses from the mountains to the coast. The forces were spread out and communicated mainly by radio.
Defending Gemas
One main defense area was around the central road and railway near Segamat. It had three parts:
- The 8th Indian Infantry Brigade held positions near Gemas.
- The 27th Australian Brigade was further ahead. They prepared an ambush at the Gemensah Bridge. This ambush was set by the 2/29th Australian Infantry Battalion.
- The 22nd Indian Infantry Brigade guarded the roads to Segamat from Malacca.
The Gemensah Bridge Ambush Plan

B Company of the 2/30th Australian Battalion, led by Captain Desmond J. Duffy, hid near the Gemensah Bridge. The bridge was rigged with explosives. Artillery guns were placed on higher ground behind the infantry. They could fire on the Japanese as they approached the bridge. Lieutenant Colonel Frederick Galleghan, known as "Black Jack," commanded the 2/30th Australian Battalion.
The Japanese forces, called Mukaide Force, were moving towards Gemas. This force included the 1st Tank Regiment with infantry and artillery support. It was led by Colonel Mukaida. His tank regiment had 31 Type 97 Chi-Ha and 17 Type 95 Ha-Gō tanks.
Defending Muar
The second main defense area covered the west coast roads leading to the Johore Strait. The 45th Indian Brigade, with artillery support, was assigned to defend this area. It included the port of Muar and stretched about 30 kilometers (19 miles) into the jungle along the Muar River. Two battalions were placed along the river, and a third was kept in reserve near the coast.
The Imperial Guards Division was moving down the west coast. A group led by Colonel Masakazu Ogaki approached Muar from the sea. The 4th and 5th Guards Regiments, led by General Nishimura, approached Muar from the north.
The British 18th Division's 53rd Infantry Brigade also joined Westforce. This brigade included the 2nd Cambridgeshire Regiment and the 5th and 6th Norfolk Battalions. They had been at sea for 11 weeks and were not ready for immediate fighting.
The Battle Begins
Fighting at Gemencheh Bridge and Gemas

The ambush happened around 4:00 PM on January 14. Japanese troops from the 5th Division, riding bicycles, crossed the bridge first without trouble. Then came the main group, also on bicycles, followed by tanks and engineer trucks. At this point, the bridge was blown up. Wood, bicycles, and bodies flew into the air. B Company of the 2/30th Australian Battalion opened fire from hidden positions. The Japanese column suffered huge losses from machine gun and rifle fire. Many Japanese soldiers had tied their rifles to their bicycle handlebars, making the ambush even more effective.
The Japanese suffered heavy casualties. However, some Japanese soldiers who had passed the ambush found and cut the telephone cable. This cable connected the ambush party to the artillery. So, the Allied artillery did not get the signal to fire.

Despite this, the Australians still received some artillery support. Most of the Japanese shells fell on their own main column at the bridge, adding to their losses. The ambush party, after causing great damage, retreated that evening. Most of B Company rejoined their battalion near Gemas the next day. B Company lost one man killed and six missing. The six missing men were later found to have been shot by the Japanese after being captured. The Japanese reported 70 dead and 57 wounded for their Mukaide Detachment.
On the morning of January 15, Japanese planes bombed Gemas. Six hours after the ambush, the Japanese had repaired the bridge. They moved towards Galleghan's main position on the Gemas-Tampin road. The remaining Mukaide Force was joined by the Japanese 11th Regiment. The 2/30th Battalion was positioned across the road and railway line. They had two 2-Pounder Anti-Tank Guns facing the road. By 10:00 AM, Japanese infantry fought the Allied defense lines. More tanks joined them as the day went on. In a short but fierce battle, Australian anti-tank guns from the 2/4th Australian Anti-Tank Regiment destroyed six of eight Japanese tanks. Their infantry also caused heavy losses to the Japanese infantry following the tanks.
After 24 hours of fighting, Galleghan pulled his battalion back. The 2/30th Battalion had caused many Japanese casualties with minimal losses to themselves. They had 17 killed, 9 missing, and 55 wounded. In two days of fighting, Australian historians estimate the Japanese 5th Division suffered about 1,000 casualties.
The withdrawal was not attacked. For the next day, the Segamat area was quiet. Bennett was confident after the initial success. He told the Singapore Times that his troops would stop the Japanese advance.
The Fall of Muar

On the night of January 15, the Japanese captured several barges on the south bank of the Muar River. They used them to cross the river. They faced no resistance except a brief fight with an Indian patrol. This patrol did not tell headquarters that the Japanese were on the south bank. At dawn, the Japanese surprised and defeated a company of the 7/6th Rajputana Rifles. The other three Indian companies on the north bank were cut off and captured. The main garrison at Muar did not even know a whole Japanese division was on the other side of the river. By noon, the Japanese were attacking Muar Town from upstream. They also attacked the supply lines of the 4/9th Jat Regiment, which was near Bakri.
At Muar, the Japanese tried to land and take the harbor. Australian artillery stopped them, firing at crowded barges. But by late afternoon, the Japanese, who had crossed the river further up, were in Muar Town. The commanders of the Rajputana Rifles and Royal Garhwal Rifles were killed. Most of their officers also died, leaving the young Indian soldiers without leaders. To make things worse, a Japanese air raid destroyed the 45th Brigade Headquarters. All the staff officers were killed, and Brigadier Duncan was badly shaken. Command of the 45th Brigade was temporarily given to Anderson of the 2/19th Australian Battalion.
By nightfall on January 16, Muar Town and its harbor were in Japanese hands. The remaining 45th Brigade retreated several kilometers down the coast to Parit Jawa. Japanese ambushes were set up to stop any Allied counter-attack. The Japanese continued their push towards Bakri, Parit Sulong, and Batu Pahat.
The Siege of Bakri


On January 17, the remaining units of the 45th Indian Brigade, joined by the Australian 2/19th and 2/29th Battalions, were sent to recapture Muar. They gathered around Bakri and set up defenses. The 2/29th, led by Lieutenant Colonel John Robertson, dug in around the Bakri-Muar Road. They had anti-tank guns, anti-aircraft guns, and mortars. Brigadier Herbert Duncan planned a three-part attack from Bakri to Muar. But the attack failed before it even started. The 45th Brigade ran into a Japanese ambush, and the counter-offensive was called off.
The next day, January 18, General Nishimura ordered his own three-part attack on Bakri. It was led by nine Type 95 Ha-Gō light tanks under Captain Shiegeo Gotanda. However, Captain Gotanda attacked without infantry support. Lieutenant Bill McClure's two anti-tank guns (from the 2/4th Australian Anti-Tank Regiment) destroyed all nine of Gotanda's tanks. Sergeant Clarrie Thornton and Sergeant Charles Parsons were recognized for their bravery. Lieutenant Colonel John Robertson, commander of the 2/29th Battalion, was killed soon after while retreating. Without tank support, the Japanese infantry could not break through. Nishimura later called this fight "severe and bloody." By dawn on the 19th, the Japanese were nearly surrounding the 45th Brigade on the main road.
The 6th Norfolk Battalion of the British 53rd British Brigade was defending a ridge west of Yong Peng. This ridge covered the retreat path for the 45th Brigade, which was almost surrounded. On January 19, two battalions of the Japanese 4th Guards Regiment attacked and drove them off the ridge. The British retreated into the thick jungle. The Norfolks could not tell headquarters their position because they had no radio.
At dawn on January 20, the 3/16th Punjab Regiment was ordered to recapture the ridge. When they reached it, they were accidentally fired upon by the Norfolks, who thought they were Japanese. After losses on both sides, the mistake was cleared up. But before a proper defense could be set, the Japanese attacked. They killed the Punjab Regiment's commander and drove both the Norfolks and Indian troops off the hill. The 45th Brigade and the two Australian battalions at Bakri were now in danger of being cut off.
That same day, Brigadier Duncan, who had recovered, was killed leading a successful charge to get back lost vehicles. With Duncan and Robertson dead, Lieutenant Colonel Charles Anderson took full command of the 45th Brigade and other units around Bakri. Early on January 20, Anderson was ordered to leave Bakri and try to break through to Yong Peng. Anderson decided to wait for the 4/9th Jat Regiment to join his column. During this delay, most of the 2/29th Battalion were cut off. Only about 200 men from the 2/29th Battalion and 1,000 Indian troops from the 45th Brigade could join Anderson's column. Other survivors from the 2/29th came back later in small groups. About 1 kilometer (0.6 miles) from Bakri, Anderson's column was stopped by a Japanese roadblock. Several attempts to break through failed. Finally, a charge led by Anderson himself succeeded.
More roadblocks lay ahead. By sunset, after fighting all day, the column had moved about 3 kilometers (1.9 miles). Anderson ordered them to keep marching through the night. The brigade reached more open country, making passage easier, even though they carried many wounded.
The young and inexperienced 45th Indian Brigade was almost destroyed. Most of its officers were killed or wounded, including Brigadier Duncan and all three battalion commanders. In a few days, Percival had lost an entire Indian brigade and most of two Australian battalions.
-
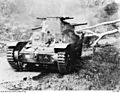
Type 95 Ha-Gō tanks destroyed by Australian gunfire near Bakri.
-
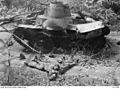
A disabled Type 95 Ha-Gō light tank.
-
A disabled Type 95 Ha-Gō light tank with its crew.
-
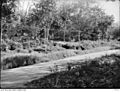
The approximate location where Lieutenant Colonel Charles Anderson led a charge against a Japanese roadblock.


The Parit Sulong Bridge


It took Anderson's column two days to fight their way about 15 kilometers (9.3 miles) to the bridge. Scouts reported at 7:15 AM that the bridge at Parit Sulong was held by the Japanese. The guards from the 6th Norfolks, who had been cut off, had left their post.
Anderson found a strong Japanese machine gun position at the Parit Sulong Bridge. His brigade tried to dislodge the Japanese at dawn on January 21. But they were pushed back by tanks, aircraft, and artillery. They were forced into a small area of only about 400 meters (440 yards) of roadway. Fighting lasted all day. By 5:00 PM, casualties were severe. A radio message said that a relief force from Yong Peng was on its way. The sound of distant gunfire gave the column hope.
The back of the column was repeatedly attacked by tanks and infantry. In the late afternoon, two soldiers managed to disable the lead tank with grenades. This created a temporary roadblock. This allowed the defenders at the back to disable other tanks using grenades and Boys anti-tank rifles.
At dusk, with many dead and wounded, Anderson sent two ambulances with critically wounded men to the bridge. He asked for them to be allowed to pass to Allied lines. The Japanese refused. Instead, they demanded that the Indian brigade surrender, offering to care for the wounded. Still hoping for relief, Anderson refused to surrender. The Japanese then ordered the ambulances to stay on the bridge as a roadblock. They threatened to shoot them if they moved. After dark, Lieutenant Austin and a driver, both wounded, quietly moved the ambulances back down the slope. They started the engines and drove back to the brigade.
The next morning, two RAF Fairey Albacores from Singapore dropped supplies for the 45th Brigade. Escorted by three RAAF Brewster Buffalos, they then bombed the Japanese holding the bridge. Soon after, enemy tanks attacked again.
Anderson later received another message from Bennett, saying there was no hope of relief. It was up to Anderson to decide to withdraw. As a last resort, he sent a company to test the resistance at the bridge again. He hoped the airstrike had weakened it. But the Japanese response showed there was no chance of success.
At 9:00 AM, after destroying guns, vehicles, and other equipment, Anderson ordered a retreat. The wounded who could not walk were left behind with volunteers to care for them. Anderson and the remaining brigade spread out eastward through the jungle and swamps to Yong Peng. They left behind 150 wounded men. Eventually, about 500 Australians and 400 Indians survived to reach British lines. This was out of more than 4,000 men from the 45th Brigade and two Australian battalions. More stragglers from units cut off at Bakri continued to arrive.
The Parit Sulong Massacre
For the wounded left behind, the Japanese treated them badly and then killed almost all of them. This included members of an Australian ambulance group. The Japanese forced the wounded into small rooms in a hut at Parit Sulong village. The wounded lay piled on top of each other. The Japanese refused them water, even mocking them by bringing buckets of water to the doorway and then pouring it out.
The prisoners were tied in small groups with rope or wire. They were pushed into roadside bushes and shot with machine guns. Gasoline was poured on the bodies, some of whom were still alive, and set on fire. This was likely to hide evidence of war crimes.
One survivor, Lieutenant Ben Hackney of the 2/29th Australian Battalion, crawled away. He found two other survivors from his battalion, including Sergeant Ron Croft. Both were covered in gasoline and were among the few not tied when the prisoners were shot. An English soldier joined them. The man with Croft died the next day. The remaining three were given shelter in a Malay house. Hackney, unable to stand, convinced the others to leave him hidden. Croft is thought to have died on April 15, 1942.
Hackney was later carried away by local Malays and left some distance from the house. Malays often refused to help him, fearing Japanese revenge. But local Chinese helped him. He was caught by a group of Malays, including a policeman, on February 27, 36 days after he started his escape. They turned Hackney over to the Japanese at Parit Sulong, where he was beaten. He survived the war and provided information about the massacre. He and Private Reginald Wharton are the only two Europeans who survived. In total, 145 prisoners died. Many Indian prisoners were beheaded.
General Takuma Nishimura was believed to have ordered the massacre. Two Indian soldier survivors confirmed the events. In 1950, a War Crimes Court sentenced Nishimura to death for it.
The Retreat Continues
On January 23, in the final part of the battle, the 2nd Loyals covered the last men of Anderson's column as they reached British lines. They had two companies positioned as a rear guard. At 2:00 PM, as they were about to withdraw, seven Japanese tanks and about two battalions of infantry quickly appeared. They tried to remove the Loyals' roadblock. In the short battle, the 2nd Loyals caused heavy losses to the Japanese infantry. But the Loyals had no anti-tank weapons and were outnumbered. They were driven off by the tanks and Japanese infantry. During the Battle of Muar, the 2nd Loyals suffered about 200 casualties before retreating to Singapore.
Battle Losses
The 45th Brigade suffered terrible losses, especially among officers. The brigade could not be rebuilt in the last weeks of the Malayan campaign. Only 400 Indian soldiers from the 45th Brigade and 500 soldiers from the two Australian battalions escaped with Anderson's force. The brigade was soon broken up, and the remaining troops were sent to other Indian brigades. The two Australian battalions also suffered greatly. 271 men from the 2/19th Battalion reached British lines, but only 130 from the 2/29th Battalion made it back before Singapore surrendered. Many men from both battalions were still in the jungle when the campaign ended. The 2/19th Battalion suffered more dead, missing, and wounded than any other Australian Infantry Force unit in World War II, with 335 killed and 97 wounded.
More than 400 Japanese troops were killed in the ambush at Gemas. This was the biggest loss in a single action at that time. Japan's losses at Muar included a company of tanks and about a battalion of men.
What Happened Next


The Allies were slow to respond because they lacked signal equipment and transport. During that week, the Japanese used 250 bombers and 150 fighters from airfields in Malaya and Thailand. The Allies probably had only two or three dozen bombers and about the same number of fighters available. Arthur Percival blamed the 45th Indian Brigade for the failure of Muar's defense. He said they were given important tasks despite their lack of training.
Despite this, the brigade achieved a very important goal. They fought for almost a week, day and night, from Muar Harbor to Parit Sulong Bridge. They held up the Imperial Guards Division, which had strong air and tank support. This allowed the three brigades of Westforce in the Segamat area to safely retreat down the central road to Labis and then towards Yong Peng.
Even with heavy casualties, Anderson's force kept the Imperial Guards busy for four days. Percival wrote that "The Battle of Muar was one of the epics of the Malayan campaign." He said their small force held up a Japanese division for almost a week. This saved the Segamat force from being surrounded and destroyed. Anderson was awarded the Victoria Cross for his bravery and his men's courage.
One criticism of Percival was his decision to send the British 53rd Infantry Brigade to the front line. The brigade had just arrived in Singapore on January 13, only three days before being sent to fight. They had been at sea for 11 weeks in crowded ships and had no exercise. The brigade was originally meant for the North African Campaign, but their ships were sent to Singapore when Japan invaded Malaya.
News of the ambush at Gemensah Bridge was well received in Singapore. Despite the defeats at Muar, Bakri, and Parit Sulong, many Singaporeans thought the action at Gemensah was a turning point. They believed the Japanese invasion would soon be stopped. A radio commentator in Singapore said the news gave good reason to believe the tide of battle was turning, with the Australians as a "seawall" against the Japanese.
Lieutenant Colonel Frederick Galleghan, who commanded the Australians at Gemas, was awarded the Distinguished Service Order. Captain Desmond Duffy, who led B Company at the bridge ambush, received the Military Cross.
According to Alan Warren, in his book Britain's Greatest Defeat, Tomoyuki Yamashita described the battle at Muar as the most "savage encounter" of the campaign. Warren states that the Imperial Guards lost a company of tanks and a battalion's worth of infantry casualties. He adds that the fighting between Bakri and Parit Sulong was one of the few times the Japanese faced equally tough resistance.
See also
- Gemensah Bridge
- Parit Sulong Bridge
- Malaya Command – Order of Battle
- Japanese Order of Battle, Malayan Campaign
