
Battle of Sittang Bridge facts for kids
Quick facts for kids Battle of Sittang Bridge |
|||||||
|---|---|---|---|---|---|---|---|
| Part of The Burma Campaign | |||||||
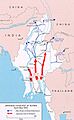
 Japanese Conquest of Burma April–May 1942 |
|||||||
|
|||||||
| Belligerents | |||||||
| Commanders and leaders | |||||||
| Strength | |||||||
| 1 understrength division | 1 regiments | ||||||
The Battle of Sittang Bridge was an important fight during the Burma Campaign in World War II. It happened on February 22 and 23, 1942. The battle was a big win for Japan. The British Indian Army lost many soldiers and had to retreat in a very messy way.
Sir John Smyth, a British general, led the Indian Army at Sittang Bridge. He called it "the Sittang disaster." The Sittang Bridge was a large iron railway bridge. It stretched for hundreds of yards over the Sittang River in Burma (now Myanmar).
The 17th Indian Infantry Division had already fought hard at the Battle of Bilin River. They were very tired and weak. They finally got permission to pull back across the Sittang River on February 19. They left the enemy under the cover of night. Then they moved about 30 miles (48 km) west towards the bridge.
Japanese forces, the 214th and 215th Regiments, moved forward quickly. Their goal was to cut off the British troops at Sittang. William Slim, a top British general, later took charge in Burma. He said the Sittang Bridge battle was "the most important battle of the first campaign."
Contents
The Battle for Sittang Bridge
Retreating to the Bridge
5008.jpg)
February 21 was a bright and hot day. The 17th Division had very little water. Japanese planes attacked them from above. They shot and bombed the soldiers on the road. This caused many injuries. The soldiers had to leave their vehicles and equipment behind. Many men hid in a nearby rubber plantation.
Early on February 22, the 17th Division's main camp was attacked. But the Japanese were pushed back. A small group of British Indian soldiers defended the bridge. These soldiers were from different units, including the Duke of Wellington's Regiment.
On February 22, engineers from the Malerkotla Sappers and Miners got the bridge ready to be blown up. However, two British brigades, the 16th Indian Infantry Brigade and 46th Indian Infantry Brigade, were still stuck east of the bridge.
General Smyth worried about Japanese paratroopers landing. He sent the 1/4th Gurkhas to the west side of the bridge. They were to protect it from attacks from behind. But he had to send them back. The Japanese 33rd Division attacked from the east. Their first charge almost took the east end of the bridge. A British field hospital was captured.
The 3rd and 5th Gurkhas were coming from the east. They fought back and pushed the Japanese away in "a furious battle." Close-quarters jungle fighting continued for most of the day. The bridge was almost taken again, but the attackers were pushed back. By the evening of February 22, the British Indian Army still held the bridge.
A Difficult Decision
Smyth had told his engineers to be ready to blow up the bridge. At 4:30 AM on February 22, it became clear the bridge might fall to the Japanese very soon. Smyth had a tough choice. He could destroy the bridge, but that would leave more than half of his own troops on the wrong side. Or, he could leave it standing, giving the Japanese a clear path to Rangoon.
Smyth later said, "Hard though it is, there is very little doubt as to what is the correct course: I give the order that the bridge shall be blown immediately." But only one part of the bridge, Span 5, fell into the river. Spans 4 and 6 were damaged but stayed in place.
Smyth reported this "unpleasant and devastating news" to General Hutton, the overall commander in Burma. General Slim later wrote about Smyth's decision. He said it's easy to criticize, but hard to make such a choice. Only commanders facing similar tough decisions can understand the pressure. However, Slim did not fully support Smyth's choice. Smyth was later removed from his command. He never led troops in battle again. Brigadier David "Punch" Cowan took his place.
Official records show that Smyth had wanted to move his troops across the Sittang much earlier. But he was told no. The records state that Hutton might have been wiser to let Smyth decide once the fighting started at Bilin.
Aftermath of the Battle
The Japanese could have completely destroyed the 17th Division. But they did not. They wanted to capture Rangoon quickly. Stopping to finish off the British would have caused delays. So, they moved on, looking for another place to cross the river. Later on February 22, the remaining soldiers of the 17th Division swam and used boats to cross the Sittang in daylight.
After smaller fights at the Battle of Pegu and Taukkyan Roadblock, the Japanese took Rangoon without a fight on March 9. Luckily for the 17th Division survivors, the Japanese had removed their roadblocks. This allowed the Indian soldiers who escaped Sittang Bridge to get away to the north.
After Sittang, the 17th Division had only 3,484 infantry soldiers left. This was just over 40% of its normal strength. It was already low on soldiers before the battle. Most of its cannons, vehicles, and other heavy gear were lost. They had only 550 rifles, ten Bren guns, and 12 tommy guns left. Most soldiers had lost their boots while swimming the river.
Even so, the 17th Division was rebuilt and given new equipment. The lost cannons were old ones from World War I. Their anti-aircraft guns were just Lewis guns. The 17th Division kept fighting the Japanese almost constantly from December 1941 to July 1944. Then it was pulled from the front lines just before the Battle of Imphal.
According to historian Louis Allen, blowing up the Sittang Bridge was a turning point. Two brigades were still on the wrong side of the river. Once the bridge was gone and the 17th Division was weakened, the path to Rangoon was open. This meant Burma's fate was sealed.
Images for kids
-
Japanese Conquest of Burma April–May 1942
