Battle of Tulkarm facts for kids
Quick facts for kids Battle of Tulkarm |
|||||||
|---|---|---|---|---|---|---|---|
| Part of the Middle Eastern theatre of World War I | |||||||
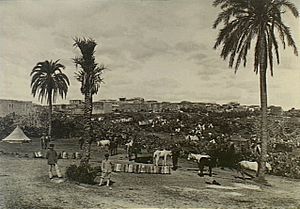 German photograph of Tulkarm taken in 1915 |
|||||||
|
|||||||
| Belligerents | |||||||
|
|||||||
| Commanders and leaders | |||||||
| Units involved | |||||||
|
Egyptian Expeditionary Force XXI Corps's60th Division guns of the Destroyers HMS Druid and HMS Forester with most of the 383 land-based guns Desert Mounted Corps |
Yildirim Army Group
|
||||||
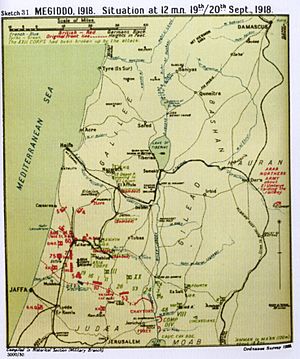
The Battle of Tulkarm was a key part of the Battle of Megiddo. This big battle happened in September 1918, near the end of World War I. It was fought in Palestine, a region in the Middle East.
On September 19, 1918, British Empire forces attacked the Ottoman Eighth Army. This army included soldiers from the German and Ottoman empires. The battle took place along the Mediterranean coast, near the town of Tulkarm. British soldiers, especially the 60th Division, used a strong artillery attack. They also had support from naval ships.
This victory was very important for the British Empire. It helped them break through the enemy lines. This allowed their cavalry to move quickly and surround the Ottoman armies. Many thousands of enemy soldiers were captured. The British also gained control of a lot of land. This included areas from the Judean Hills all the way to what is now the border of Turkey.
After the Battle of Megiddo, the British cavalry chased the retreating Ottoman soldiers. They reached Damascus just six days later. Five weeks after the battle, a peace agreement was signed. By then, the city of Aleppo had also been captured.
During the Battle of Tulkarm, the 60th Division pushed forward. They cut through the Ottoman trenches. Artillery fire helped them move ahead. This forced the Ottoman Eighth Army to pull back. The British then captured Tulkarm, which was the Eighth Army's main base. This quick attack opened the way for the British cavalry. They rode north along the Plain of Sharon. Their goal was to cut off the Ottoman armies.
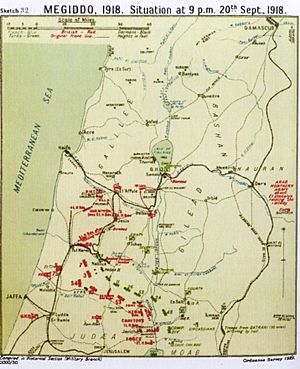
By September 20, the cavalry had reached the enemy's rear. They almost completely surrounded the Ottoman Seventh and Eighth Armies. This happened during other battles like Nazareth and Jenin. Meanwhile, other British soldiers attacked Ottoman lines further inland. The Ottoman Seventh Army's headquarters at Nablus was also captured.
Why the Battle Happened
By July 1918, it was clear that Germany's big attack on the Western Front had failed. This meant that the fighting in Palestine could start again.
General Edmund Allenby led the Egyptian Expeditionary Force (EEF). He wanted to attack in September. His goal was to capture Tulkarm and Nablus. These were the main bases for the Ottoman Seventh and Eighth Armies. Allenby also wanted to encourage his own new Indian troops and his Arab allies.
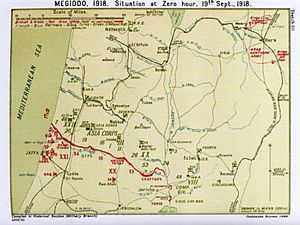
In September 1918, the front line was long. It started at the Mediterranean Sea, north of Jaffa. It then went southeast across the Plain of Sharon. After that, it went east over the Judean Hills. From there, it dropped steeply into the Jordan Valley.
Getting Ready for Battle
British Plans and Preparations
The British had a large force ready to attack. On the Plain of Sharon, the XXI Corps had 35,000 soldiers. The Desert Mounted Corps had 9,000 cavalry. They also had 383 artillery guns.
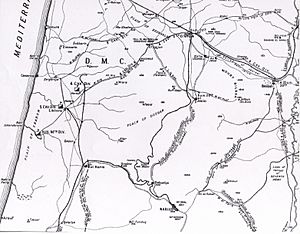
General Allenby planned a fast and strong attack. This was like a "blitzkrieg," meaning a lightning war. The Battle of Sharon would start with an attack on an 8-mile long front. This was between the railway line and the Mediterranean Sea. Allenby gathered three cavalry divisions behind three infantry divisions. They had strong artillery support. The British had a big advantage in numbers.
The main goal for the 60th Division was to attack with huge force. They would break through the German and Ottoman front line. This would create a wide gap. This gap was for the cavalry to rush through. The cavalry needed to get behind the Ottoman armies quickly.
After the cavalry broke through, the XXI Corps would capture Tulkarm. They would also cut the railway line. This railway supplied the Ottoman armies. The infantry divisions would then turn northeast. They would push the enemy back into the Judean Hills.
The 60th Division would advance towards Tulkarm. Other divisions would attack nearby defenses. The XX Corps would also attack in the Judean Hills. Their goal was to capture Nablus and block escape routes.
All these attacks aimed to force the enemy to retreat. They would be pushed towards Jenin and Damascus. The Esdraelon Plain was a key area. It had important communication hubs. If the British cavalry could capture it quickly, they could trap the entire Ottoman army.
British Empire Deployments
The 60th Division, led by Major General J. S. M. Shea, was to fight near Nahr el Faliq. Their job was to create a bridgehead across the river. This would open the way for the cavalry. Then, the 60th Division would capture Tulkarm and cut the railway.
By September 18, the 60th Division was ready. The 180th Brigade was in front. The 181st Brigade was behind them. The 5th Light Horse Brigade was also with the 60th Division. They would help build a bridge across Nahr el Faliq.
German and Ottoman Forces
In August 1918, the Ottoman Yildirim Army Group had about 40,000 soldiers. They defended a 56-mile long front. They had many machine guns. Some estimates say they had 26,000 infantry and 372 guns.
Cevat Pasha led the Eighth Army. It had 10,000 soldiers and 157 guns. Its headquarters was in Tulkarm. This army held the line from the coast to the Judean Hills. It included the XXII Corps and the "Asia Corps."
The 7th, 19th, and 20th Divisions held the shortest part of the front. These divisions were known as very strong fighters. The 7th and 19th Divisions had fought bravely at Gallipoli in 1915. The 20th Division also fought at Gallipoli and in Galicia.
The Ottoman forces had most of their heavy artillery in this area. They also knew that a big attack was coming. On September 17, they moved a reserve division closer to the front line.
Some reports say the Ottoman armies were short on soldiers. They also had problems with supplies. Soldiers sometimes only got small amounts of food.
Tabsor Defenses
The Tabsor defenses were a strong system of trenches and forts. They were 1 to 3 miles deep. There was another defense line 5 miles behind it. A third line was starting to be built near Tulkarm.
Some thought the Ottoman defense was too rigid. They believed a more flexible approach would have been better.
The Battle Begins
Heavy Bombardment
The British started their attack at 4:30 AM. Artillery, trench mortars, and machine guns fired on the Ottoman lines. Two British destroyers, HMS Druid and HMS Forester, also fired from the sea.
This intense bombardment lasted for half an hour. Guns were placed every 50 yards along the front. Heavy artillery targeted enemy guns. Field artillery fired on the Ottoman front line. As the British infantry advanced, the artillery fire moved forward. This was called a "creeping barrage." It moved at 50 to 100 yards per minute.
XXI Corps Attacks
While the 60th Division attacked the coast, other divisions also moved. The 75th Division attacked the Tabsor defenses. They captured Et Tire. The 7th (Meerut) Division advanced northeast. The 3rd (Lahore) Division quickly captured the first line of defenses. They then turned east to attack Jiljulieh. The 54th (East Anglian) Division held its ground. They faced strong resistance from the Asia Corps.
60th Division Breaks Through
180th Brigade Captures Nahr el Faliq
Twelve minutes after the bombardment, the 180th Brigade attacked. They had three Indian infantry battalions. They quickly captured enemy positions and prisoners. They advanced 75 yards per minute behind the artillery. They captured redoubts and trenches.
The bridge over Nahr el Faliq was strongly defended. But by 7:20 AM, the 180th Brigade captured it. They set up a position on the northern side. This gave the cavalry a safe path to move north. The 180th Brigade captured about 600 prisoners. They advanced 6,000 to 7,000 yards. They had 414 casualties. The reserve battalion cleared all wire on the beach. This allowed the 5th Cavalry Division to pass through.
181st Brigade Advances
After capturing Nahr el Faliq, the 60th Division turned northeast towards Tulkarm. The 5th Light Horse Brigade was on their right.
At 6:15 AM, the 181st Brigade was ordered to advance. By 8:30 AM, their leading troops had crossed Nahr el Faliq. They then turned east. Their first goals were to capture Ayun el Werdat and Umm Sur. They captured both by 11:00 AM. Their next goal was the road to Tulkarm.
Ottoman Defenders Fight Back
By 5:45 AM, telephone communication to the Ottoman front was cut. All German and Ottoman reserves were ordered forward.
At 8:50 AM, Cevat, the Eighth Army commander, reported to his leader. He said the Ottoman 7th Division was "out of the fight." The 19th Division was under attack. Liman von Sanders ordered more soldiers to help. Meanwhile, small groups of Ottoman soldiers tried to hold back the British attack. They continued to fight as they retreated.
Eventually, the 19th Division had to retreat. The XXII Corps also retreated. They lost most of their artillery. Cevat knew by noon that British soldiers were advancing on Tulkarm. By 4:30 PM, Et Tire had been captured. By dusk, he began to move his headquarters north. He had lost contact with his XXII Corps.
Tulkarm is Captured
181st Brigade and 5th Light Horse Brigade
As the 181st Brigade neared Tulkarm, British planes bombed the town. This made many people leave Tulkarm. At 5:00 PM, the 181st Brigade captured Tulkarm railway station and the town. They captured 800 prisoners and 12 field guns.
The 5th Light Horse Brigade was told to bypass Tulkarm if it was strongly defended. Their job was to cut the main road to Nablus. This Australian and French cavalry brigade moved north of Tulkarm. They took control of the road to Nablus.
Around 9:00 PM, a small group of light horsemen saw a long column of Ottoman soldiers. They opened fire and stopped the column. Between 2,000 and 2,800 Ottoman troops surrendered. They also gave up between four and 15 guns.
After the Battle
By the end of the day, the 60th Division had achieved all its goals. They captured Tulkarm, the Eighth Army's headquarters. They had marched 17 miles. The Eighth Army commander was on the run. His army was in chaos. The British cavalry had ridden many miles north. They had successfully passed through the gap created by the infantry.
On the evening of September 19, General Bulfin ordered the advance to continue. The 60th Division's goal for September 20 was to hold a position north of Tulkarm.
The 60th Division's 179th Brigade moved towards 'Anebta. Their goal was to capture a railway tunnel. They quickly pushed back small enemy groups. They entered 'Anebta at 11:20 AM. They captured 66 prisoners and the intact tunnel. The 181st Brigade set up a defensive line north of the Tulkarm road.
Meanwhile, at 2:00 AM on September 20, the 5th Light Horse Brigade advanced. They went to cut the railway from Messudieh to Jenin. They blew up the line. The brigade was then ordered to move to Jenin. But instead, they returned to Tulkarm. They had captured 140 prisoners and two machine guns.
On September 19, the British XXI Corps destroyed the right side of the Ottoman front line. They captured 7,000 prisoners and 100 guns. The remaining parts of the Eighth Army were captured the next day. This happened at Jenin. On September 19 and 20, the XXI Corps had 3,378 casualties. 446 of them were killed. They captured 12,000 prisoners, 149 guns, and many supplies. Most of the Eighth Army was destroyed.


